8. アニメーション
ParaView では、入力データだけでなく、各タイムステップで解析や可視化パラメータも変更できるアニメーションシーンを作成できます。
時変データセットを読み込む際、 ParaView は自動的にタイムステップ情報を読み込みます。その後、現在の時間を選択し、パイプラインが再計算されます。
プロパティアニメーションは、一連のキーフレームを記録することで作成されます。各キーフレームでは、可視化パイプラインを構成するリーダー、ソース、フィルタのプロパティ、カメラの位置と向きに値を設定します。パラメータを選択したら、アニメーションを再生することができます。
また、アニメーションの結果は、 File メニューから異なる形式で保存することができます。
Save Animation: 画像ファイル(アニメーションフレームごとに1つの画像)またはムービー(利用可能なコーデックに依存)
Save Geometry: シーン内のすべてのジオメトリを ParaView のPVDファイル形式で保存
Save Extracts: Extractors ソースを持つパイプラインで設定されたデータセットとスクリーンショットを保存します。
Export Animated Scene: 外部ビューア用に、vtk.js形式でエクスポートする。
画像ファイルまたはムービーファイルに保存することができます。 各フレームでレンダリングされたジオメトリはファイル形式で保存することもでき、時間変化するデータセットとして ParaView にロードし直すことができます。
8.1. タイムマネージャー
Time Manager は主に時間を管理する場所です。 これは View メニューからアクセスできます。
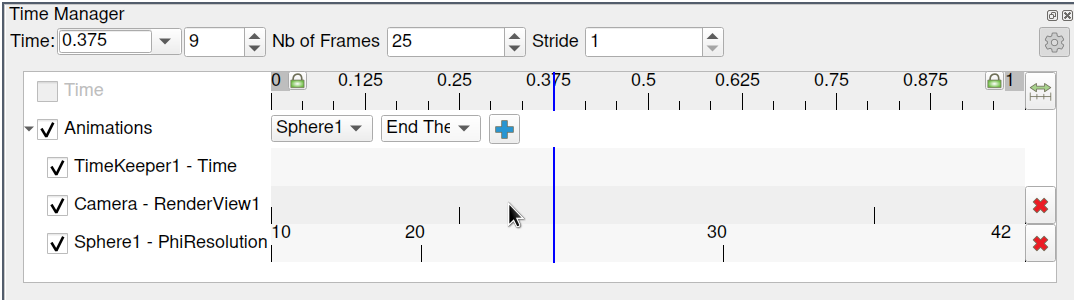
図 8.1 タイムマネージャー。
このパネルは表として表示されます。 表の上には、アニメーションの時間の進み方を管理するコントロールがあります。
表の中で、トラックは2つのセクションに整理されている。 1つ目は、パイプラインに存在する時間変化するデータに関する情報を表示します。 各行は、1つの時間的パイプラインソースと、それに関連するタイムステップにマッチします。 テーブルの最初の行は、単に Time と表示され、シーンの時間、つまりシーンを再生するときに使用される時間を示しています。 これはパイプラインのソースデータの時間の組み合わせになります。 現在表示されている時間は、上部の Time フィールドと、テーブル内の太い縦線の両方で示される。
Note that both the first and the last time labels of the timeline have special background.
Click on them to enter Start Time and End Time entry-boxes and configure the start and end times
for the animation. By default, when you load time varying datasets, the start
and end times are automatically adjusted to cover the entire time range present
in the data. The lock check-buttons just next to the Start Time and End Time
labels will prevent this from happening, so that you can ensure that your
animation covers a particular time domain of your choosing.
2番目のパートはアニメーショントラックです。 Animations の行にはアニメーションを作成するウィジェットがあります。

図 8.2 アニメーショントラック。
データソースを選択し、一番下の行でデータソースの特定のプロパティを選択します。そのプロパティのキーフレームを持つアニメーショントラックを作成するには、右側の + をクリックします。新しいトラックが作成されます。この図では、SphereSource1 の Phi Resolution プロパティとカメラの位置に対応するトラックがすでに存在しています。トラックを削除するには、 X ボタンを押します。トラックを一時的に無効にするには、トラックの左側にあるチェックボックスをオフにします。プロパティの値を入力するには、トラック名の右側の白い領域内をダブルクリックします。すると Animation Keyframes ダイアログが表示されます。カメラエントリをダブルクリックすると、図 8.3 のようなダイアログが表示されます。

図 8.3 カメラトラックの編集
Animation Keyframes ダイアログボックスで New を押すと、新しいキーフレームを作成できます。キーフレームの一部またはすべてを削除するには、 Delete キーまたは Delete All キーを押します。 New をクリックすると、テーブルに新しいローが追加されます。どの行でも、 Time 列をクリックしてキーフレームの特定の時間を選択したり、右側の列をクリックしてパラメータの値を入力したりできます。キーフレーム時間でプロパティの値を設定できる正確なユーザインタフェースコンポーネントは、さまざまです。使用可能な場合は、中央の補間カラムをダブルクリックして、2つのキーフレーム間の補間を変更できます。
Time Manager のトラックでは、各キーフレームが発生する時間内の位置が縦線で表示されます。その時点でプロパティに選択された値と、その値と次の値の間で使用される補間関数は、必要に応じてテキストで表示されます。たとえば、上の図では、球体の解像度は10から始まり、リニア補間によって20に変化します。カメラ値が長すぎてテキストとして表示できないため、トラックには表示されませんが、アニメーション全体で4つのキーフレームの間隔があることがわかります。トラック自体の垂直線をドラッグできるため、各キーフレームが発生する時間を簡単に調整できます。
Did you know?
アニメーションショートカット
Time Managerを使えば、アニメーションビューを使わなくても、簡単なアニメーショントラックを追加し、キーフレームを編集することができます。まず、SettingsダイアログからShow Animation Shortcutを有効にします(Generalタブで、名前でオプションを検索するか、アドバンスビューに切り替えてください)。すると、Propertiesパネルにあるアニメーション可能なプロパティのいくつかに、アイコンが表示されるようになります。このアイコンをクリックすると、このプロパティに新しいアニメーショントラックを追加し、編集することができます。

8.2. シーンの時間設定
8.2.1. 時間コントロール
Time Manager には、図 8.4 に示すように、アニメーション自体のプロパティを制御できるヘッドバーがあります。

図 8.4 タイムマネージャーウィジェット。
The Time entry-box shows the current animation time, which is the same as shown by a
vertical marker in this view. You can change the current animation time by
either entering a value in this box, if available, or by dragging the vertical
marker.
The second entry-box is the timestep index. You can also edit it.
If the scene does not use any pipeline sources to get its list of times (see below), you can also
edit Number of frames to set the total number of frames for the scene.
The Stride parameter, available in advanced mode, allows to jump by this number of timesteps
when navigating through times.
8.2.2. Time list
ParaView supports two modes to configure scene times.
The time list can either come from the data themself or it can be generated.
We call them Snap to Timestep and Sequence respectively.
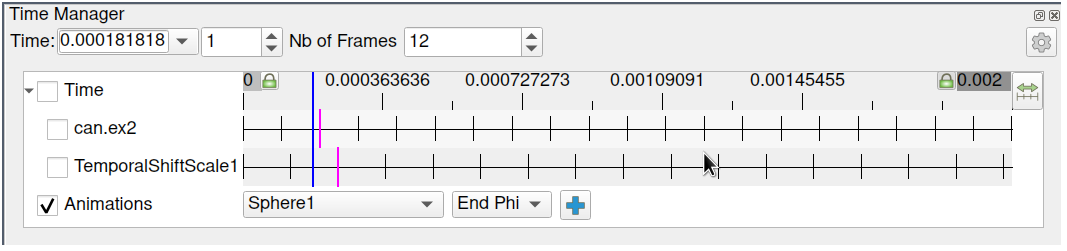
図 8.5 タイムマネージャーシークエンス。
In Sequence mode, the number of frames is controlled by the No. Frames
spinbox. Times are evenly spaced between Start and End time.
This is the preferred mode when working with non-temporal data.
This is activated when none of the Time tracks are enabled, i.e.
the checkbox left to the Time label of first track is disabled.
In the figure, the main timeline has 12 ticks. They do not match the times from the data, as expected for a sequence.
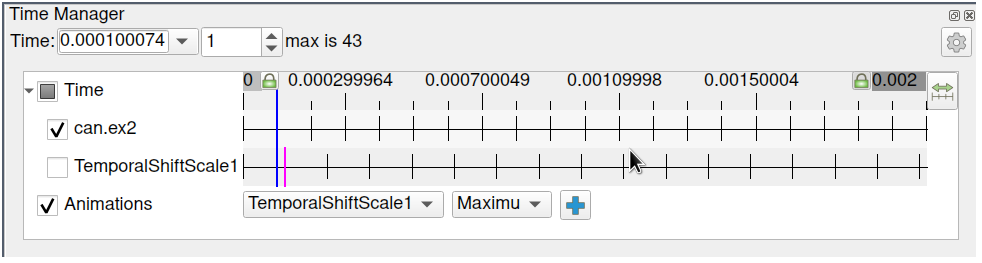
図 8.6 タイムマネージャースナップからタイムステップ。
In Snap To TimeSteps mode, the number of frames in the animation is
determined by the number of time values in the dataset being animated and thus cannot be changed.
This is the animation mode used by default by ParaView when a dataset with time values is loaded.
Then playing the animation means playing through the time values of the dataset one after the other.
This is enabled when at least one Time track is checked.
In the figure, only can.ex2 is checked so the scene knows only about its timesteps:
the main timeline has same ticks as the can.ex2 track.
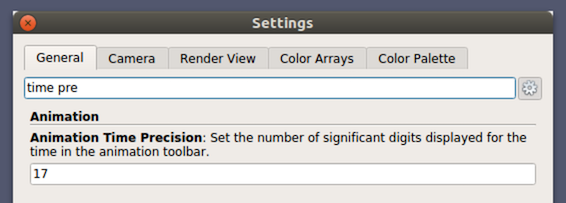
Did you know?
You can change the precision (number of significant digits) displayed by the animation clock by changing the
Animation Time Precisionvalue in theSettingsunder theGeneraltab.
8.3. 時系列データのアニメーション化
We saw that the main scene of ParaView can know about the times available from a pipeline source, such as a reader that produces time varying data. Then a current time is set at the scene level, and by default the pipeline is updated to the relevant time.
しかし、データに存在しない時刻を要求した場合はどうなるのでしょうか? 固定されたデータ時刻で何らかのプロパティのアニメーションを行うには? 時間そのものをアニメーションさせることはできますか?
ParaView offers one answer to all those questions: the Time Keeper.
This is an animation track, visible only in advanced mode.
The Time Keeper maps the scene time to a new time used to update the pipeline.
The default mapping simply maps the scene time to itself.
しかし、データ時間とアニメーション時間を切り離すことで、複雑なアニメーションを作成することができます。
TimeKeeper – Time トラックをダブルクリックすると、図 8.7 に示すような Animation Keyframes ダイアログが表示されます。このダイアログでは、3つの基本的に異なる方法でデータ時間を進行させることができます。 Animation Time ラジオボタンが選択されている場合は、データ時間がアニメーション時間に関連付けられてスケーリングされるため、アニメーションの進行に伴ってデータが自然に変化します。時間によって変化するデータの性質を無視する場合は、代わりに Constant Time を選択します。この場合、アニメーションの期間中にデータが表示される特定の時間値を選択します。最後に、 Variable Time ラジオボタンを選択してデータ時間を完全に制御し、可視化パイプラインの他のアニメート可能なプロパティと同様にデータ時間を制御できます。図 8.7 に示す例では、時間はアニメーションの最初の15フレームでは前に進み、次の30フレームでは後ろに進み、最後の15フレームでは前に進みます。
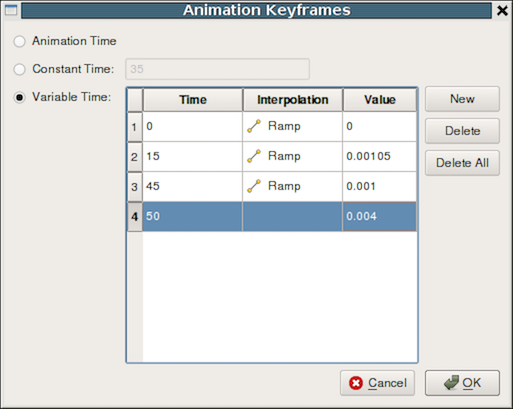
図 8.7 キーフレームを使用したデータ時間の制御
8.4. カメラのアニメーション
Just like you can change parameters on sources and filters in an animation, you
can also change the camera parameters. You can add
animation tracks to animate the camera for all the 3D render views in the setup
separately. To add a camera animation track for a view, with the view selected,
choose Camera from the first drop-down menu. The second drop-down list allows
you to choose how to animate the camera. Then click on the + button.
There are three possible options, each of which provides different mechanisms to specify
the keyframes. It's not possible to change the mode after the animation track
has been added, but you can simply delete the track and create a new one.
8.4.1. Follow data
このモードでは、データをビューの中心に維持するために、カメラの焦点と位置が変更されます。ただし、カメラのズームレベルは変更されません。
8.4.2. カメラの補間
このモードでは、各キーフレームでカメラ位置、焦点、ビュー角度、上方向を指定します。アニメーションプレーヤは、これらの指定された位置の間を補間します。他のパラメータと同様に、キーフレームを編集するには、トラックをダブルクリックします。 Use Current ボタンを使用して、現在の位置をキーフレームとしてキャプチャすることもできます。
図 8.8 カメラアニメーションパラメータを設定します。
このモードを使って、アニメーションがスムーズに視覚化されるように十分なキーフレームを正しく追加するのは、かなり難しいかもしれません。 しかし、数台のカメラで細かくコントロールしたい場合には、このモードが適しています。
8.4.3. 経路
このモードでは、カメラ位置とカメラの焦点によって取られるパスを指定できます。デフォルトでは、パスは選択したオブジェクトの周りを周回するように設定されています。その後、キーフレームを編集してパスを変更できます。これは、正確な視点よりもグローバルモーションを制御する場合に適したモードです。
図 8.9 に、キーフレームのパスを編集するためのダイアログを示します。カメラ位置(Camera Position)またはカメラフォーカス(Camera Focus)を選択すると、パスの設定に使用できるウィジェットが3Dビューに表示されます。CTRL + Left Click を使用して新しい制御点を挿入し、⇧ + Left Click を使用して制御点を削除します。パスを閉じるかどうかを切り替えることもできます。
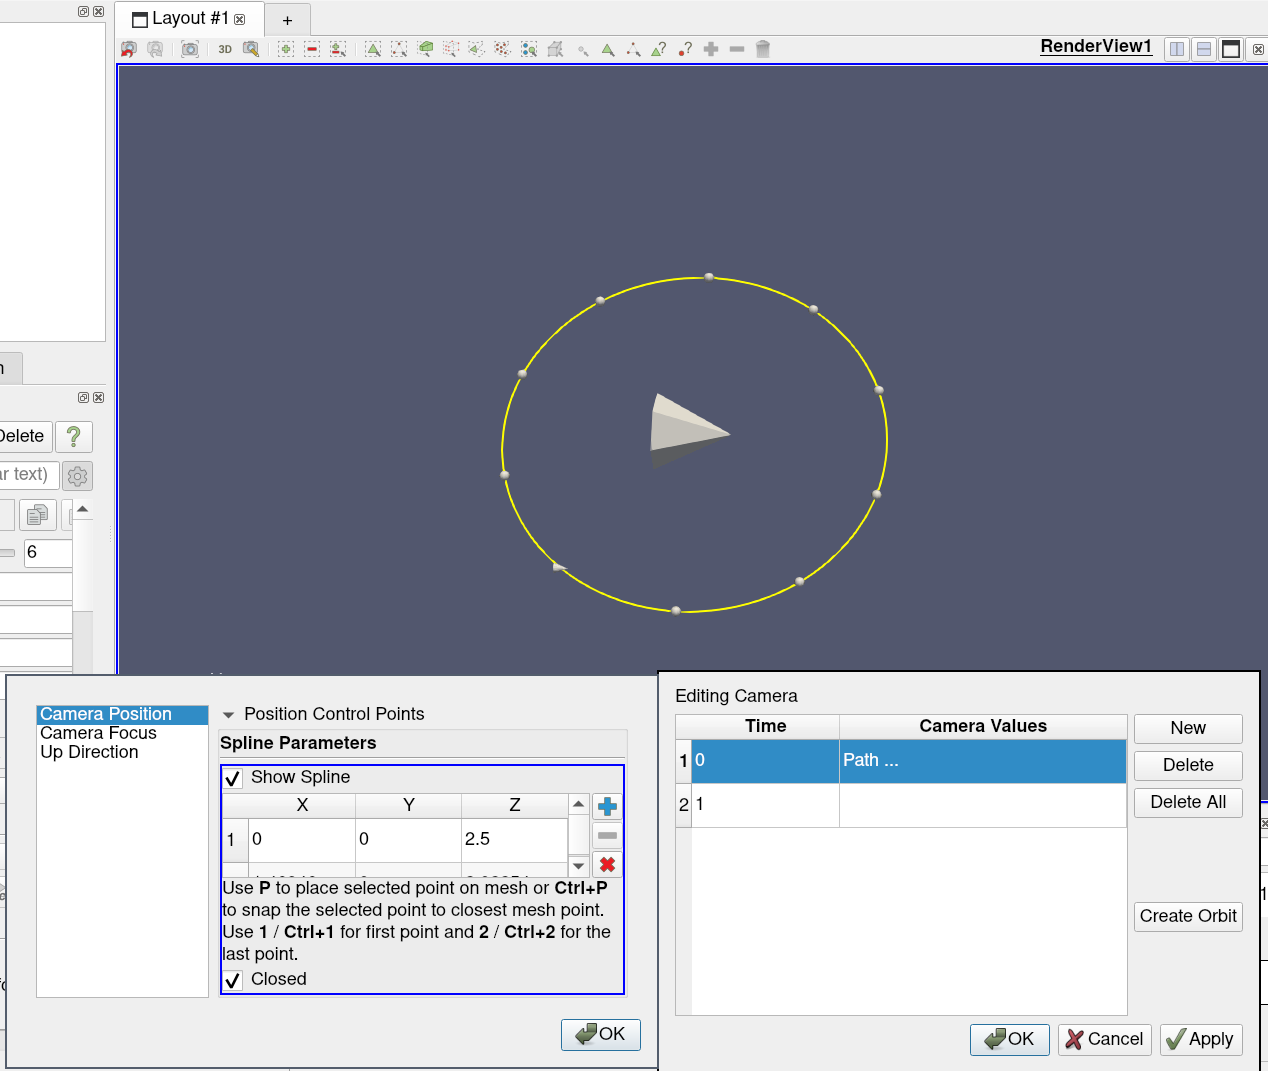
図 8.9 カメラ経路の作成
このモードでは、カメラが対象オブジェクトの周りを回転するカメラ アニメーションをすばやく作成できます。 Orbit ボタンをクリックするとダイアログが表示され、回転中心、回転面の法線、原点 (つまり、回転面上の点) などの軌道パラメータを編集できます。 始まります)。 デフォルトでは、 Center は選択されたオブジェクトの境界の中心であり、 Normal はカメラが使用する現在の上方向であり、原点は現在のカメラ位置です。
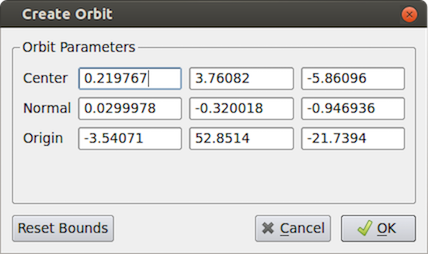
図 8.10 カメラ軌道の作成
8.5. アニメーションを再生する
アニメーションを設計したら、図 3.9 に示すVCRコントロールツールバーを使用してアニメーションを再生できます。

図 8.11 paraview の VCR Controls と Current Time Controls ツールバー
フレームは可能な限り高速でレンダリングされます。 したがって、視聴フレームレートは、各フレームの生成とレンダリングに必要な時間に依存します。
アニメーションを再生するとき、視覚化パイプラインの幾何学的出力をメモリにキャッシュすることができます。 アニメーションを再生する場合、画像を生成するための計算がほとんど必要ないため、再生速度が格段に速くなります。
8.6. Pythonを使ったアニメーションの探索
以下のPythonコマンドで、アニメーションシーンを取得し、探索することができます。
paraview のユーザーインターフェースでタイムステップをナビゲートするのと同じように、Pythonのコマンドを使用して同じことを行うことができます。これらのコマンドは、アニメーションシーンオブジェクトから利用できます。
>>> scene = GetAnimationScene()
このオブジェクトには、どのアニメーションのタイムステップを表示するかを変更するためのメソッドがいくつか用意されています。
>>> scene.GoToFirst()
>>> scene.GoToLast()
>>> scene.GoToNext()
>>> scene.GoToPrevious()
アニメーションの再生を開始・停止するためのメソッドを追加で用意しました。
>>> scene.Play()
>>> scene.Stop()
>>> scene.Reverse()
Play() は現在のタイムステップから最後のタイムステップまでアニメーションを再生します。Reverse() は現在のタイムステップから最初のタイムステップまでアニメーションを逆再生します。
最後に、ロードされたすべてのデータセットで利用可能な時間にアクセスするには、次のようにします。
>>> times = scene.TimeKeeper.TimestepValues
>>> times
[0.0, 0.1, 0.2]
便利なシーンプロパティには、以下のようなものがあります:
>>> scene.NumberOfFrames = 100
>>> scene.PlayMode = 'Snap To Timesteps' # or 'Sequence'
ソース/フィルタのプロパティに基づいて独自のアニメーションを作成することもできます
# create a new 'Sphere'
sphere1 = Sphere(registrationName='Sphere1')

# get active view
renderView1 = GetActiveViewOrCreate('RenderView')

# show data in view
sphere1Display = Show(sphere1, renderView1, 'GeometryRepresentation')

# trace defaults for the display properties.
sphere1Display.Representation = 'Surface'

# reset view to fit data
renderView1.ResetCamera(False, 0.9)

# update the view to ensure updated data information
renderView1.Update()

# get animation track
sphere1StartThetaTrack = GetAnimationTrack('StartTheta', index=0, proxy=sphere1)

# create a new key frame
keyFrame0 = CompositeKeyFrame()

# create a new key frame
keyFrame1 = CompositeKeyFrame()
keyFrame1.KeyTime = 1.0
keyFrame1.KeyValues = [360.0]

# initialize the animation track
sphere1StartThetaTrack.KeyFrames = [keyFrame0, keyFrame1]

# get animation scene
animationScene1 = GetAnimationScene()

animationScene1.Play()