9. 結果の保存
この章では、ParaView で可視化結果を保存するさまざまな方法について説明します。視覚化プロセスを通して生成される結果には、イメージとレンダリング結果、フィルタによって生成されたデータセット、他のレンダリングアプリケーションに読み込むためのシーン表現、およびアニメーションから生成されたムービーが含まれます。
9.1. データセットの保存
ソース、リーダー、フィルタなど、どのパイプラインモジュールによって生成されたデータセットも ParaView に保存することができます。ParaView にデータセットを保存するには、まず Pipeline Browser``でパイプラインモジュールを選択し、アクティブなソースにします。複数の出力ポートを持つモジュールの場合、目的のデータセットを生成する出力ポートを選択します。データセットを保存するには、 :guilabel:`File > Save Data` メニュー、または ``Main Controls ツールバーの  ボタンを使用します。また、キーボードショートカット CTRL + S (または ⌘ + S )も使用することができます。ファイル保存ダイアログ (図 9.1) では、ファイル名とファイル形式を選択することができます。利用可能なファイルフォーマットのリストは、保存しようとしているデータセットの種類に依存します。
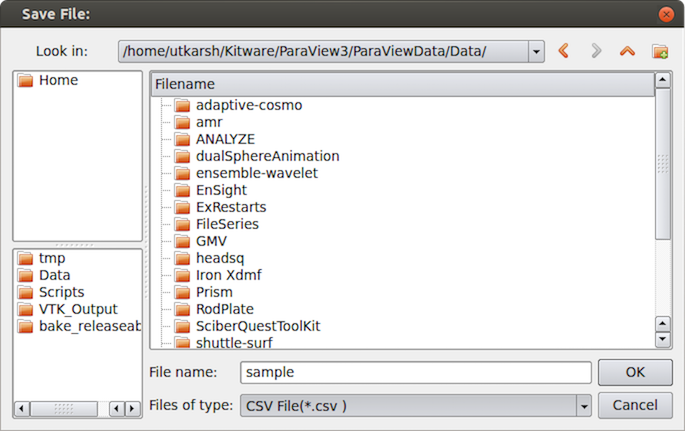
図 9.1 paraview の Save File ダイアログ
使用するファイル名とファイル形式を受け入れると、paraview は Configure Writer ダイアログボックスを表示できます( 図 9.2 )。このダイアログでは、書き込みプロセスをさらにカスタマイズできます。このダイアログに表示されるプロパティは、選択したファイル形式によって異なり、 Write All Time Steps を使用できるか、出力ファイルに書き込む属性を選択できます。
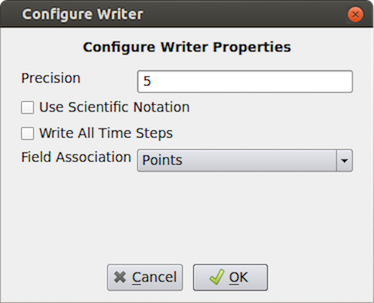
図 9.2 データセットをcsvファイルとして保存するときに表示される paraview の Configure Writer ダイアログ
pvpython でも、以下のようにデータセットを保存できます。
# Saving the data using the default properties for
# the used writer, if any.
>>> SaveData("sample.csv", source)

# the second argument is optional, and refers to the pipeline module
# to write the data from. If none is specified the active source is used.

# To pass parameters to configure the writer
>>> SaveData("sample.csv", source,
             Precision=2,
             FieldAssociation='Cells')
pvpython は、paraview と同様に、ファイル拡張子と書き込み対象として選択されたデータセットタイプに基づいてライターを選択します。確かに、ライターが利用できるオプションを見つけるのは難しいかもしれません。最善の方法は、paraview の Pythonトレース 機能を使用して、生成されたサンプルスクリプトをリファレンスとして使用することです( 1.6.2 章)。実行時の問題を回避するには、トレース時にPythonスクリプトで使用するのと同じ種類のデータセットと同じファイルフォーマットを使用してください。
9.2. レンダリングされた結果の保存
結果をレンダリングするビュー(これには、 SpreadSheet View)は、標準イメージ形式(PNG、JPEG、TIFF、BMP、PPM)のいずれかでのイメージ(またはスクリーンショット)の保存をサポートしています。 一部のビューでは、PDF、X3D、VRMLなどの複数のフォーマットでの結果のエクスポートもサポートしています。
9.2.1. スクリーンショットの保存
paraview のビューからレンダリングイメージを保存するには、File > Save Screenshot メニューオプションを使用します。選択すると、ファイルダイアログが表示され、スクリーンショットを保存するファイルパスと形式を選択できます。イメージファイルを選択すると、 Save Screenshot Options ダイアログ (図 9.3) が表示されます。このダイアログボックスでは、どのイメージをどのように保存するかを制御するさまざまなパラメータを選択できます。
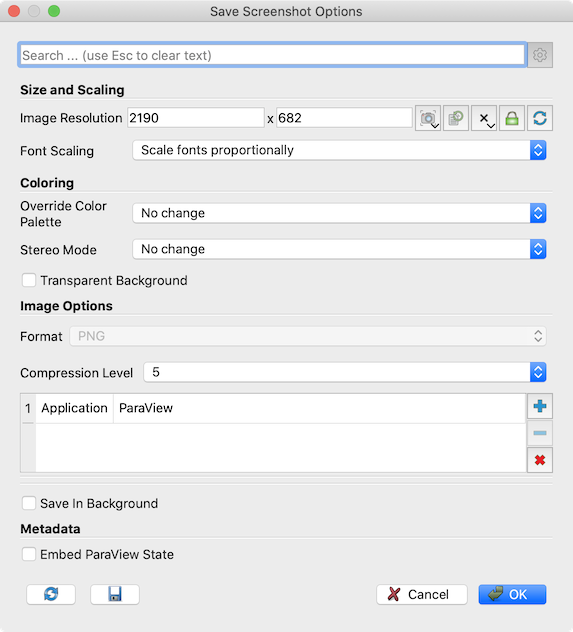
図 9.3 paraview に保存するスクリーンショットをカスタマイズするために使用する Save Screenshot Options ダイアログ
可視化設定にアクティブなタブが1つしかない場合は、( 図 9.3 ) に示すオプションが表示されます。使用可能なオプションは次のとおりです。
Image Resolution: ターゲットイメージの解像度をピクセル単位で指定します。デフォルトでは、現在のビュー寸法に設定されています。必要に応じて変更できます。解像度が現在の解像度より大きい場合、ParaViewは、タイル表示( tiling )を使用して、複数のステージでイメージ全体をレンダリングします。信頼できる結果を得るには、現在の縦横比を表示します。Tools > Lock View Size Custom を使用すると、ビューサイズを適切なアスペクト比にロックできます。Font Scaling: 現在の解像度よりも大きな解像度が指定された場合、フォントの拡大/縮小方法を制御できます。DefaultScale fonts proportionallyは、アスペクト比が維持される限り、WYSIWYGを達成しようとします。これは、画面より高いDPI(またはPPI)表示を目的とした画像の保存に適しています。Do not scale fontsを使用すると、フォントの拡大縮小を回避し、ピクセル単位のサイズを現在画面に表示されているサイズと同じに保つことができます。これは、同じピクセル解像度の大きなディスプレイを対象としたイメージを保存する場合に適しています。Override Color Palette: このドロップダウンを使用して、スクリーンショットを保存するためだけにカラーパレットを変更することもできます。Stereo Mode: このオプションでは、サポートされているステレオモードのいずれかを使用してイメージを保存できます。Transparent Background: ファイル形式がサポートしている場合は、このオプションをチェックして、現在の背景色ではなく透明な背景色でイメージを保存できます。Format: ファイル保存ダイアログで選択したファイル形式を表示します。
圧縮レベルなどのオプションが異なるフォーマットの場合、フォーマット固有のオプションが Save Screenshot Options ダイアログに表示されます。PNG形式には、0(圧縮なし)から9(最大圧縮)の範囲の Compression Level オプションがあります。JPEG形式のオプションは、0から100の範囲の Quality と、プログレッシブJPEGとしてファイルを保存できる Progressive です。TIFFファイル形式には、 None 、 PackBits 、および Deflate の値を指定できる Compression オプションがあります。BMPファイル形式にはオプションはありません。
アクティブなタブに複数のビューがある場合、図 9.4 に示すように、Save Screenshot Options ダイアログにはさらにいくつかのオプションがあります。
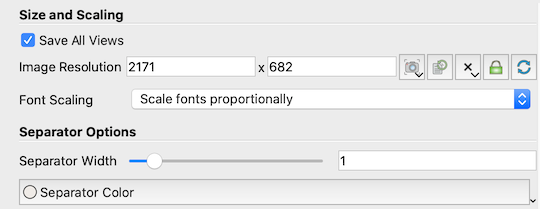
図 9.4 アクティブなタブに複数のビューがある場合に、Save Screenshot Options ダイアログの追加オプションが使用できます。
Save All Views: これをチェックすると、アクティブなタブのすべてのビューがUIとまったく同じレイアウトで保存されます。チェックしないと、アクティブビューのみが保存されます。Separator Options: 生成されたイメージのビュー間に描画されるセパレータを制御します。Separator Widthは、Separator Colorと同様にピクセル単位で指定できます。
スクリーンショットを pvpython に保存するには、SaveScreenshot を使います。
# Save a screenshot from a specific view.
>>> myview = GetActiveView()
>>> SaveScreenshot("aview.png", myview)

# Save all views in a tab
>>> layout = GetLayout()
>>> SaveScreenshot("allviews.png", layout)

# To save a specific target resolution, rather than using the
# the current view (or layout) size, and override the color palette.
>>> SaveScreenshot("aviewResolution.png", myview,
        ImageResolution=[1500, 1500],
        OverrideColorPalette="Black Background")
いつものように、paraview で Pythonトレース を使用して、特定のスクリーンショットイメージの保存に使用するメソッドの正確な形式をトレースできます。
9.2.2. シーンのエクスポート
使用可能な場合は、paraview の File > Export Scene... メニューオプションを使用して、サポートされている複数の形式でビュー内の可視化結果をエクスポートできます。 Render View (または類似するビュー)の場合は、Cinema Database、EPS、PDF、PS、SVG、POV、VRML、WebGL、X3D、およびX3DB形式を使用できます。エクスポートするファイルを選択すると、paraview が Export Options ダイアログをポップアップして、データセットの保存と同様にエクスポートする形式のパラメータを設定できるようにします( 9.1 章)。
また、pvpython からエクスポートする場合は、次のような形式になります(繰り返しますが、Pythonトレース を使って正しい形式を見つけるのが一番簡単です)。
>>> myview = GetActiveView()
>>> ExportView('/tmp/sample.svg', view=myview,
               Plottitle='ParaView GL2PS Export',
               Compressoutputfile=1)
# the arguments after 'view' depend on the exporter selected.
9.3. アニメーションの保存
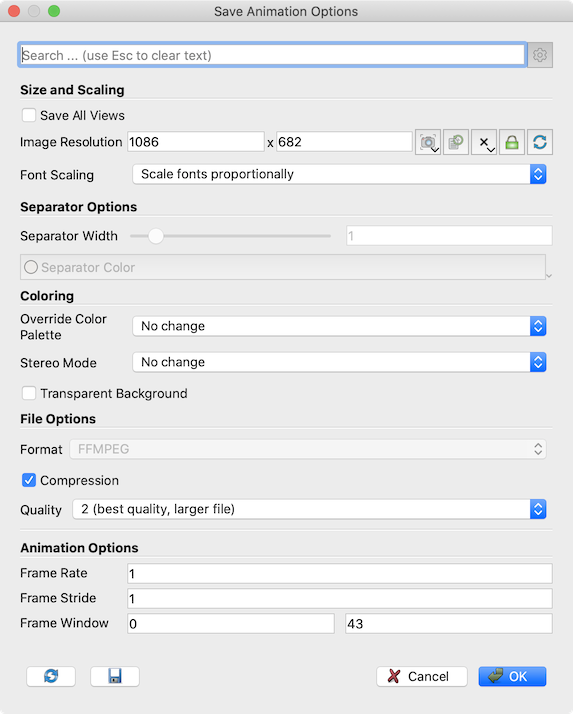
図 9.5 アニメーションの保存をカスタマイズするために使用する、paraview の Save Animation Options ダイアログ
アニメーションを一連の画像やビデオファイルとして保存するには、 File > Save Animation メニューオプションを使います。 ファイル保存ダイアログが表示され、保存先とフォーマットを選択します。 使用可能なファイル形式には、AVI(WindowsおよびLinux)、MP4(Windowsのみ)、Oggビデオ形式、およびPNG、JPEG、TIFFなどの画像形式があります。 アニメーションを画像フレームとして保存する場合、 ParaView は指定されたファイル名の接尾辞としてフレーム番号を使って連番の一連の画像ファイルを生成します。
ファイルとフォーマットを選択すると、 Save Animation Options ダイアログが表示されます( 図 9.5)。このダイアログは、ほとんど Save Screenshot Options ダイアログのクローンです( 図 9.3)。オプションとして、図 9.4 で追加されたマルチビューオプションや、フォーマット固有の圧縮オプション、アニメーション固有のパラメータなどがあります。 これらは次のとおりです。
Frame Rate: アニメーションを一連のイメージではなくビデオファイル(AVIまたはOgg)として保存する場合、生成されるビデオのフレームレートを指定できます。一連の画像として保存する場合は効果がありません。Frame Stride: 現在のタイムステップのスクリーンショットを記録した後、何タイムステップ先にジャンプするかを定義します。Frame Window: If you didn't want to save out the full animation, instead limit to a specific window, you can use this to specify the range of frames to save. If you are generating a animation from a temporal dataset with timesteps, the frame generally corresponds to the timestep number.
アニメーションを pvpython に保存するには、SaveAnimation を使います。この関数の引数は SaveScreenshot と同じですが、アニメーション固有のオプションのパラメータが追加されています。
>>> SaveAnimation('animation.avi', GetActiveView(),
      FrameWindow = [1, 100],
      FrameRate = 1)
9.4. 状態の保存
表示設定によって生成された結果を保存するだけでなく、すべてのパイプラインモジュール、ビュー、レイアウト、およびそれらのプロパティを含む表示パイプライン自体の状態を保存できます。これは、Application State または単に state と呼ばれます。
paraview に保存できる状態ファイルには、ParaView state file (*.pvsm) と Python state file (*.py) の2種類があります。PVSMファイルは、XMLベースのテキストファイルで、人間が判読して機械で読み取ることができますが、初心者にとっては必ずしも人間に優しいとは限りません。ただし、状態ファイルを読んで意味を理解する予定がない場合は、PVSMがアプリケーション状態を保存する最も堅牢で信頼性の高い方法です。状態を保存してから手動で変更したい場合は、Pythonトレースを使用するとUIでPythonスクリプトとして実行するアクションをトレースできるため、Python状態ファイルを使用する方がよいでしょう。一方、Pythonの状態ファイルでは、アプリケーションの現在の状態全体がPythonスクリプトとして保存され、paraview または Python Shell で使用できます。
9.4.1. paraview に状態ファイルを保存/ロードする
In paraview, you can save the
state using the File > Save State... menu option. Conversely, to load a saved
state file, you can use File > Load State....

図 9.6 paraview の Save State File ダイアログ
Stateファイルをロードするには、File > Load State... メニューを使用します。 Stateファイルをロードすると、現在の表示状態に影響することに注意してください。
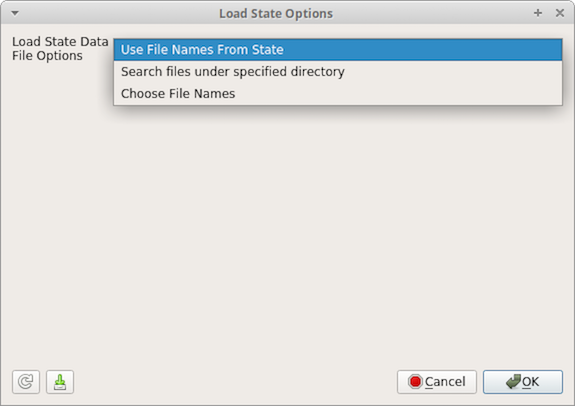
図 9.7 データファイルの検索オプションを表示する、paraview の Load State Options ダイアログ
この方法でPVSMファイルをロードすると、データファイルを検索する場所を尋ねられます。使用可能なオプションは、 Use File Names From State 、 Search files under specified directory 、 Choose File Names の3つです。 Use File Names From State を選択すると、ParaView は状態ファイルに保存されている絶対パスでデータを検索します。 Search files under specified directory を選択すると、ParaViewが状態ファイル内の絶対パスでファイルを検索する前にファイルを検索するディレクトリを参照するオプションが表示されます。デフォルトでは、コンピュータ間で状態ファイルを簡単に共有できるように、状態ファイルの場所が設定されます。 Choose File Names を選択すると、状態ファイル内のファイル名のリストが表示され、それぞれを個別にオーバーライドできます。
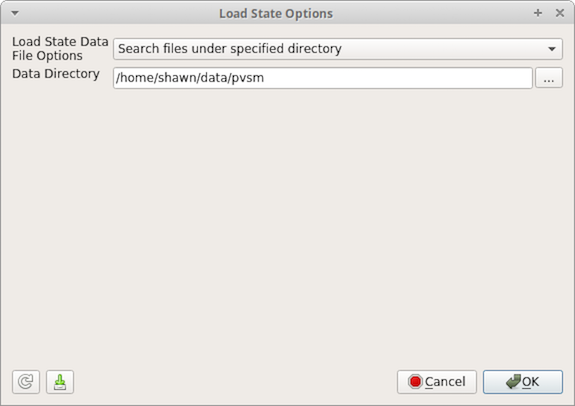
図 9.8 Search files under specified directory オプションを示す、paraview の Load State Options ダイアログ
9.4.2. pvpython に状態ファイルを保存/ロードする
pvpython では、次のようにPVSM状態ファイルのみを保存/ロードできます。
>>> from paraview.simple import *

# Save the PVSM state file. Currently, this doesn't support
# saving Python state files.
>>> SaveState("sample.pvsm")

# To load a PVSM state file.
>>> LoadState("sample.pvsm")
stateで使用されるすべてのデータファイルを特定のディレクトリのデータファイルに置換するには、次の形式を使用します。
>>> LoadState("sample.pvsm",
              data_directory="[directory path]",

              # optionally, restrict to specified directory
              restrict_to_data_directory=True)
状態ファイルで使用されているファイル名を明示的にオーバーライドする場合、関数シグネチャは少し複雑になります。Pythonトレース機能を使用して、特定の状態ファイルの関数呼び出しを生成する方が簡単な場合があります。次の形式になります。
>>> LoadState("sample.pvsm",
              filenames = [

                # a `dict` object for each reader in statefile to update.
                {
                  "name": "[reader name as shown in the pipeline browser]",

                  # if multiple readers have the same name, 'id' may be used
                  # instead of 'name' where the value is "id" used in the
                  # state file for this reader.

                  # filename properties and their overridden values for this
                  # reader, for example:
                  "FileName" : "foo.vtk",
                },

                # multiple such `dict`s can be specified.
              ])

# here's an example
>>> LoadState(statefile,
              filenames=[
                  {
                      'name' : 'can.ex2',
                      'FileName' : data_dir + 'can.ex2',
                  },
                  {
                      'name' : 'dataset',
                      'FileName' : data_dir + 'disk_out_ref.ex2',
                  },
                  {
                      'name' : 'timeseries',
                      'FileName' : [ data_dir + 'dualSphereAnimation/dualSphereAnimation_P00T0000.vtp',
                                     data_dir + 'dualSphereAnimation/dualSphereAnimation_P00T0001.vtp',
                                     data_dir + 'dualSphereAnimation/dualSphereAnimation_P00T0002.vtp',
                                     data_dir + 'dualSphereAnimation/dualSphereAnimation_P00T0003.vtp',
                                     data_dir + 'dualSphereAnimation/dualSphereAnimation_P00T0004.vtp',
                                     data_dir + 'dualSphereAnimation/dualSphereAnimation_P00T0005.vtp',
                                     data_dir + 'dualSphereAnimation/dualSphereAnimation_P00T0006.vtp',
                                     data_dir + 'dualSphereAnimation/dualSphereAnimation_P00T0007.vtp',
                                     data_dir + 'dualSphereAnimation/dualSphereAnimation_P00T0008.vtp',
                                     data_dir + 'dualSphereAnimation/dualSphereAnimation_P00T0009.vtp',
                                     data_dir + 'dualSphereAnimation/dualSphereAnimation_P00T0010.vtp']
                  },
              ])
Use the location argument to specify whether the state file is located on a remote server.
# Load a state file from a remote server.
>>> from paraview.modules.vtkRemotingCore import vtkPVSession
>>> LoadState("sample.pvsm", location=vtkPVSession.SERVERS)
Did you know?
Not all user interface settings are saved in ParaView state files. For example, the
Show Plane and Show Outline and Intersection Edges settings in the Plane widget in the Slice
and Clip filters are not saved because they are temporary interface state, not part of the data
pipeline or display properties.
9.4.3. 状態ファイルの自動保存
paraview では、 Edit > Settings > Auto Save を使用して、ステートの自動保存機能を有効にすることができます。 有効にすると、ParaViewで重要な変更があるたびにステートファイルが更新されます。 これには、パイプラインの変更やレンダリングプロパティの変更も含まれます。
フォーマット(PVSMまたはPython)は設定パネルで設定でき、出力ディレクトリも設定できます。 デフォルトでは、標準のAppDataディレクトリが選択され、PVSMフォーマットが使用されます。
paraview を開くと、 File > Recent Files メニューから、最後に自動保存した状態を簡単に読み込むことができます。
実際には2つの自動保存状態があります。 1つは変更を加える直前に保存され、もう1つはその直後に保存されます。 状態が保存されるたびに、直前に保存された状態はバックアップ状態 (*.bak*で終わる) に移動されます。
こうすることで、もし paraview が修正に必要な計算中に終了しても、2つの状態のうち最初の状態だけが保存され、バックアップ状態には修正が行われる前のParaViewの状態に対応する有効な状態が含まれることになります。
これによって、クラッシュを報告するために、どの変更がクラッシュの引き金になったかを特定するのが簡単になります。
9.5. マクロ
paraview では、Pythonスクリプトをマクロとして保存することができ、マクロツールバーに保存され、いつでもクリックしてスクリプトを実行することができます。 トレースが作成されると、トレースのテキストエディタで File > Save as Macro を使ってマクロとして保存することができます。 また、 paraview では Macros > Import new macro... をクリックしてファイルからマクロをインポートしたり、 Macros > Edit macros をクリックして既存のマクロを管理することができます。
9.6. Extractors
9.1 章 と 9.2 章 は、アクション (またはPythonでは、関数を呼び出します) を使用してデータセットとイメージを保存する2つの方法です。たとえば、別のタイムステップの結果を生成する場合は、すべてのアクションを繰り返す必要があります。これを回避する1つの方法は、データファイルとイメージファイルを生成するPythonスクリプトを作成し、それをマクロとして使用することです。もっと簡単な方法は、抽出ジェネレータ extractors を使うことです。抽出ジェネレータはパイプラインモジュールの一種で、ソースやフィルタに似ていますが、ライターのように動作します。フィルタと同様に、ソースやフィルタとは異なり、入力がありますが、別のパイプラインモジュールで消費できる出力は生成されません。代わりに、activated を実行すると、ファイルが生成されます。これをextractsと呼びます。
これらは単なるパイプラインモジュールであるため、これらを作成および設定するためのソースおよびフィルタとして同様のメカニズムを使用します。 これらを作成するには、Extractors メニューを使用します。 Pipeline Browser は、可視化に存在するすべてのextractorを表示します。 これらのいずれかを選択するには、Pipeline Browser でクリックします。この時点で、Properties パネルが更新され、選択したextractorでパラメータが表示されます。
extractorには、データ抽出とイメージ抽出の2種類があります。前者はソースおよびフィルタによって生成されたデータセットからファイルを生成し、後者はビューからのレンダリング結果を保存します。データextractorが作成されると、デフォルトではアクティブソースが入力(フィルタに似ています)として使用され、イメージextractorでは代わりにアクティブビューが使用されます。
9.6.1. Extractorプロパティ
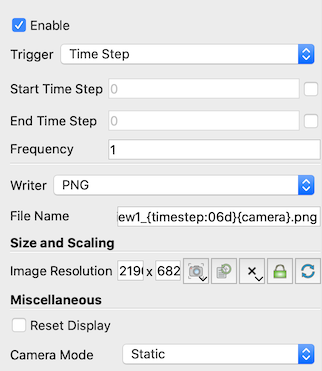
図 9.9 Properties of an image extractor for PNG files.
You use the Properties panel view and change extractor properties.
The available properties can be grouped into two major groups: first are
Trigger properties which are common to all extractors, and the second
are the Writer properties which are parameters specific to type of writer
the extractor uses.
Trigger properties define when the extractor is activated i.e.
under what conditions does the extractor produce extracts. Currently, we
support time-based controls. You can select the Start Time Step,
End Time Step or the Frequency at which to generate the results.
Frequency is the number of timesteps per activation. To write every
other timestep, set the Frequency to 2, to write every 3rd timestep, set it
to 3, and so on.
Writer properties are specific to the writer. For data extractors,
these will be similar to the writer properties shown in the
Configure Writer dialog for the writer described
in Section 9.1 章. For
image extractors, they are similar to the Save Screenshot Options
dialog described in Section 9.2.1 章. The Writer
properties also lets you set a File Name . This is the file name to use to
save the extracts. Since extractors are designed to generate a new
extract every time they are activated, the File Name supports patterns that
let you make the filename unique per activation. {timestep} or {time} in the
filename are replaced by the timestep index and the time value for each
activation. You add leading zeros (or other prefixes) to the numbers using a
form such as {timestep:06d}. There the timestep will be padded with zeros if the
number of digits is less than 6. You should not use absolute paths for
specifying the filenames here. We will see how to select prefix to store these
extracts under in the next section.
9.6.2. 抽出データの保存
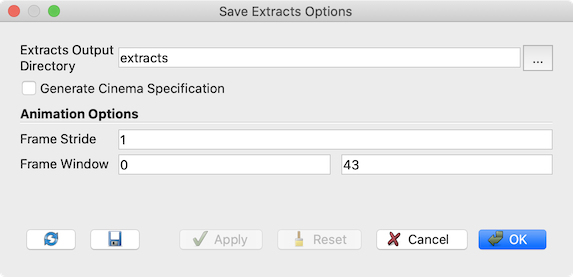
図 9.10 File > Save Extracts... で示される Save Extracts Options ダイアログ
Once the extractors have been setup, you can trigger the saving of
extract using File > Save Extracts.... This will pop up the
Save Extract Options dialog which lets you configure the extract generation.
Extracts Output Directory specifies the root directories under which all extracts are saved.
Check Generate Cinema Specification to generate a data.csv file under the chosen
extracts output directory that summarizes the generated extracts. This can be then used
with viewers provided by
the Cinema Science project to explore the generated extracts. Frame Stride and
Frame Window control the timesteps for which extracts are generated.
Ok をクリックすると、ParaViewは、 すべてのタイムステップ( VCR Controls )でアニメーションが実行され、トリガ条件に基づいて抽出ジェネレータがアクティブになり、抽出が生成されます。正常に完了すると、選択したルートディレクトリの下にファイルがあるはずです。
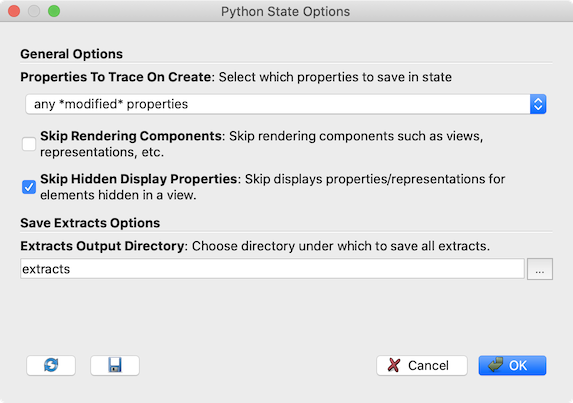
図 9.11 File > Save State を使用してPython状態(state)ファイルを保存するときに表示される Python State Options
In addition to generating extracts using the GUI, you can use pvpython or pvbatch
to generate extract offline. Thus is especially handy for HPC use-cases; you can
setup your state using an interactive session and once done save out the state and
schedule a non-interactive job for the potentially time-consuming extract generation
stage. To do so, setup your visualization pipeline including the extractors
as normal. Then, instead of using Save Extracts , use
File > Save State... and save out a Python state file.
The Python State Options dialog has a section similar to Save Extracts Options
dialog for choosing Extracts Output Directory and Generate Cinema Specification.
Click Ok to save the Python script. The Python script has a section near
the end of the end as follows:
if __name__ == '__main__':
    # generate extracts
    SaveExtracts(ExtractsOutputDirectory='extracts')
これにより、pvbatch または pvpython を使用してスクリプトが実行されたときに、Pythonスクリプトが抽出を保存します。