13. 軸グリッド
Oftentimes, you want to render a reference grid in the background for a
visualization -- think axes in a chart view, except this time we are talking of the 3D
Render View . Such a grid is useful to get an understanding for the data bounds and
placement in 3D space. In such cases, you use the Axes Grid . Axes Grid renders a 3D
grid with labels around the rendered scene. In this chapter, we will take a
closer look at using and customizing the Axes Grid and present different types of axes.
13.1. 基礎
Axes Grid の Render View を有効にするには、 Properties パネルを使用します。 View セクションで、 Axes Grid チェックボックスをオンにしてアクティブビューの Axes Grid をオンにします。

Edit ボタンをクリックすると、軸グリッドのプロパティダイアログ( 図 13.1 )が表示され、Axes Grid をカスタマイズすることができます。プロパティパネルと同様に、このダイアログは検索可能です。そのため、ダイアログの上部にある Search ボックスを使用して、関心のあるプロパティを検索することができます。同時に、  ボタンを使って、パネルのデフォルトモードとアドバンスドモードを切り替えることができます。
Using this dialog, you can change common properties like the titles
( X Title , Y Title , and Z Title ),
title and label fonts using Title Font Properties
and Label Font Properties for each of the axes directions,
as well as the Grid Color . Besides labeling the axes, you can render a
grid by checking Show Grid . Once you have the Axes Grid setup to your
liking, you can use the  to save your
selections so that they are automatically loaded next time you launch ParaView.
You can always use the
to save your
selections so that they are automatically loaded next time you launch ParaView.
You can always use the  to revert back to ParaView
defaults.
to revert back to ParaView
defaults.
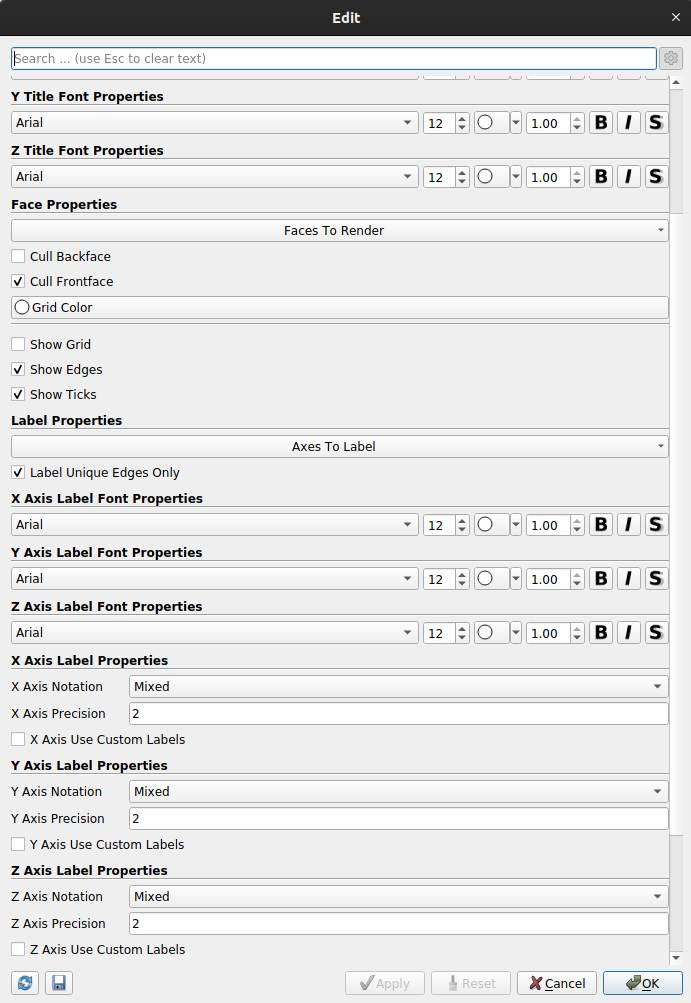
図 13.1 Edit Axes Grid ダイアログボックスは、Axes Grid をカスタマイズするために使用します。
13.2. 使用例
利用可能なカスタマイズをさらに詳しく見るために、可能なさまざまな可視化結果を見てから、 Edit Axes Grid ダイアログのプロパティーを使用してそれらを設定する方法を見てみましょう。これらの例では、ParaViewにパッケージされている disk_out_ref.ex2 サンプルデータセットを使用します。

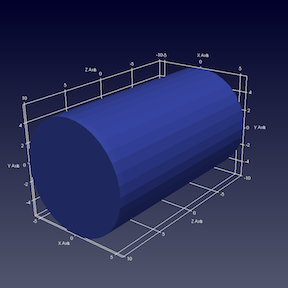
上の図では、左側がデフォルトの Axes Grid です。 Axes Grid の表示をオンにするだけで、このような表示が生成されます。シーンを操作しても、軸の配置は常にレンダリングされたジオメトリの背後に残ります。拡大ズームおよび縮小ズームすると、ラベルとティックは視覚的な手がかりに基づいて更新されます。
軸平面に沿ってグリッドを表示し、目盛およびラベルと位置合わせするには、 Show Grid チェックボックスをオンにして、右側に表示します。
By default, the gridded faces are always the farthest faces i.e. they stay behind
the rendered geometry and keep on updating as you rotate the scene. To fix which
faces of the bounding-box are to be rendered, use the Faces To Render
button (it's an advanced property, so you may have to search for it using the
Search box in the Edit Axes Grid dialog). Suppose, we want to label
just one face, the lower XY face. In that case, uncheck all the other faces
except Min-XY in menu popped up on clicking on the Faces to Render
button. This will indeed just show the min-XY face, however as you rotate the
scene, the face will get hidden as soon as the face gets closer to the camera
than the dataset. This is because, by default, Cull Frontfaces is enabled.
Uncheck Cull Frontfaces and ParaView will stop removing the face as it
comes ahead of the geometry, enabling a visualization as follows.
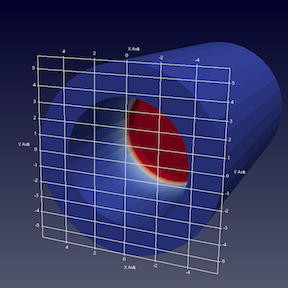
レンダリングする面をコントロールするだけでなく、ラベルを配置する場所もコントロールできます。Y軸に沿ってラベルを配置する方法をParaViewに決定させたいとしますが、X軸については、\(2.5\)、\(0.5\)、\(-0.5\)、および \(-4.5\) という値に明示的にラベルを付けたいとします。そのためには、Edit Axes Grid パネルの拡張モードであると仮定して、 X Axis Use Custom Labels をチェックします。 これにより、次に示すように値を追加できるテーブルウィジェットが表示されます。
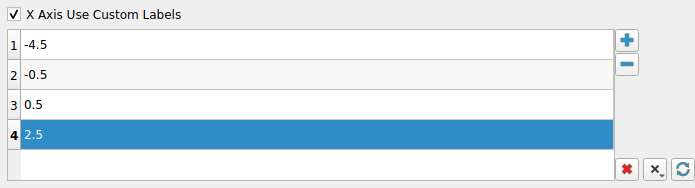
 ボタンを使って、カスタム値を追加してください。ついでに、
X Axis Label Font Properties と X Axis Title Font Properties の色を赤に、同様にY軸の色を緑に変更してみましょう。タイトルのフォントサイズを18に大きくして目立たせると、次のような可視化結果が得られます(下図、左)。
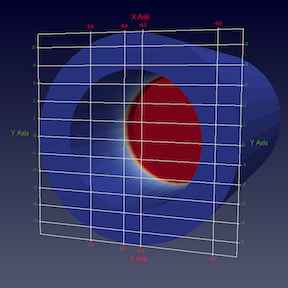
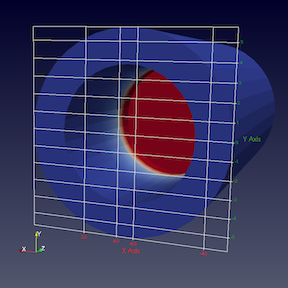
ここでは、軸平面の両側にラベルが付いています。一方の辺だけにラベルを付ける場合は、 Axes To Label プロパティを使用して、 Min-X と Min-Y 以外のすべての辺のチェックマークを外します。これにより、上の図のように表示されます。
13.3. pvpython での Axes Grid
pvpython では、 Axes Grid はレンダービューの AxesGrid プロパティとしてアクセスできます。
>>> renderView = GetActiveView()

# AxesGrid property provides access to the AxesGrid object.
>>> axesGrid = renderView.AxesGrid

# To toggle visibility of the axes grid,
>>> axesGrid.Visibility = 1
Axes Grid ダイアログボックスを使用して設定した Edit Axes Grid のすべてのプロパティは、この axesGrid オブジェクトで使用でき、次のように変更できます。
>>> axesGrid.XTitle = 'X Title'
>>> axesGrid.XTitleColor = [0.6, 0.6, 0.0]
>>> axesGrid.XAxisLabels = [-0.5, 0.5, 2.5, 3.5]
1.6.2 章 で説明したトレース機能を使えば、どのPython APIを使って Edit Axes Grid ダイアログの特定のプロパティを変更したり、help を使ったりするかを決定できることに注意してください。
>>> help(axesGrid)
Help on GridAxes3DActor in module paraview.servermanager object:

class GridAxes3DActor(Proxy)
 |  GridAxes3DActor can be used to render a grid in a render view.
 |
 |  Method resolution order:
 |      GridAxes3DActor
 |      Proxy
 |      __builtin__.object
 |
 |  Methods defined here:
 |
 |  Initialize = aInitialize(self, connection=None, update=True)
 |
 |  ----------------------------------------------------------------------
 |  Data descriptors defined here:
 |
 |  AxesToLabel
 |      Set the mask to select the axes to label. The axes labeled will be a subset of the
 |      axes selected depending on which faces are also being rendered.
 |
 |  CullBackface
 |      Set to true to hide faces of the grid facing away from the camera i.e. hide all
 |      back faces.
 |
 |  CullFrontface
 |      Set to true to hide faces of the grid facing towards from the camera i.e. hide all
 |      front faces.
 |
 |  DataPosition
 |      If data is being translated, you can show the original data bounds for the axes
 |      instead of the translated bounds by setting the DataPosition to match the
 |      translation applied to the dataset.
 |
 ...
13.4. Data Axes Grid
特定のデータセットに合わせたグリッドを表示するには、Display セクションの Data Axes Grid を使用します。グリッドの原点と境界は、シーン全体からではなく、アクティブなパイプラインソースから計算されます。
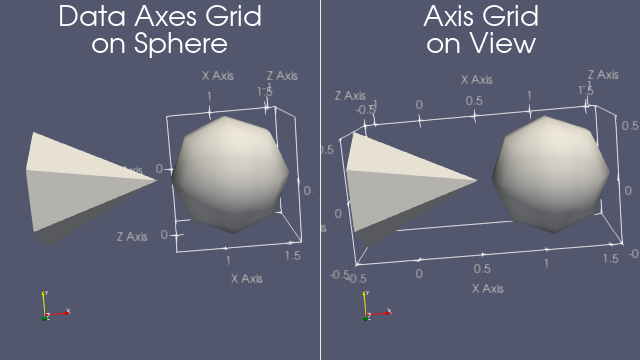
図 13.2 データ軸グリッド Data Axes Grid (左)はアクティブなデータを中心に表示します。 ビューの Axes Grid (右)はシーン全体を扱います。
13.1 章 で詳しく説明されているように、この設定は Axes Grid に非常によく似ています。
13.5. 極座標軸
極座標を使いたい場合は、 Display セクションの Polar Axes を使います。

図 13.3 Polar Axes の例。
多くのパラメーターは Edit ボタンから設定することができます。 Polar Axes は異なるオブジェクトの組み合わせとして見ることができます。 Polar Axis と呼ばれる主軸から始まり、半径方向の距離を測定することができます。同じ原点を共有する異なる Radial Axes は特定の角度で向きを変えます。それらはオプションでいくつかの Arc とリンクされています。
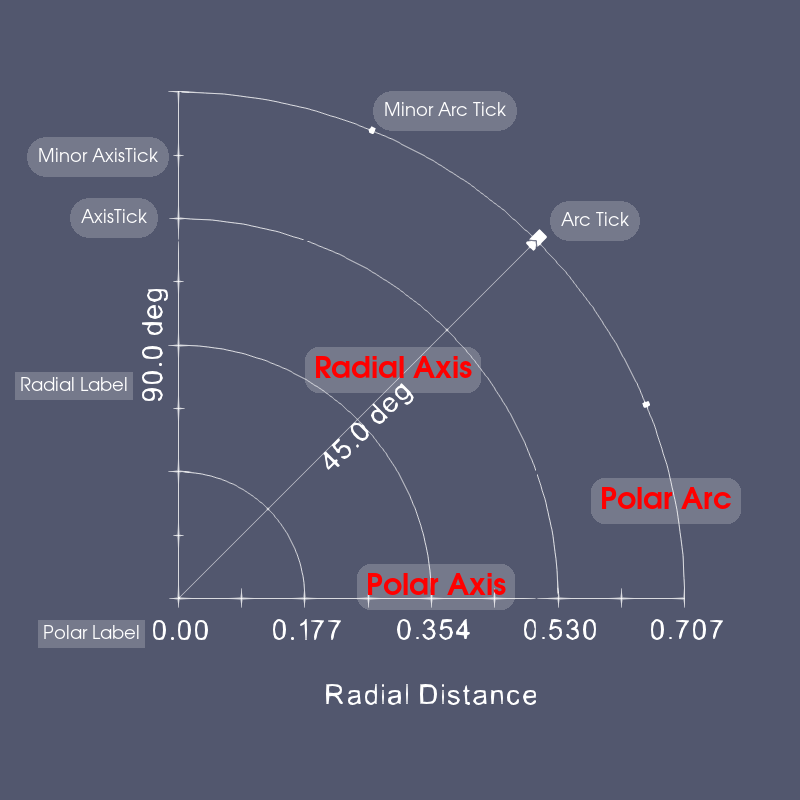
図 13.4 The Polar Axes different components.
13.6. 凡例グリッドと極座標グリッド
グリッドがスクリーンスペースにある、つまり常にシーンの上にある方がいい場合もあるでしょう。これを設定するには、 View セクションの Camera Parallel Projection をオンにします。次に、 Legend Grid か、極座標に対応する Polar Grid を選択します。

図 13.5 Polar Grid (左)と Legend Grid (右)は常にビューの上に表示されます。