14. ParaViewのカスタマイズ
ParaView は、ユーザーの好みやニーズに合わせてさまざまな方法でカスタマイズできます。カスタマイズオプションには、アプリケーションの一般的な動作の設定、フィルタ、表現、ビューに使用されるデフォルトのプロパティ値のカスタマイズ、paraview クライアントの機能のカスタマイズなどがあります。 この章では、ParaView をカスタマイズするさまざまな方法について説明します。
14.1. 設定
他の大きなアプリケーションと同様に、paraview はアプリケーションの動作の一部をカスタマイズするメカニズムを提供します。これらは application settings と呼ばれます。または単に settings です。このような設定は、Edit > Settings メニュー(MacOSでは ParaView > Preferences )からアクセスできる Settings ダイアログを使用して変更できます。1.2 章 、8.14.1 章 、8.14.4 章 など、このダイアログボックスの一部をすでに見てきました。本節では、このダイアログボックスで使用できるその他のオプションについて詳しく説明します。
Settings ダイアログはいくつかのタブに分かれています。 General タブには、その他の設定のほとんどがまとめられています。 Camera タブでは、 Render View および同様のビューのマウス操作マッピングを変更できます。 8.14.1 章 および 8.14.4 章 で説明した Render View タブには、 Render View および同様のビューのレンダリングに関するオプションがあります。 Color Palette タブは、アクティブなカラーパレットを変更するために使用します。
このダイアログの使い方は、Properties パネルとあまり変わりません。一番上には Search ボックスがあり、入力テキストにマッチするプロパティを検索することができます( 1.1.2 章 )。 ボタンは、デフォルトモードとアドバンスドモードを切り替えるために使用されます。
To apply the changes made to any of the settings, use the Apply or OK
buttons. OK will apply the changes and close the dialog, while Cancel
will reject any changes made and close the dialog. Any changes made to
the options in this dialog are persistent across sessions. That is, the next time you
launch paraview, you'll still be using the same settings chosen earlier. To
revert to the default, use the Restore Defaults button. You can also manually
edit the setting file as in 14.3.1 章.
Furthermore, site maintainers can provide site-wide defaults for these, as is
explained in 14.4 章.
次に、重要なオプションのいくつかを見ていきます。アドバンスモードでのみ利用可能なオプションは、 のアイコンを使って表示されています。上級者向けのオプションは ボタンで切り替えるか、Search ボックスで検索する必要があります。
14.1.1. 一般設定
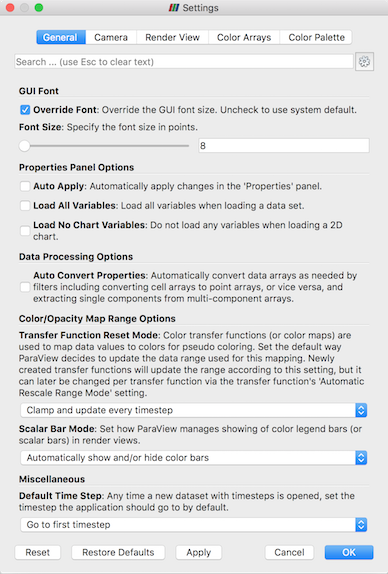
図 14.1 General 設定タブを表示する paraview の Settings ダイアログ
General OptionsShow Welcome Dialog: このチェックを外すと、アプリケーション起動時にウェルカムスクリーンを表示しないようになります。効果を確認するには、paraviewを再起動する必要があります。Show Save State On Exit: これをチェックすると、アプリケーションを終了するときに状態ファイルを保存するようにparaviewが指示されます。Crash Recovery: これをチェックすると、可視化パイプラインに変更を加える際に、paraviewが断続的にバックアップ状態ファイルを保存します。何らかの理由でparaviewがクラッシュした場合、paraviewを再起動すると、クラッシュが起こる前に保存したバックアップ状態をロードするかどうかを選択することができるようになります。これは \(100\%\) 信頼できるものではありませんが、クラッシュによる可視化状態の喪失を避けるために有用と考えるユーザーもいるかもしれません。Force Single Column Menus: 複数列のメニューをサポートするプラットフォームでは、すべてのメニュー項目を強制的に単一のスクロール可能な列に表示します。これは、低解像度の画面ですべてのメニュー項目を選択できるようにする場合に便利です。
GUI FontOverride Font: このチェックボックスをオンにすると、ユーザーインタフェースにカスタムフォントサイズを使用します。これにより、システムのデフォルトのフォントサイズが上書きされます。Font Size: UI要素に使用するフォントのサイズ。
View OptionsDefault View Type:paraviewが起動すると、デフォルトでRender Viewが作成されます。このオプションを使用すると、デフォルトで作成されるRender Viewの代わりに、作成されるビューの種類を変更することができます。デフォルトで何もビューを作成しない場合は、Noneを選択することもできます。
Properties Panel OptionsAuto Apply: チェックが入っていると、Propertiesパネルで変更した内容が、Applyボタンをクリックしなくても自動的に適用されます。同じ設定はMain Controlsツールバーの ボタンでも切り替えることができます。Auto Apply Active Only: これにより、自動適用はアクティブソース上のプロパティのみに制限されます。Properties Panel Mode: これにより、 1.2 章 で説明されているように、Propertiesパネルを分割して表示することができるようになります。
Data Processing OptionsAuto Convert Properties: 複数のフィルタが、点データ配列やセルデータ配列など、1つのタイプの配列に対してのみ機能します。このようなフィルタを使用する前に、Point Data To Cell DataまたはCell Data To Point Dataフィルタを適用する必要があります。これらのフィルタを明示的に追加する必要がないようにするには、このチェックボックスをオンにします。このチェックボックスをオンにすると、ParaView は、セル配列をポイント配列に変換したり、ポイント配列をポイント配列に変換したり、マルチコンポーネント配列から1つのコンポーネントを抽出したりするなど、フィルタが必要とするデータ配列を自動的に変換します。
Color/Opacity Map Range OptionsTransfer Function Reset Mode: この設定は、ParaView がカラーおよび不透明度マップの範囲をリセットする方法(または伝達関数)の初期設定を制御します。新しく作成したカラー/不透明度マップ( 4.2.2 章 )のAutomatic Rescale Range Modeの初期値を設定します。この設定は、カラーマップの作成後に、カラーマップごとに変更できます。Scalar Bar Mode:paraviewがRender Viewおよび同様のビューに表示するカラー凡例(またはスカラーバー)の管理方法を制御します。
Default Time Stepこの設定は、タイムステップを持つデータセットが開かれるたびに、paraviewがアプリケーションによって表示される現在の時刻をどのように更新するかを制御します。Leave current time unchanged, if possible、Go to first timestep、Go to last timestepから選択できます。AnimationCache Geometry For Animation: これはアニメーション再生時にジオメトリのキャッシュを有効にし、ループ内のアニメーション再生のスピードアップを図るものです。キャッシュを有効にすると、パイプラインが更新されていないため、Informationパネルなどで報告されるデータ範囲が不正確になる可能性があります。Animation Geometry Cache Limit: アニメーションキャッシュが有効な場合、この設定は、任意のランクによってキャッシュされるジオメトリの量(キロバイト単位)を制御します。ランクのキャッシュサイズがこの制限に達するとすぐに、ParaView は残りのタイムステップをキャッシュしなくなります。Animation Time Notation: 注釈ツールバーの時刻の表示表記を設定します。オプションは、Mixed、Scientific、およびFixedです。Animation Time Precision: アニメーションツールバーに表示される時間の桁数を設定します。
Maximum Number of Data Representation Labels選択範囲がデータ属性によってラベル付けされている場合、これが使用するラベルの最大数になります。ラベル付けするポイント/セルの数がこの値を超える場合、この数のサブセットが代わりにラベル付けされます。オーバーラップするラベルが多すぎると判読できなくなるため、デフォルトでは100に設定されています。
14.1.2. Camera 設定
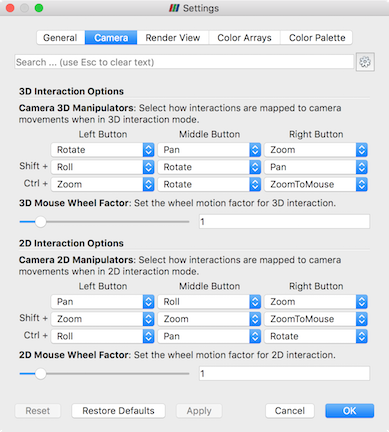
図 14.2 Settings dialog in paraview showing the Camera settings tab with the
default fields.
This tab allows you to configure how you interact with 3D and 2D views in ParaView. You
can customize the mapping between mouse buttons and keyboard modifiers to camera interaction
types, such as Rotate, Pan, Zoom, and others. The mappings are defined
separately for 3D and 2D interaction modes. You can reassign these controls by setting
them to your desired mouse button (left, middle or right) and modifier combinations (no
modifier, ⇧ (shift), or CTRL/⌘).
The types of camera controls that can be assigned are: Pan, Zoom, Roll,
Rotate, Zoom To Mouse, Multi Rotate and Rotate Skybox.
Additionally, you can adjust the 2D and 3D mouse wheel factors, which control the zoom rate of the camera movements in their respective modes. There are also options to reverse the mouse wheel zoom direction, and to enable zooming to the cursor position instead of the center of the view.
Changes made in this dialog persist across sessions. You may reset to the default settings
by clicking the Restore Defaults button and then selecting Apply, or restore any
settings that were changed but not applied back to their prior state, by clicking the
Reset button.
For more details about camera interactions, read 5.4.2.2 章.
14.1.3. Render View 設定
Render View タブで使用可能な各種オプションについては、8.14.1 章 および 8.14.4 章 を参照してください。
14.1.4. Color Palette
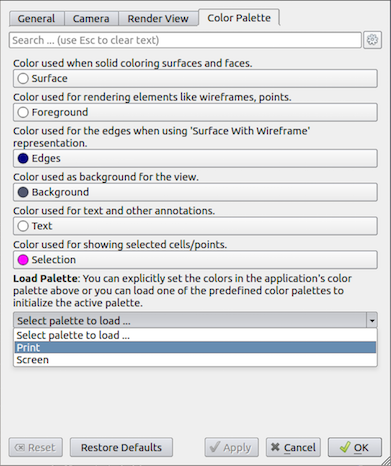
図 14.3 Color Palette 設定タブを表示する paraview の Settings ダイアログ
Color Palette タブ( 図 14.3 )を使用すると、アクティブなカラーパレットの色を変更できます。このタブには、使用可能なカラーカテゴリ、 Surface 、 Foreground 、 Edges 、 Background 、 Text 、 Selection が一覧表示されます。これらのカテゴリごとに使用する色を手動で設定したり、 Load Palette オプションを使用して定義済みパレットの1つをロードすることができます。color palettes を理解するために、例を見てみましょう。
paraview を起動してアクティブビューを分割し、2つの Render View インスタンスを並べて作成します。paraview を -dr コマンドライン引数で起動して、現在の設定がこのデモに影響しないようにすることもできます。次に、左側のビューで Sphere を Wireframe として表示し、右側のビューで Cone を Surface として表示します。 また、 Cone の Cube Axis をオンにします。図 14.4 (左) のように表示されます。
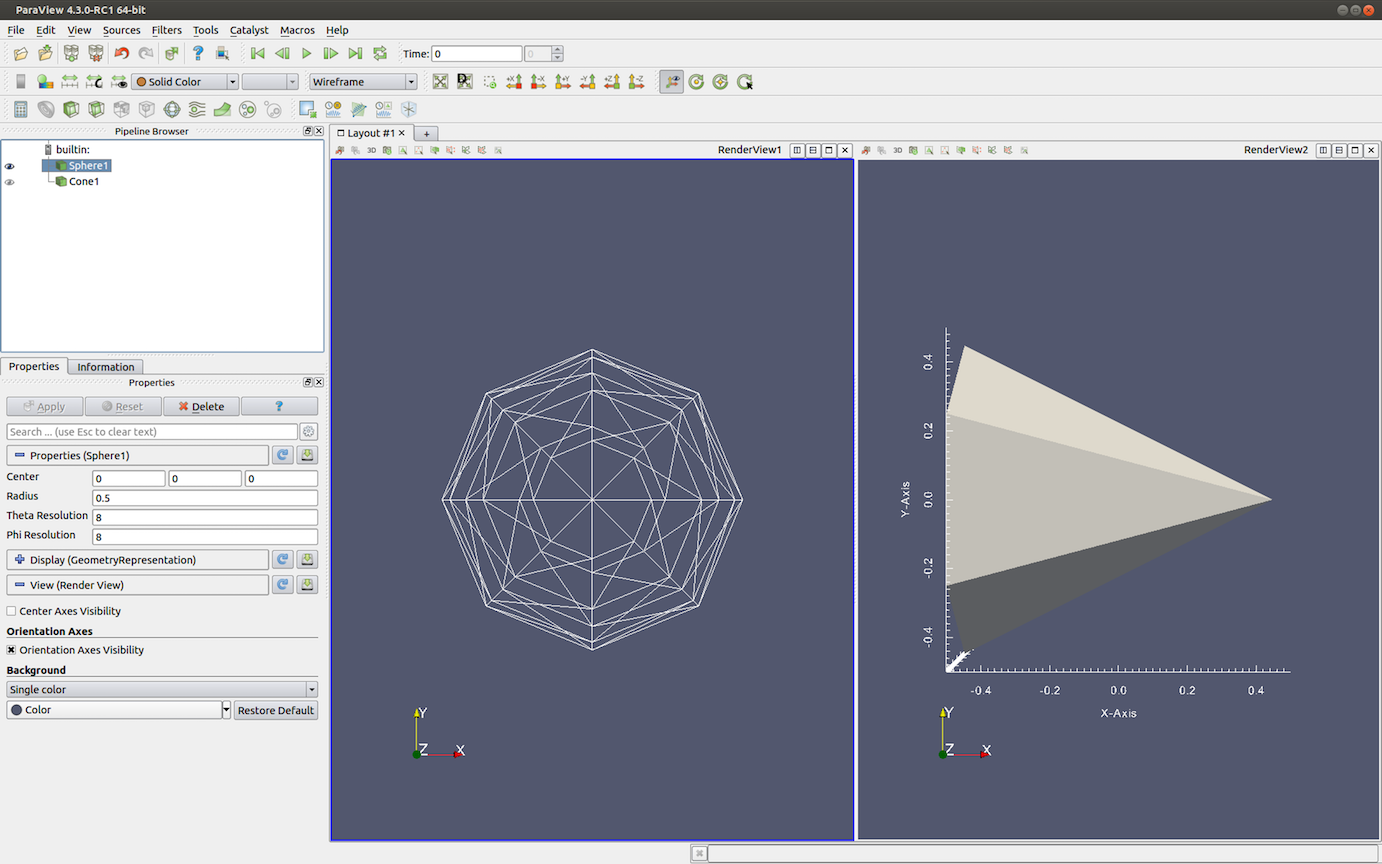
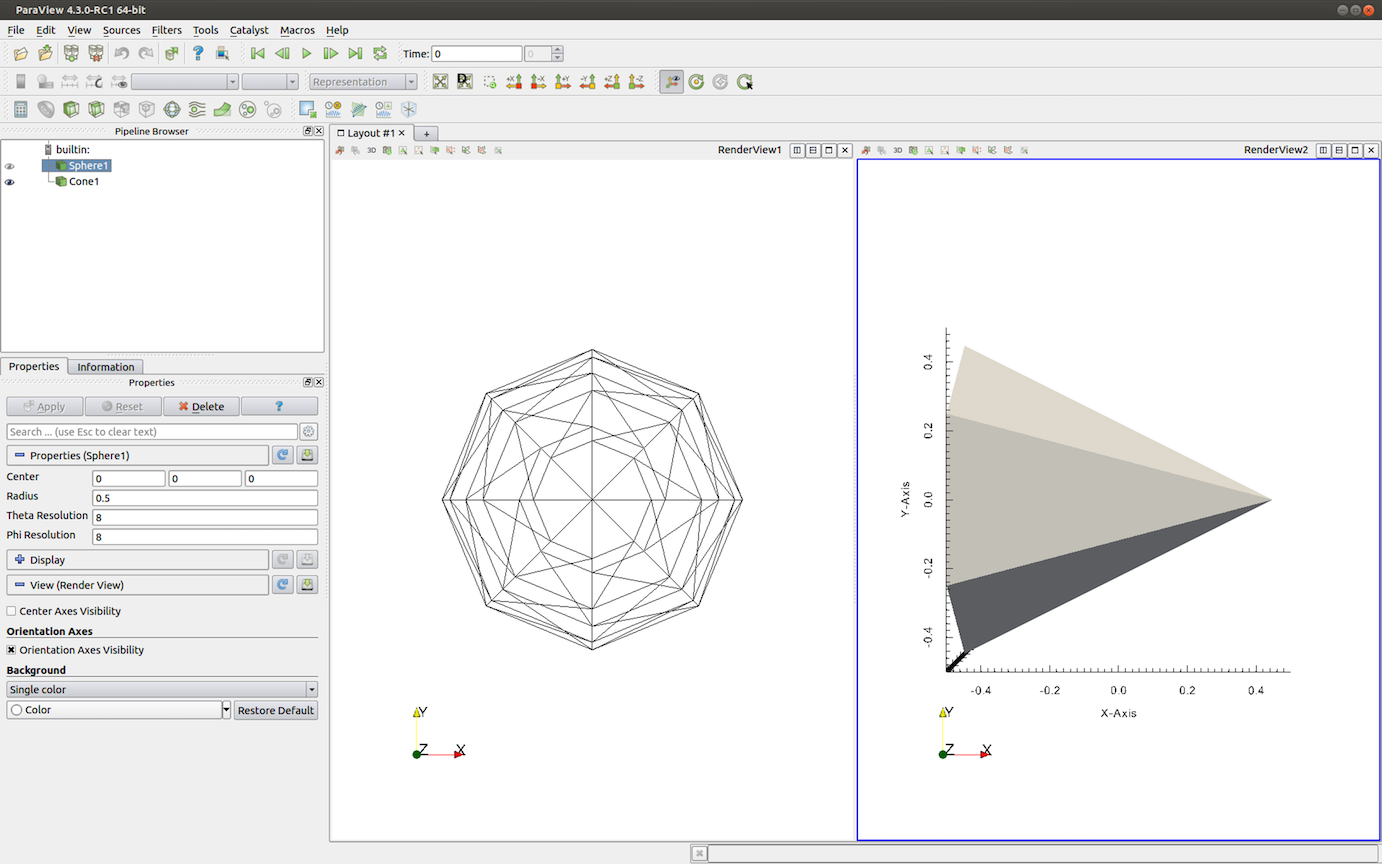
図 14.4 Print カラーパレットをアクティブパレットとしてロードした場合の効果。左側はオリジナルの表示で、右側は Print パレットをロードした後の結果。
次に、印刷用のイメージを生成するとします。通常、印刷では、背景色を白にし、ワイヤフレームと注釈を黒にします。そのためには、1つの方法として、各ビュー、表示、および立方体軸の各色を変更します。特に大規模なパイプラインでは、それがどれほど退屈になるか想像できるだろう。代替方法として、 Settings ダイアログを使用して、図 14.3 に示すようにアクティブなカラーパレットを Print に変更し、 OK または Apply をクリックします。 図 14.4 (右)のような表示に変わります。
基本的に、ParaView では、任意の色プロパティをいずれかの色分類項目に リンク できます。カラーパレットを変更すると、パレットカテゴリにリンクされている色プロパティも、カテゴリの色に合わせて自動的に更新されます。図 14.5 に、 Properties パネルのカラーパレットカテゴリにカラープロパティをリンクする方法を示します。小さなドロップダウンメニューマーカーを使用して、カラーパレットのカテゴリを表示するメニューをポップアップ表示します。いずれか1つを選択して、そのプロパティをカテゴリにリンクします。ボタンをクリックして手動で色を変更すると、リンクが自動的に切断されます。
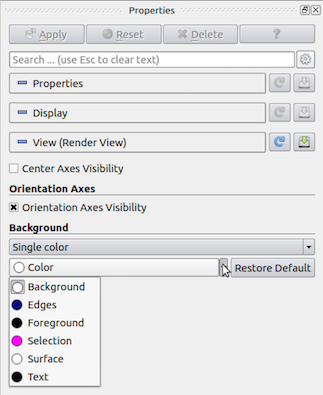
図 14.5 ポップアップメニューを使用すると、 Properties パネルのカラーパレットカテゴリにカラープロパティをリンクできます。
14.2. カスタムデフォルト設定
このセクションでは、ソース、リーダー、フィルタ、リプレゼンテーション、およびビューのプロパティのカスタムデフォルト設定を指定する方法について説明します。 これを使用すると、たとえば、新しいビューのデフォルトの背景色、グラデーション背景を使用するかどうか、球ソースの解像度、特定のファイル形式からロードするデータ配列、およびその他のほとんどすべてのオブジェクトプロパティのデフォルトの設定を指定できます。
すべての ParaView 実行可能ファイルで同じカスタムデフォルトが使用されます。これは、paraview 実行ファイルで指定されたカスタムデフォルトが pvpython および pvbatch のデフォルトとしても使用されることを意味します。これにより、paraview を使用して可視化を設定したり、pvpython または pvbatch を使用して時系列データからアニメーションを生成したりすることが容易になります。
14.2.1. プロパティのデフォルトカスタマイズ
paraview の Propertiesパネルには、 Properties 、 Display 、View の3つのセクションがあります。各セクションには2つのボタンがあります。これらのボタンは、 図 14.6 で赤色で囲まれています。ディスクアイコンの付いたボタンは、 Apply ボタンで適用されたセクションの現在のプロパティ値を保存するために使用します。 Apply ボタンで変更されたが適用されていないプロパティ値は、カスタムデフォルト設定として保存されません。
円形の矢印(または再ロードアイコン)が付いたボタンは、オブジェクトのカスタムプロパティ設定を ParaView のアプリケーションのデフォルト値に戻すために使用します。現在のプロパティ設定をデフォルト値として保存すると、それらの値は、別の値に変更するかリセットするまで、以降デフォルト値として扱われます。保存されたデフォルト値は設定ファイルに書き込まれるため、ParaView を再度閉じて起動したときに使用できます。
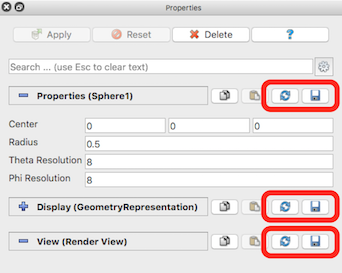
図 14.6 Properties パネルでデフォルトのプロパティ値を保存および復元するためのボタン
リロードボタンをクリックすると、デフォルトのプロパティ値への変更を取り消すことができます。これにより、現在のビューのプロパティ値が paraview のアプリケーションのデフォルト値にリセットされます。paraview のデフォルト値を完全に復元するには、saveボタンをもう一度クリックする必要があります。そうしないと、復元されたデフォルト値は現在のオブジェクトにのみ適用され、そのオブジェクトの新しいインスタンスには、最後にsaveボタンをクリックしたときに保存されたカスタムデフォルト値が適用されます。
14.2.2. 例:カスタム背景色の指定
Render View のデフォルトの背景色を変更するとします。これを行うには、 Properties パネルの View セクションまでスクロールし、現在の背景色を表示するコンボボックスをクリックします。新しい色を選択し、OK をクリックします。次に、 View (Render View) セクションのヘッダーまでスクロールし、ヘッダーの右にあるディスクボタンをクリックします。これにより、新しい背景色が新しいビューのデフォルトの背景色として保存されます。これを確認するには、3Dビューの上にあるタブの横の + 記号をクリックして、新しいレイアウトを作成します。 Render View ボタンをクリックします。デフォルトとして保存したカスタムバックグラウンドカラーで、新しいレンダービューが作成されます。
14.3. Configuration files
ParaView enables you to configure various aspects of its operation, from specifying default property values (described in :numref:sec:CustomDefaultSettings) to graphical interface organization. Some configuration options can be specified for all users on a system through site-wide configuration files while individual users can further customize ParaView with per-user configuration files.
14.3.1. JSONを使用した設定の構成
Some ParaView settings are stored in a text file in the JSON format.
We recommend to use the user interface in paraview to
set most default values, but it is possible to set them
by editing the JSON settings file directly. It is
always a good idea to make a backup copy of a settings file prior to
manual editing.
The ParaView executables read from and write to a file named
ParaView-UserSettings.json, which is located in your home
directory on your computer.
The search procedure is detailed in 14.4 章.
注意
The JSON settings configuration is named depending on its location!
Use ParaView-SiteSettings.json file for the install locations,
and ParaView-UserSettings.json for the user space version.
This file will exist if you have made any default settings changes through the user
interface in the paraview executable. Once set, these
default settings will be available in subsequent versions of ParaView.
カスタムのデフォルト設定を指定するファイルの簡単な例を次に示します。
{
  "sources" : {
    "SphereSource" : {
      "Radius" : 3.5,
      "ThetaResolution" : 32
    },
    "CylinderSource" : {
      "Radius" : 2
    }
  },
  "views" : {
    "RenderView" : {
      "Background" : [0.0, 0.0, 0.0]
    }
  }
}
ファイルの階層構造に注意してください。階層の最初のレベルは、設定を指定するオブジェクトが参照するグループを指定します(この例では "sources")。2番目のレベルでは、設定を指定するオブジェクトに名前を付けます。最後に、3番目のレベルでは、独自のデフォルトの設定を指定します。デフォルト値はリテラル(定数)、文字列、または配列(角括弧で囲まれたコンマ区切りリテラルで表される)に設定できることに注意してください。
グループとオブジェクトの名前は、ディレクトリ ParaView/ParaViewCore/ServerManager SMApplication/Resources (Windowsでは ParaView\ParaViewCore\ServerManager\SMApplication\Resources)内の ParaView ソースコード内のXMLプロキシ定義ファイルから取得されます。グループ名は、 ProxyGroup 要素の name 属性で定義されます。オブジェクト名は、 Proxy 要素の name 属性から取得します(または vtkSMProxy サブクラスの要素)。プロパティ名は、オブジェクトの *Property XML要素の name 属性から取得されます。
Did you know?
Edit > Settings メニューの paraview で使用できるアプリケーション全体の設定も、このユーザ設定ファイルに保存されます。そのため、アプリケーションの設定を変更した場合、"settings"という名前のグループの下にいくつかのエントリが表示されます。
14.3.2. サーバーの設定
ParaView の設定に加えて、サーバー設定を使用して、 pvserver 、 pvdataserver 、 pvrenderserver のコマンドラインオプションのデフォルト値を指定することができます。
Server settings file is named ParaViewServer-UserSettings.json.
- 以下の接続コマンドラインオプションのみ指定可能:
--connect-id--hostname--client-host--reverse-connection--timeout--timeout-command--timeout-command-interval--bind-address
The expected formatting of the server settings file is as follows:
{
  "cli-options" : {
    "connection" : {
      "connect-id" : 17,
      "reverse-connection" : true,
      "client-host" : "bailey"
    }
  }
}
設定名は、オプションの "long" バージョンで、先頭の2つのダッシュを除いたものである。
サーバー設定はファイル内で手動で設定するのみで、 ParaView アプリケーションから変更することはできません。
Did you know?
The application-wide settings logic is also valid for server settings
and a ParaViewServer-SiteSettings.json in the locations
specified in the 14.4 章 will be used in the
same way.
14.3.3. Configuring application environment
For a smoother experience, the ParaView graphical application will also save and restore your environment: panel positions, recent files used and more.
This information is stored in a ParaViewX.Y.ini file (X.Y being the version numbers),
that will be written in your user space when ParaView exits.
This file is not intended to be edited from a text editor. It is more like a snapshot of the application organization the last time you close it.
14.3.4. Property Panel Visibilities
For an advanced control of the ParaView interface, a PropertyPanelVisibilities.json
can be provided either in user space or under a site directory,
in any of the directories mentioned in 14.4 章.
This file will override the visibility of any property to be either "default", "advanced", or "never".
The structure of this JSON file is similar to the ParaView-UserSettings one:
it should should be a collection of object per proxy group, containing one object per proxy,
itself having a list of properties.
Example of PropertyPanelVisibilities.json
{
  "annotations" :
  {
    "GridAxes3DActor" :
    {
      "XTitle" : "advanced"
    }
  },
  "sources" :
  {
    "SphereSource" :
    {
      "StartTheta" : "default",
      "StartPhi" : "never"
    }
  }
}
ParaView does not generate this file, it is intended to be provided when deploying the application.
14.4. Configuration locations
Each configuration file can be located in several directory locations. ParaView expects a writable directory in the user space so that it can store user-customized settings files. Additional configuration files that apply to all users of a system can be configured as part of the ParaView installation process. These types of configuration files are called "site settings".
14.4.1. User settings: configuration at the user level
The user space contains the files that can be written by the ParaView application. This also were you can add your own configurations.
On Windows, this is located at %APPDATA%/ParaView/, where the
APPDATA environment variable is usually something like
C:/Users/USERNAME/AppData/Roaming, where USERNAME is
your login name.
On Unix-like systems, it is located under $XDG_CONFIG_HOME/ParaView/
if defined or under $HOME/.config/ParaView/.
14.4.2. Site settings: configuration at installation level
ParaView実行可能ファイルは、複数の場所でサイト設定ファイルを検索します。ParaView を INSTALL ディレクトリにインストールした場合、ParaView 実行可能プログラムは、次のディレクトリ内のサイト設定ファイルを指定された順序で検索します。
INSTALLINSTALL/share/paraview-X.Y(INSTALL\share\paraview-X.Yin Windows systems)INSTALL/lib(INSTALL\libin Windows systems)INSTALL/..(INSTALL\..in Windows systems)
On macOS additional paths are searched. Considering a ROOT directory
at INSTALL/../../.., following paths are added:
ROOTROOT/../libINSTALL/../lib/paraview-X.YINSTALL/../SupportROOT/../Support
where X is ParaView's major version number and Y is
the minor version number. ParaView executables will search these
directories in the given order, reading in the first
file it finds.
Did you know?
To aid in debugging problems with the site settings file location, you
can define the PARAVIEW_LOG_APPLICATION_VERBOSITY to INFO.
This will turn on verbose output about application configuration, including
showing where the ParaView executables are looking for the configuration files.