8. リモートおよび並列の可視化
ParaView アプリケーションの目標の1つは、大規模なデータセットのデータ分析と可視化を可能にします。 ParaView は、1台のデスクトップマシンでは処理できないことが多いスーパーコンピューティングリソースで実行されたシミュレーションからのシミュレーション結果を可視化する必要性から生まれました。 このようなデータセットのインタラクティブな可視化を可能にするには、ParaView リモートおよび/または並列データ処理を使用します。 基本的な概念は、メモリやその他の制限のためにデータセットがデスクトップマシンに収まらない場合、デスクトップから駆動されるマシンのクラスター間でデータセットを分割できるということです。 この章では、ParaView を使用したリモートおよび並列データ処理の基本について説明します。 クラスタの設定については、ParaView Wiki [ThePCommunity] を参照してください。
Did you know?
リモート処理と並列処理は一緒に使用されることが多いですが、それらは異なる概念を参照しており、一方だけを使用することも可能です。
ParaViewの場合、リモート処理とは、クライアント (通常は paraview または pvpython ) が pvserver に接続され、別のリモートマシンで実行されるという概念です。すべてのデータ処理と、場合によってはレンダリングは pvserver で実行できます。クライアントは、可視化パイプラインを構築し、生成された結果を表示することによって、可視化プロセスを駆動します。
並列処理とは、データセット全体を処理するために rank ---と呼ぶ単一のコア---の代わりに、データセットを複数のランクに分割する概念です。通常、 pvserver のインスタンスは複数のランクで並列に実行されます。クライアントが並列に動作するサーバーに接続されている場合は、リモート処理と並列処理の両方を使用します。
pvbatch の場合、並列に動作するがクライアント接続を持たないアプリケーションがあります。これは遠隔処理なしの並列処理の場合です。
8.1. リモート処理を理解する
簡単な使用例を考えてみましょう。2台のコンピュータがあり、1台はオフィスにあり、もう1台は自宅にあるとします。オフィスにあるマシンは、家庭にあるマシンよりも、メモリとコンピューティング能力が大きく、より優れたマシンです。その場合、オフィスマシンでシミュレーションを実行し、結果のファイルをオフィスマシンに接続されたディスクに保存することがよくあります。作業中にこれらの結果を表示するには、 paraview を起動してデータファイルを開くだけです。では、自宅で可視化とデータ分析を行う必要がある場合はどうすればよいでしょうか。いくつかのオプションがあります。
データファイルをホームマシンにコピーし、
paraviewを使用して可視化することができます。しかし、これは退屈な作業です。ファイルを常に手動でコピー/更新しなければならないだけでなく、マシンの計算能力と利用可能なメモリが減少しているため、マシンのパフォーマンスが低下しています。Remote Desktop や VNC のようなデスクトップ共有システムを使うこともできますが、ネットワークの接続状況によってはうまくいかないことがあります。
または、ParaView のリモート処理機能を使用することもできます。コンセプトはかなりシンプルです。pvserver (ワークマシン上で動作する)と paraview client (ホーム・マシン上で実行され)という2つのプロセスがあります。ソケット(必要に応じてSSHトンネル上で)を介して互いに通信します。このモードで paraview を使用するという点では、これまでの使用方法と同じです。パイプラインを作成し、それらのパイプラインによって生成されたデータをビューなどで確認します。ただし、パイプライン自体は pvserver プロセス上にリモートで作成されます。したがって、パイプラインは作業マシン上のディスクにアクセスできます。実際には、Open File ダイアログは、作業マシン、つまり pvserver が実行されているマシン上のファイルシステムを参照します。可視化パイプラインで作成したフィルタは、pvserver で実行されます。
すべてのデータ処理は pvserver で実行されますが、レンダリングに関しては、paraview はサーバプロセスでレンダリングを実行してイメージのみをクライアントに配信するように構成することも(リモートレンダリング)、クライアントにレンダリングするジオメトリを配信してローカルでレンダリングするように構成することもできます(ローカルレンダリング)。リモートレンダリングでは、作業マシンのグラフィックス機能を使用します( pvserver を実行しているマシン)。新しいレンダリングを取得する必要があるたびに(たとえば、パイプラインパラメータを変更したり、カメラを操作する場合などです。)、pvserver プロセスは新しいイメージを再レンダリングしてクライアントに配信します。ローカルレンダリングでは、レンダリングされるジオメトリがクライアントに配信され、クライアントがそれらをローカルにレンダリングします。したがって、すべてのインタラクションがサーバー側の処理を必要とするわけではありません。可視化パイプラインが更新されたときのみ、サーバーは更新された形状をクライアントに配信する必要があります。
8.2. paraview でのリモート可視化
8.2.1. リモートサーバーの起動
リモートデータ処理および可視化に ParaView を使用するには、まずリモートシステムでサーバーアプリケーション pvserver を起動する必要があります。これを行うには、シェルを使用してリモートシステムに接続し、次のコマンドを実行します。
> pvserver
端末に次の起動メッセージが表示されます。
Waiting for client...
Connection URL: cs://myhost:11111
Accepting connection(s): myhost:11111
これは、サーバーが起動し、クライアントからの接続を待機していることを意味します。
8.2.2. サーバー接続の構成
paraview を使用してこのサーバーに接続するには クライアントで、 File > Connect を選択するか、 をクリックします ツールバーのアイコンをクリックして、
Choose Server Configuration ダイアログを表示します。
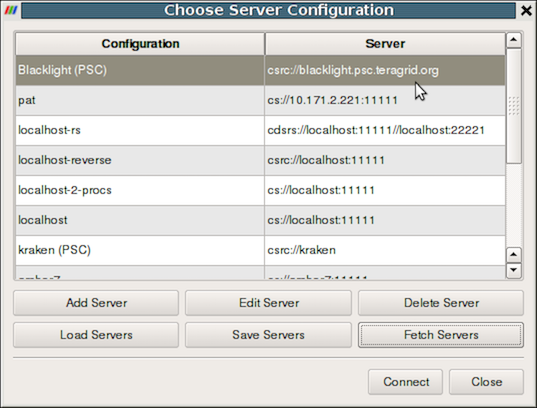
図 8.12 Choose Server Configuration ダイアログはサーバに接続するために使用されます。
Common Errors
サーバーがファイアウォールの内側にあり、ファイアウォールの外側から接続しようとしている場合は、接続が正常に確立されていない可能性があります。逆方向の接続も試してみてください ( 8.4 章)。ファイアウォールの回避策として使用します。ネットワーク接続に問題がある場合は、ネットワークマネージャに問い合わせてください。
図 8.12 は、リモートサーバー用の多数のエントリを含む Choose Server Configuration ダイアログを示しています。この図では、いくつかのサーバーがすでに構成されていますが、このダイアログを最初に開いたときには、このリストは空になります。リモートサーバーに接続する前に、Add Server ボタンをクリックしてリストにエントリを追加する必要があります。これを行うと、図 8.13 のように Edit Server Configuration ダイアログが表示されます。
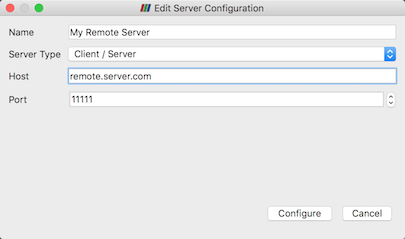
図 8.13 Edit Server Configuration ダイアログは、リモートサーバに接続するための設定を行うために使用します。
接続の名前、サーバーの種類、サーバーを起動したホストのDNS名、およびポートを設定する必要があります。デフォルトの Server Type はClient/Serverに設定されています。これは、サーバーがクライアントからの着信接続を待機していることを意味します。この設定には、後で説明するその他のオプションがいくつかあります。
完了したら、 Configure ボタンをクリックします。図 8.14 に示すように、サーバーの起動方法を指定する別のダイアログが表示されます。サーバーを手動で起動したため、 Startup Type はデフォルトの Manual 設定のままにします。オプションで、 Startup Type を Command に設定し、外部シェルコマンドを指定してサーバープロセスを起動できます。
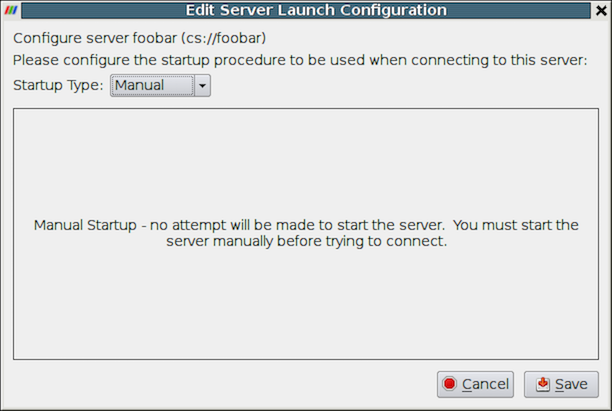
図 8.14 サーバを手動で設定します。ParaViewの外部で起動する必要があります。
Save ボタンをクリックすると、この特定のサーバ構成が保存され、後で使用できるようになります。サーバのリストからエントリを選択し、 Choose Server Configuration ダイアログの Edit Server ボタンをクリックすると、サーバ構成を編集できます。削除するには、 Delete ボタンをクリックします。
サーバ構成は、 Choose Server Configuration ダイアログからインポートおよびエクスポートできます。 Load Servers ボタンを使用してサーバ構成ファイルをロードし、 Save Servers ボタンを使用してサーバ構成ファイルを保存します。同じリモートサーバーにアクセスするために、他のユーザーとファイルを交換できます。
Did you know?
Visualization Centerでは、システム全体のサーバ構成をWebサーバ上で提供できるため、専門家でなくても構成済みの ParaView サーバを簡単に選択できます。これらのサイト全体の設定は、Fetch Servers ボタンでロードできます。上級者は、自分のサーバーをより詳細に指定することもできます。これらの機能は、ParaView Server Configuration file (8.5 章)によって提供されます。
8.2.3. リモートサーバーの接続
サーバに接続するには、設定リストから設定したサーバ構成を選択し、、必要に応じてタイムアウトのコンボボックスでタイムアウトを変更し、 Connect をクリックします。ParaViewは、成功するかタイムアウトに達するまで、サーバーへの接続を試みます。その場合は、必要に応じて再試行すればよいでしょう。接続ステップが成功すると、接続が完了し、可視化パイプラインを構築する準備が整います。
Common Errors
ParaViewは、クライアントがサーバーに接続しようとしたときに認証を行いません。そのため、外部に公開されているコンピュータリソースでは pvserver を実行しないことをお勧めします。
ParaViewでは、クライアントとサーバー間で送信されるデータも暗号化されません。データが機密性の高いものである場合は、適切なネットワークセキュリティ対策が講じられていることを確認してください。一般的なアプローチは、ネイティブのSSHサポートを使用して、サーバーの設定ファイル内でSSHトンネルを使用することです (8.5.16 章)。
8.2.4. 複数のクライアント管理
pvserver は、同時に複数のクライアントからの接続を受け付けるように構成できます。 この場合、マスターと呼ばれる1つだけがパイプラインと対話できます。他のクライアントはデータを可視化することしかできません。Collaboration Panel は、接続されているクライアント間で情報を共有します。
このモードを有効にするには、pvserver を --multi-clients フラグで起動する必要があります。
pvserver --multi-clients
リモートサーバーに多数のユーザーがアクセスできる場合は、アクセスを制限できます。 これは、接続IDを使用して実行できます。 クライアントに接続先のサーバと同じconnect-idがない場合は、 connect-idの入力を求められます。 マスターの場合は、 Collaboration Panel でconnect-idを変更できます。
connect-idの初期値は、例えば --connect-id フラグで pvserver (とそれぞれ paraview )を起動することで設定できます。
pvserver --connect-id=147
また、たとえば単独で作業できるように、 Collaboration Panel で以降の接続を無効にすることもできます。準備ができたら、他のユーザが pvserver に接続してビジュアル化を共有できるようにします。これは、pvserver が --multi-clients--disable-further-connections で起動されたときのデフォルトの機能です。
8.2.5. クライアント/サーバー可視化パイプラインのセットアップ
paraview を使用する リモートサーバーに接続している場合は、デフォルトのスタンドアロンモードで使用している場合と何ら変わりはありません。 ユーザーインターフェイスに関する唯一の違いは、 Pipeline Browser が接続しているサーバーの名前を反映していることです。  の隣のサーバー接続のアドレス アイコンが
 builtin から cs://myhost:11111 に変わります。
データ処理パイプラインはサーバー側で実行されるため、すべてのファイル入出力はサーバー側でも行われます。したがって、 Open File ダイアログは、新しいデータファイルを開くときに、paraview クライアントではなく、pvserver 実行ファイルに対してローカルなファイルシステムを参照します。
8.3. pvpython でのリモート可視化
pvpython 実行ファイルは、ローカルデータを可視化するために単独で使用できますが、リモートの pvserver に接続するクライアントとしても機能します。pvpython でパイプラインを作成する前に、Connect 関数を使用します。
# Connect to remote server "myhost" on the default port, 11111
>>> Connect("myhost") # Connect to remote server "myhost" on a
                      # specified port
>>> Connect("myhost", 11111)
これで、新しいソースが作成されると、ソースによって生成されるデータはサーバ上に置かれます。pvpython の場合、すべてのデータはサーバー上に残り、イメージもサーバー上で生成されます。イメージは、表示またはローカル・ファイル・システムへの保存のためにクライアントに送信されます。
8.4. 逆方向接続
リモートコンピューティングリソースがネットワークファイアウォールの内側に配置されている場合が多く、ファイアウォールの外側にあるクライアントをその内側にあるサーバに接続することが困難になります。ParaView では、接続の確立時に通常のクライアントサーバの役割を逆にする逆方向接続(reverse connection)を設定できます。
リモート接続を使用するには、2つの手順を実行する必要があります。まず、paraview で、新しい接続を逆に設定された接続タイプで構成する必要があります。これを行うには、File > Connect メニュー項目から Choose Server Configuration ダイアログを開きます。新しい接続を追加し、 Name を myhost (reverse) に設定し、 Server Type に Client / Server (reverse connection) を選択します。 Configure をクリックします。表示される Edit Server Launch Configuration ダイアログで、 Startup Type を Manual に設定します。構成を保存します。次に、この構成を選択し、 Connect をクリックします。クライアントがサーバーからの接続を待っていることを示すメッセージウィンドウが表示されます。
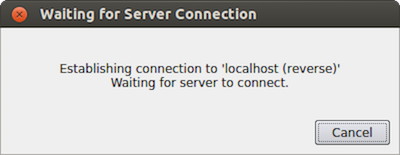
図 8.15 クライアントがサーバーからの接続を待っていることを示すメッセージ・ウィンドウ
2番目に、pvserver は --reverse-connection (-rc ) フラグで起動しなければなりません。pvserver にクライアントの名前を伝えるには、コマンドライン引数 --client-host (-ch ) を\paraview クライアントが実行されているマシンのホスト名に設定します。--server-port (-sp ) コマンドライン引数でポートを指定できます。
pvserver -rc --client-host=mylocalhost --server-port=11111
サーバーが起動すると、クライアントへの接続の成功または失敗を示すメッセージが出力されます。接続に成功すると、シェルに次のテキストが表示されます。
Connecting to client (reverse connection requested)...
Connection URL: csrc://mylocalhost:11111
Client connected.
Did you know?
Most connection related command line option can be set using a server settings file, as described in this section: 14.3.2 章
pvpython の pvserver からの逆接続を待つには、Connect ではなく ReverseConnect を使います。
# To wait for connections from a 'pvserver' on the default port 11111
>>> ReverseConnect()

# Optionally, you can specify the port number as the argument.
>>> ReverseConnect(11111)
8.5. ParaView Server 設定ファイル
Choose Server Configuration ダイアログでは、専用ボタンを使用して Load Servers と Save Servers を行うことができます。 サーバー構成は、ParViewサーバー構成ファイル(.pvsc)に保存されます。
これらのファイルにより、サーバー接続プロセスを大幅にカスタマイズできます。起動時に、ParaViewはデフォルトでロードするサーバー設定をいくつかの場所から探します。
- UnixベースのシステムおよびmacOSの場合
ParaViewの実行ディレクトリにある
default_servers.pvsc(実行ディレクトリを特定するには、ls -l /proc//exeを実行してください)under each of
XDG_DATA_DIRS, looking forParaView/servers.pvsc./usr/local/share/ParaView/servers.pvscor/usr/share/ParaView/servers.pvsc$HOME/.config/ParaView/servers.pvsc(ParaViewはユーザー定義のサーバーをここに保存します)
- Windowsの場合
ParaViewの実行ディレクトリにある
default_servers.pvscを参照してください%COMMON_APPDATA%\ParaView\servers.pvsc%APPDATA%\ParaView\servers.pvsc(ParaViewはユーザー定義のサーバーをここに保存します。)
The exact procedure to find the writable directory is detailed in 14.4 章.
ここでは、一般的な使用例をいくつか紹介します。
8.5.1. ケース1:シンプルなコマンドサーバーの起動
このケースでは、ローカルで起動された pvserver (localhost) に 11111 ポートで接続しています。ただし、サーバーを起動するコマンドは、サーバーに接続する直前に自動的に呼び出されるので、接続を中止する前に timeout 秒間待機します。
<Server name="case01" resource="cs://localhost:11111" timeout="10">
  <CommandStartup>
    <Command process_wait="0" delay="5" exec="/path/to/pvserver"/>
  </CommandStartup>
</Server>
ここで、CommandStartup 要素は、サーバーに接続する前に、あるコマンドを実行することを指定します。これには、 process_wait 、パラビューがプロセスの開始を待つ時間(秒)、 delay 、コマンド実行後にパラビューが接続を試みるまでの時間(秒)、最後に exec が含まれます。
8.5.2. ケース2:シンプルなリモートサーバー接続
このケースでは、"amber1" という名前のノードで実行されているシンプルなサーバー接続( pvserver プロセスへの接続)の設定を、ポート20234で行っています。pvserver プロセスは、ユーザーが手動で起動します。
<Server name="case02" resource="cs://amber1:20234">
  <ManualStartup/>
</Server>
ここで、name は、パイプラインブラウザに表示されるサーバの名前を指定し、resource は、接続のタイプ(cs -- クライアントサーバを意味する)、ホスト名、ポートを指定します。リソースにポート番号(例:20234)が指定されていない場合は、デフォルトのポート番号(例:1111)が使用されます。ユーザーは手動で pvserver プロセスを起動するので、ここでは ManualStartup を使用します。
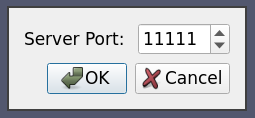
8.5.3. ケース3:ユーザーが指定したポートでのサーバー接続
これはケース2と同じですが、pvserver に接続するためのポート番号を毎回ユーザーに尋ねることにしています。
<Server name="case03" resource="cs://amber1">
  <ManualStartup>
    <Options>
      <Option name="PV_SERVER_PORT" label="Server Port: ">
        <Range type="int" min="1" max="65535" step="1" default="11111" />
      </Option>
    </Options>
  </ManualStartup>
</Server>
ここでは、唯一の違いは Options 要素です。この要素は、ユーザーがサーバーに接続する際に指定するランタイムオプションを指定するために使用されます。利用可能なランタイムオプションのリストについては、本節を参照してください。この例では、ポート番号を選択するための積分スピンボックスをユーザに表示したいので、オプションのタイプを指定するために Range 要素を使用しています。ユーザーがこのサーバーに接続すると、次の画像のようなダイアログが表示されます。
8.5.4. ケース4 :データサーバー/レンダーサーバーへのシンプルな接続
これはケース2と同じですが、単一のサーバー(例: pvserver )の代わりに、 pvdataserver がamber1のポート20230で動作し、 pvrenderserver がノードamber2のポート20233で動作する、別々のレンダーサーバー/データサーバーに接続しています。
<Server name="case04" resource="cdsrs://amber1:20230//amber2:20233">
  <ManualStartup />
</Server>
ケース2との唯一の違いは、 resource の仕様です。cdsrs は、クライアント-データサーバ-レンダーサーバの構成であることを示しています。最初の host:port ペアがデータサーバーで、2番目のものがレンダーサーバーです。
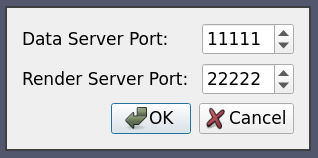
8.5.5. ケース5:ユーザーが指定したサーバーポートを持つデータサーバー/レンダーサーバーへの接続
これは、ケース3とケース4を組み合わせたもので、レンダリングサーバーとデータサーバーの両方のポート番号をユーザーに尋ねるものです。
<Server name="case05" resource="cdsrs://localhost//localhost">
  <ManualStartup>
    <Options>
      <Option name="PV_DATA_SERVER_PORT" label="Data Server Port: ">
        <Range type="int" min="1" max="65535" step="1" default="11111" />
      </Option>
      <Option name="PV_RENDER_SERVER_PORT" label="Render Server Port: ">
        <Range type="int" min="1" max="65535" step="1" default="22222" />
      </Option>
    </Options>
  </ManualStartup>
</Server>
このXMLは、すでに説明したように、非常にわかりやすいものです。このXMLによって生成されるオプションダイアログは次のようになります:
8.5.6. ケース6: 逆接続
デフォルトでは、クライアントはサーバープロセスに接続します。しかし、paraviewクライアントに、代わりにサーバーからの接続を待つように指示することができます。これを逆接続と呼びます。このような場合、サーバープロセスは --reverse-connection または --rc フラグを付けて起動しなければなりません。
サーバー構成のxmlで逆接続を示すには、 resource プロトコル部分のサフィックスを rc (reverse connection:逆接続)にするだけです。
resource="csrc://localhost" -- connect to pvserver on localhost using reverse connection
resource="cdsrsrc://localhost//localhost" -- connect to pvdataserver/pvrenderserver using reverse connection.
そのため、ケース1と同様のシンプルなローカル逆接続サーバーの構成は次のようになります。
<Server name="case06" resource="csrc://localhost:11111">
  <CommandStartup>
    <Command exec="/path/to/pvserver --reverse-connection --client-host=localhost"/>
  </CommandStartup>
</Server>
ここでは、 exec の中の --client-host=localhost は、実際には必要ありません。
8.5.7. ケース7:オプション付きサーバーコマンド
事例1で見たように、サーバーは接続時にParaViewが起動しますが、これを事例3で見たように Option 要素と組み合わせることで、動的に生成されるサーバーコマンドを作成することができます。
<Server name="case07" resource="cs://localhost">
  <CommandStartup>
    <Options>
      <!-- The user chooses the port on which to start the server -->
      <Option name="PV_SERVER_PORT" label="Server Port: ">
        <Range type="int" min="1" max="65535" step="1" default="11111" />
      </Option>
    </Options>
    <Command delay="5" exec="/path/to/pvserver">
      <Arguments>
        <Argument value="--server-port=$PV_SERVER_PORT$" />
      </Arguments>
    </Command>
  </CommandStartup>
</Server>
ケース1と同様に、CommandStartup と Command 要素を使用しています。コマンドライン引数は、 Arguments 要素を使って、実行されるコマンドに渡すことができます。$name$ として指定されたすべてのランタイム環境変数は、実際の値に置き換えられます。例えば、この例では、 $PV_SERVER_PORT$ が、オプションダイアログでユーザーが選択したポート番号に置き換えられます。
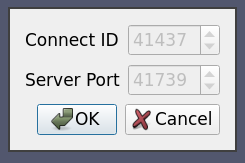
8.5.8. ケース8:connection-idとランダムポートの使用
多くの場合、サーバクラスタでは、異なるユーザに対して複数のpvserver(またはpvdataserver/pvrenderserver)プロセスを実行していることがあります。そのような場合、サーバーとクライアントの間である程度の認証が必要になります。これは(非常に基本的なレベルではありますが)connect-idオプションで実現できます。サーバプロセスの起動時にコマンドラインで指定された場合( --connect-id を使用)、サーバは同じ接続IDを報告したクライアントだけに接続を許可します。
また、他のユーザーとのポート衝突を避けたいので、サーバー接続にはランダムなポートを使用しています。
以下は、ケース7と同様の例ですが、connect-idオプションとランダムなサーバーポートを使用しています。
<Server name="case08" resource="cs://localhost">
  <CommandStartup>
    <Options>
      <Option name="PV_CONNECT_ID" label="Connect ID" readonly="true">
        <Range type="int" min="1" max="65535" default="random" />
      </Option>
      <Option name="PV_SERVER_PORT" label="Server Port" readonly="true">
        <Range type="int" min="11111" max="65535" default="random" />
      </Option>
    </Options>
    <Command exec="/path/to/pvserver" delay="5">
      <Arguments>
        <Argument value="--connect-id=$PV_CONNECT_ID$" />
        <Argument value="--server-port=$PV_SERVER_PORT$" />
      </Arguments>
    </Command>
  </CommandStartup>
</Server>
In this case, the readonly attribute on the Option indicates that the value cannot be changed by the user, it is only shown for information purposes.
The default value for the PV_CONNECT_ID and PV_SERVER_PORT is set to random so that ParaView makes up a value at run time.
Of course, in a production environment they should be assigned by user instead of randomly generated.
8.5.9. ケース9:sshによるサーバの起動
この使用例では、特別に細工されたsshコマンドを使用して、あるリモートホスト上でサーバプロセスが生成されます。ユーザーがsshの実行ファイルを指定できるようにします。また、ユーザーが毎回入力しなくてもいいように、ParaViewのセッション全体でssh実行ファイルのパスを保持したいと考えています。
<Server name="case09" resource="cs://localhost:11111">
  <CommandStartup>
    <Options>
      <Option name="SSH_USER" label="SSH Username" save="true">
        <!-- choose the username. Since 'save' is true, this value will
             be maintained across sessions -->
        <String default="user" />
      </Option>
      <Option name="SSH_EXE" label="SSH Executable" save="true">
        <!-- select the SSH executable. Since 'save' is true, this value will
             also be maintinaed across sessions -->
        <File default="ssh" />
      </Option>
    </Options>
    <Command exec="$SSH_EXE$" delay="5">
      <Arguments>
        <Argument value="-L8080:amber5:11111" /> <!-- port forwarding -->
        <Argument value="amber5" />
        <Argument value="-l" />
        <Argument value="$SSH_USER$" />
        <Argument value="/path/to/pvserver" />
      </Arguments>
    </Command>
  </CommandStartup>
</Server>

ここで、 exec 属性の値が $SSH_EXE$ に設定されていることに注意してください。そのため、ユーザーが選択した ssh 実行ファイルに置き換えられます。Option``要素のオプション属性 save を使用して、ユーザーが選択した値をParaViewのセッション全体で保存するようにParaViewに指示します。これにより、ユーザーはこのサーバーに接続するたびに、ユーザー名とssh実行ファイルを入力する必要がなくなります。
Did you know?
While SSH connection can be started by crafting the command, ParaView
now support SSH connection natively by specifying a SSHCommand, see below
for more information.
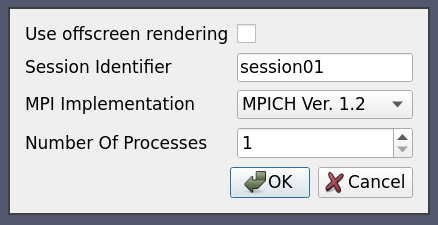
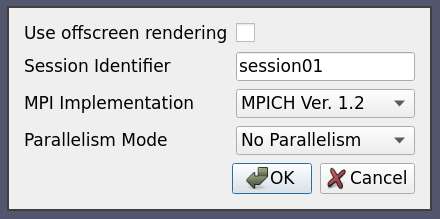
8.5.10. ケース 10:ユーザーが設定可能なカスタムオプションを持つカスタムスクリプトを使用したサーバーの起動
この例では、サーバー構成の全機能を説明します。例えば、サーバープロセスを開始するために複数の引数を取るカスタムスクリプト "MyServerStarter" があるとします。この設定を使って接続しようとしたときに、ユーザーがこれらの引数の値を設定できるようにしたいとします。例として、MyServerStarterが次のような引数を取るとします。
force-offscreen-rendering-- オフスクリーンレンダリングの使用を示す
--force-onscreen-rendering-- 画面上でのレンダリングを指示する(--force-offscreen-renderingがないことから推測できるが、ここでは例として使用している)
--session-name=<string>-- セッションを識別する何らかの文字列
--mpitype=<mpich1.2|mpich2|openmpi>-- 利用可能なMPI実装の中から選択する
--num-procs=<num>-- number of server processes
--server-port-- pvserverプロセスに渡されるポート番号
これらはすべて(-server-portを除く)、接続時にユーザーが設定できる必要があります。これは以下のように実現できます:
<Server name="case10" resource="cs://localhost">
  <CommandStartup>
    <Options>
      <Option name="OFFSCREEN" label="Use offscreen rendering">
        <Boolean true="--use-offscreen" false="--use-onscreen" default="false" />
      </Option>
      <Option name="SESSIONID" label="Session Identifier">
        <String default="session01"/>
      </Option>
      <Option name="MPITYPE" label="MPI Implementation">
        <Enumeration default="mpich1.2">
          <Entry value="mpich1.2" label="MPICH Ver. 1.2" />
          <Entry value="mpich2" label="MPICH Ver 2.0" />
          <Entry value="openmpi" label="Open MPI" />
        </Enumeration>
      </Option>
      <Option name="NUMPROC" label="Number Of Processes">
        <Range type="int" min="1" max="256" step="4" default="1" />
      </Option>
    </Options>
    <Command exec="/path/to/MyServerStarter" delay="5">
      <Arguments>
        <Argument value="--server-port=$PV_SERVER_PORT$" />
        <Argument value="--mpitype=$MPITYPE$" />
        <Argument value="--num-procs=$NUMPROC$" />
        <Argument value="$OFFSCREEN$" />
        <Argument value="--session-name=$SESSIONID$" />
      </Arguments>
    </Command>
  </CommandStartup>
</Server>
各 Option は新しいランタイム変数を定義します。このランタイム変数は Command セクションの ${name}$ としてアクセスすることができます。この設定で接続しようとすると、以下のようなオプションダイアログが表示されます。
これは、サーバ管理者の必要に応じて、sshやバッチスケジューラなどを使用してサーバプロセスを開始するように拡張することができます。また、リバース接続を使用するように設定することもできます(リソース属性のプロトコルを変更することで)
8.5.11. ケース11:ケース10+スイッチステートメント
これはケース10と同じですが、1つだけ変更点があります。ユーザーがプロセス数を選択できないようにしました。代わりに、distribution comboboxの値に基づいてプロセス数が自動的に選択されます。
<Server name="case11" resource="cs://localhost">
  <CommandStartup>
    <Options>
      <Option name="OFFSCREEN" label="Use offscreen rendering">
        <Boolean true="--use-offscreen" false="--use-onscreen" default="false" />
      </Option>
      <Option name="SESSIONID" label="Session Identifier">
        <String default="session01"/>
      </Option>
      <Option name="MPITYPE" label="MPI Implementation">
        <Enumeration default="mpich1.2">
          <Entry value="mpich1.2" label="MPICH Ver. 1.2" />
          <Entry value="mpich2" label="MPICH Ver 2.0" />
          <Entry value="openmpi" label="Open MPI" />
        </Enumeration>
      </Option>
      <Option name="DISTRIBUTION" label="Distribution Mode">
        <Enumeration default="notDistributed">
          <Entry value="notDistributed" label="Not Distributed" />
          <Entry value="someDistribution" label="Some Distribution" />
          <Entry value="highDistribution" label="Highly Distributed" />
        </Enumeration>
      </Option>
      <Switch name="DISTRIBUTION">
        <Case value="notDistributed">
          <Set name="NUMPROC" value="1" />
        </Case>
        <Case value="someDistribution">
          <Set name="NUMPROC" value="2" />
        </Case>
        <Case value="highDistribution">
          <Set name="NUMPROC" value="10" />
        </Case>
      </Switch>
    </Options>
    <Command exec="/path/to/MyServerStarter" delay="5">
      <Arguments>
        <Argument value="--server-port=$PV_SERVER_PORT$" />
        <Argument value="--mpitype=$MPITYPE$" />
        <Argument value="--num-procs=$NUMPROC$" />
        <Argument value="$OFFSCREEN$" />
        <Argument value="--session-name=$SESSIONID$" />
      </Arguments>
    </Command>
  </CommandStartup>
</Server>
Switch 文は、子として Case 文しか持つことができず、一方、 Case 文は、子として Set 文しか持つことができません。Set ステートメントは、値が固定されていて、ユーザーがその値を設定するように促されないことを除けば、Option とあまり変わりません。
8.5.12. ケース12:シンプルなSSH run serverコマンド
もし、Command 要素でSSHコマンドを作成できるようになったとしても、それは非常に複雑で、ParaViewのパイプラインブラウザでは、sshトンネルを介して接続される可能性があるため、正しいサーバーが表示されないことがあります。
ここでは、ケース1と同様に、ネイティブの ssh サポートを使用して、デフォルトポートで直接接続する前に、amber1上で pvserver プロセスをリモートで起動します。
<Server name="case12" resource="cs://amber1">
  <CommandStartup>
    <SSHCommand exec="/path/to/pvserver" delay="5">
      <SSHConfig user="user"/>
    </SSHCommand>
  </CommandStartup>
</Server>
まず、Command の代わりに SSHCommand 要素が使われ、ParaViewがネイティブのsshサポートを使用することを認識します。次に、ssh接続を設定するために、SSHConfig 要素を使用します。user 属性は、SSHで使用するSSHユーザーです。パスワードが必要な場合は、ParaViewを実行するためのターミナルでパスワードを求められますが、これは場合によっては表示されないことがあります。
8.5.13. Case Thirteen: 複雑な設定のSSH run serverコマンド
ここでは、ケース12と同様に、ネイティブのsshサポートを使用して、amber1上のpvserverプロセスをリモートで起動してから直接接続していますが、使用する構成をより具体的に指定しています。
<Server name="case13" resource="cs://amber1">
  <CommandStartup>
    <Options>
      <!-- The user chooses the port on which to start the server -->
      <Option name="PV_SERVER_PORT" label="Server Port: ">
        <Range type="int" min="1" max="65535" step="1" default="11111" />
      </Option>
    </Options>
    <SSHCommand exec="/path/to/pvserver" delay="5">
      <SSHConfig user="user" port="2222">
        <Terminal exec="/usr/bin/xterm"/>
        <SSH exec="/usr/bin/ssh"/>
      </SSHConfig>
      <Arguments>
        <Argument value="--server-port=$PV_SERVER_PORT$"/>
      </Arguments>
    </SSHCommand>
  </CommandStartup>
</Server>
Inside the SSHConfig element, we use different elements.
First, we added a port attribute to specify which port to use, using the -p option of the SSH command.
Here, Terminal element is used to specify that ParaView will try to open a terminal to ask the
user for his password. Here, the terminal executable is specified using the exec attribute.
If it was not, ParaView would try to find one automatically (Linux and Windows).
On Linux and macOS, it is possible to specify the command_option to use with the terminal executable.
This is needed when using gnome-terminal, eg: <Terminal exec="/usr/bin/gnome-terminal" command_option="--"/>
When troubleshooting server configuration, not using Terminal element is suggested
as the terminal will close as soon as the command finish executing.
On Linux, it is also possible to replace the Terminal element by the AskPass element
to specify the ParaView should use SSH_ASKPASS so that a ask-pass binary is used when asking
for the SSH password.
Finally, the SSH element specify the SSH binary to use thanks to its exec attribute.
We also use PV_SERVER_PORT, similarly to case seven to let the user select the port to connect to.
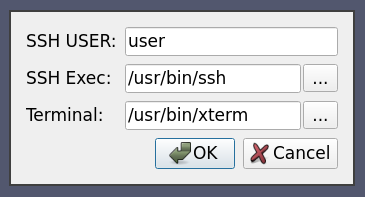
8.5.14. ケース14:ユーザーが選択したコンフィグを使ったSSHランサーバーコマンド
ここでは、ケース13とケース5と同様に、ネイティブのsshサポートを使用して、amber1上のpvserverプロセスをリモートで起動してから直接接続していますが、ユーザにいくつかのSSHオプションを対話的に選択させています。
<Server name="case14" resource="cs://amber1">
  <CommandStartup>
    <Options>
      <Option label="SSH USER:" name="SSH_USER" save="true">
        <String default="user"/>
      </Option>
      <Option label="SSH Exec:" name="SSH_EXEC" save="true">
        <File default="/usr/bin/ssh" />
      </Option>
      <Option label="Terminal:" name="TERMINAL" save="true">
        <File default="/usr/bin/xterm"/>
      </Option>
    </Options>
    <SSHCommand exec="/path/to/pvserver" delay="5">
      <SSHConfig user="$SSH_USER$">
        <Terminal exec="$TERMINAL$"/>
        <SSH exec="$SSH_EXEC$"/>
      </SSHConfig>
      <Arguments>
        <Argument value="--server-port=$PV_SERVER_PORT$"/>
      </Arguments>
    </SSHCommand>
  </CommandStartup>
</Server>
他のすべてのオプションと同様に、SSH 関連のオプションもユーザが対話的に設定できます。ここでは、ssh で接続する際に使用する SSH ユーザー、SSH 実行ファイル、および Terminal 実行ファイルをユーザーが設定できるようにしています。
8.5.15. ケース15:逆接続でのSsh run serverコマンド
ケース12と13と同様に、ネイティブのsshサポートを使用して、amber1上でリモートで逆接続のpvserverプロセスを開始し、そのプロセスがクライアントのホスト名を使用して、静的な非デフォルトポートでParaViewに接続するようにします。
<Server name="case15" resource="csrc://amber1:11112">
  <CommandStartup>
    <SSHCommand exec="/path/to/pvserver" delay="5">
      <SSHConfig user="user">
        <Terminal/>
      </SSHConfig>
      <Arguments>
        <Argument value="--reverse-connection"/>
        <Argument value="--client-host=$PV_CLIENT_HOST$"/>
        <Argument value="--server-port=$PV_SERVER_PORT$"/>
      </Arguments>
    </SSHCommand>
  </CommandStartup>
</Server>
The only difference with case twelve is in the resource, which now contain the reverse connection
as well as the usage of $PV_CLIENT_HOST$ in the arguments for the reverse connection,
automatically set to the hostname of the client which the server should be able to resolve to an ip
to connect to.
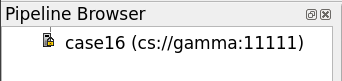
8.5.16. Case Sixteen: Secured Connection to a Server through SSH tunnel
To communicate securely through a ssh tunnel, something usually done with a crafted command looking like this:
ssh -L local_port:localhost:server_port user@remote /path/to/pvserver --server-port server_port
You would then connect on a server on localhost:local_port within ParaView.
This is complex to set up either manually of with a Command element. Also,
the true server and port will not appear in the pipeline browser in ParaView.
This is however natively supported with SSHCommand element.
Here we create a secured SSH tunnel to amber1 before connecting through the SSH tunnel on
the 11111 port, the local ParaView client internally uses the 8080 port.
<Server name="case16" resource="cs://amber1:11111">
  <CommandStartup>
    <SSHCommand exec="/path/to/pvserver" delay="5">
      <SSHConfig user="user">
        <Terminal/>
        <PortForwarding local="8080"/>
      </SSHConfig>
      <Arguments>
        <Argument value="--server-port=$PV_SERVER_PORT$"/>
      </Arguments>
    </SSHCommand>
  </CommandStartup>
</Server>
Similarly to case thirteen, we only add a PortForwarding element in the SSHConfig element with the optional local attribute port,
so that ParaView creates a SSH tunnel to connect through.
If local attribute is not specified, the server port will be used.
The $PV_SERVER_PORT$ is automatically set to the value of the port to use within the SSH tunnel.
In ParaView, the tunnel will be integrated nicely in the UI with the correct port and hostname in the pipeline browser,
the server icon will look different with a small lock to note the secured nature of this connection:
8.5.17. Case Seventeen: Secured Reverse Connection from a HPC node through SSH tunnel running on a gateway
Similarly to case sixteen, a reverse connection through a SSH tunnel would require to craft a command like this one:
ssh -R server_port:localhost:local_port user@gateway /path/to/submit_script_pvserver.sh --reverse-connection --client-host gateway --server-port server_port
We assume submit_script_pvserver.sh is a shell script that will request and connect to a HPC node and then execute pvserver with
the bash arguments of the script.
That would connect to an already waiting ParaView client ready for a reverse connection server on localhost:local_port.
This is complex to set up either manually or with a Command element.
Also, the true server host and port will not appear in the pipeline browser in ParaView.
This is however natively supported with SSHCommand.
Here we create a reverse secured SSH tunnel to gateway, in order to run a submission script which will then, access a compute node and reverse connect
to the client through the SSH tunnel running on the gateway, using port 11115.
The local ParaView client internally uses the 8080 port.
Please note the SSH server on the gateway must have GatewayPort yes in its configuration.
<Server name="case17" resource="csrc://gateway:11115">
  <CommandStartup>
    <SSHCommand exec="/path/to/submit_script_pvserver.sh" delay="5">
      <SSHConfig user="user">
        <Terminal/>
        <PortForwarding local="8080"/>
      </SSHConfig>
      <Arguments>
        <Argument value="--reverse-connection"/>
        <Argument value="--client-host=gateway"/>
        <Argument value="--server-port=$PV_SERVER_PORT$"/>
      </Arguments>
    </SSHCommand>
  </CommandStartup>
</Server>
This is very similar to case sixteen, the main differences being the usage of the csrc resource style for the reverse connection
and the unspecified shell script that will run pvserver on a compute node, and, of course, the arguments to trigger the reverse connection
on the pvserver.
8.5.18. Case Eighteen: Secured Reverse Connection from a HPC node through SSH tunnel running on a gateway using random or user-specified port
Similarly to case seventeen, a reverse connection through a SSH tunnel would require to craft a command like this one:
ssh -R server_port:localhost:local_port user@gateway /path/to/submit_script_pvserver.sh --reverse-connection --client-host gateway --server-port server_port
However, it can be very useful to be able to generate random port in a dedicated range for both local_port and server_port or to let
the user specify them. This is supported thanks to the option mechanism described in case eight.
<Server name="case17" resource="csrc://gateway">
  <CommandStartup>
    <Options>
      <Option name="PV_SERVER_PORT" label="Server Port" readonly="false">
        <Range type="int" min="11111" max="65535" default="random" />
      </Option>
      <Option name="PV_SSH_PF_SERVER_PORT" label="Port forwarding Port" readonly="true">
        <Range type="int" min="8000" max="8888" default="random" />
      </Option>
    </Options>
    <SSHCommand exec="/path/to/submit_script_pvserver.sh" delay="5">
      <SSHConfig user="user">
        <Terminal/>
        <PortForwarding/>
      </SSHConfig>
      <Arguments>
        <Argument value="--reverse-connection"/>
        <Argument value="--client-host=gateway"/>
        <Argument value="--server-port=$PV_SERVER_PORT$"/>
      </Arguments>
    </SSHCommand>
  </CommandStartup>
</Server>
This is very similar to case seventeen, the main differences are that the server port and forwarding port are not set explicitly but instead
we rely on the options mechanism to provide them through PV_SERVER_PORT and PV_SSH_PF_SERVER_PORT variables.
Did you know?
SSHのネイティブサポートにより、設定ファイルを簡素化することができますが、いくつかのケースはまだカバーされておらず、複雑なカスタムコマンドが必要になります。クライアント/データサーバー/レンダーサーバーのSSHセットアップはネイティブにはサポートされておらず、ネストされたSSHトンネルもネイティブにはサポートされていません。このような設定を行うには、複雑なコマンドを使用する必要があります。
8.5.19. PVSCファイルXMLスキーマ
これが完全なPVSCファイルのXMLスキーマです
<Servers>タグはドキュメントのルート要素で、0対多の<Server>タグを含んでいます。各
<Server>タグは、設定されたサーバーを表します。
name属性は、サーバー構成を一意に識別するためのもので、ユーザーインターフェースに表示されます。
timeout属性は、クライアントがサーバーの起動を待つ最大時間(秒単位)を指定します。-1は永遠を意味し、デフォルトは60です。
resource属性は、サーバー接続の種類、サーバーのホスト、接続用のポート(オプション)を指定します。値は
cs://<host>:<port>- クライアント対サーバの構成で、クライアントがサーバに接続するフォワード接続の場合。指定されていない場合、ポートのデフォルトは 11111 です。
csrc\://<host>:<port>- クライアントとサーバの間で、サーバがクライアントに接続するという逆接続の設定の場合。指定されていない場合、ポートのデフォルトは 11111 です。
cdsrs\://<ds-host>\:<ds-port>//<rs-host>\:<rs-port>- フォワード接続を行うclient-pvdataserver-pvrenderserverの構成の場合。指定されていない場合、ds-port のデフォルトは 11111、rs-port のデフォルトは 22222 です。
cdsrsrc\://<ds-host>\:<ds-port>//<rs-host>\:<rs-port>- client-pvdataserver-pvrenderserver の構成で、リバース接続の場合。指定されていない場合、ds-port のデフォルトは 11111、rs-port のデフォルトは 22222 です。
<CommandStartup>タグは、外部コマンドを実行してサーバーを起動するために使用します。
オプションの
<Options>タグを使うと、起動時に必要なオプションをユーザーに促すことができます。
各
<Option>タグは、起動前にユーザーが変更を促されるオプションを表しています。
name属性は、オプションの名前を定義します。この名前は、実行時の環境変数として使われるときには変数名となり、<Argument>タグ内の文字列置換の目的で使用されます。
label属性は、オプションの人間が読めるラベルを定義するもので、ユーザーインターフェースで使用されます。オプションの
readonly属性は、ユーザーには見えるが、変更できないオプションを指定するのに使用できます。The optional
saveattribute can be used to indicate that the value chosen by the user for this option will be saved in the ParaView settings so that it's preserved across ParaView sessions.
<Range>タグは、ある範囲の値に対してのみ有効な数値オプションを指定します。
type属性は、制御する数値の種類を制御します。有効な値はそれぞれ、整数ならばint、浮動小数点数ならばdoubleです。
min``と ``max属性は、オプションの許容値の最小値と最大値を指定します(これらを含む)。
step属性は、ユーザーインターフェースで値を増減させる際に必要な量を指定します。
default属性は、オプションの初期値を指定します。
As a special-case for integer ranges, a default value of
randomwill generate a random number as the default each time the user is prompted for a value. This is particularly useful withPV_CONNECT_ID,PV_SERVER_PORTandPV_SSH_PF_SERVER_PORT.
<String>タグは、自由形式のテキストを値として受け入れるオプションを指定します。
default属性は、オプションの初期値を指定します。
<File>タグは、自由形式のテキストと、ファイルパスの選択を助けるファイルブラウズボタンを受け付けるオプションを指定します。
default属性は、オプションの初期値を指定します。
<Boolean>タグは、on/offまたはtrue/falseのいずれかのオプションを指定します。
true属性は、ユーザーが有効にした場合のオプションの値を指定します。
false属性は、ユーザーが無効にした場合のオプション値を指定します。
default属性は、オプションの初期値を指定するもので、trueまたはfalseのいずれかとなります。
<Enumeration>タグは、有限の値のセットの一つであるオプションを指定します。
default属性は、オプションの初期値を指定するもので、列挙された値の一つでなければなりません。各
<Entry>タグは、1つの許容値を記述します。
nameタグは、その選択肢の値を指定します。
labelタグは、その選択肢のユーザーインターフェースに表示される、人間が読めるテキストを指定します。
<Command>タグを使って、外部コマンドとその起動時の引数を指定します。
実行するコマンドのファイル名を指定するのが
exec属性です。絶対パスが指定されていない場合は、システムのPATHがコマンドの検索に使われます。この属性の値が$STRING$と指定された場合は、事前に定義された変数やユーザー定義(<Option/>を通じて)された変数の値で置き換えられます。
process_wait属性は、ParaViewがexecコマンドの開始を待つ待ち時間(秒単位)を指定します。デフォルトは0です。
delay属性は、起動コマンドが完了してから、クライアントがサーバーへの接続を試みるまでの遅延時間(秒)を指定します。デフォルトは0です。
<Argument>タグは、起動コマンドに渡されるコマンドライン引数です。
文字列の置換は各引数に対して行われ、各
$STRING$を定義済みまたはユーザー定義の変数の値に置き換えます。値が空の文字列である引数は、起動コマンドに渡されません。
<SSHCommand>タグを使って、sshで起動する外部コマンドを指定します。
<Command>関連の属性やタグはすべて適用されます。SSHの設定を行うには、
<SSHConfig>タグを使用します。
user属性は、SSHのユーザー名を設定するために使用されます。
port属性は、SSHの使用するポートを設定するために使用されます。
<Terminal>タグは、ターミナルを使ってsshコマンドを発行し、必要に応じてユーザーにパスワードを尋ねるよう、ParaViewに知らせるために使われます。
exec属性は、使用する端末の実行ファイルを指定します。設定されていない場合、ParaViewは自動的に実行ファイルを見つけようとします(WindowsおよびLinuxの場合のみ)。The
command optionattribute specifies the option to use to pass the command to the terminal executable.-eby default.
A
<AskPass>tag, which should not be used with <Terminal> tag, can be used to inform ParaView to use a AskPass, using the SSH_ASKPASS environment variable, on Linux only.
<SSH>タグで、指定するために使われます。
使用するSSH実行ファイルを指定する
exec属性です。
<PortForwarding>タグで、ParaViewにSSHトンネルの作成が必要であることを示します。これは、接続タイプに応じてフォワードまたはリバースのいずれかになります。
the
localoptional attribute that specified the local port to use the SSH tunel, and default toPV_SSH_PF_SERVER_PORTif defined,PV_SERVER_PORTotherwise.
<ManualStartup>タグは、ユーザーが接続する前に、指定されたサーバーを手動で起動することを示します。
An optional
<Options>tag can be used to prompt the user for options required at startup. Note thatPV_SERVER_PORT,PV_DATA_SERVER_PORT,PV_RENDER_SERVER_PORT,PV_CONNECT_IDandPV_SSH_PF_SERVER_PORTvariables will be taken into account in to server resource configuration when set here.
8.5.20. スタートアップコマンド変数
起動コマンドが実行されると、その環境には<Option>タグで指定されたユーザー定義の変数に加えて、以下の定義済みの変数が含まれます:
PV_CLIENT_HOST
PV_CONNECTION_URI
PV_CONNECTION_SCHEME
PV_VERSION_MAJOR(e.g.5)
PV_VERSION_MINOR(e.g.9)
PV_VERSION_PATCH(e.g.1)
PV_VERSION(e.g.5.9)
PV_VERSION_FULL(e.g.5.9.1)
PV_SERVER_HOST
PV_SERVER_PORT
PV_SSH_PF_SERVER_PORT
PV_DATA_SERVER_HOST
PV_DATA_SERVER_PORT
PV_RENDER_SERVER_HOST
PV_RENDER_SERVER_PORT
PV_CLIENT_PLATFORM(有効な変数:Windows,Apple,Linux,Unix,Unknown)
PV_APPLICATION_DIR
PV_APPLICATION_NAME
PV_CONNECT_ID
These options can be used in the <Command> or <SSHCommand> elements part of the PVSC files,
as well as extracted from the environment when running the command.
If an <Option> element defines a variable with the same name as a predefined variable, the <Option> element value takes precedence.
This can be used to override defaults that are normally hidden from the user.
As an example, if a site wants users to be able to override default port numbers, the server configuration might specify an <Option> of PV_SERVER_PORT.
8.6. 並列処理を理解する
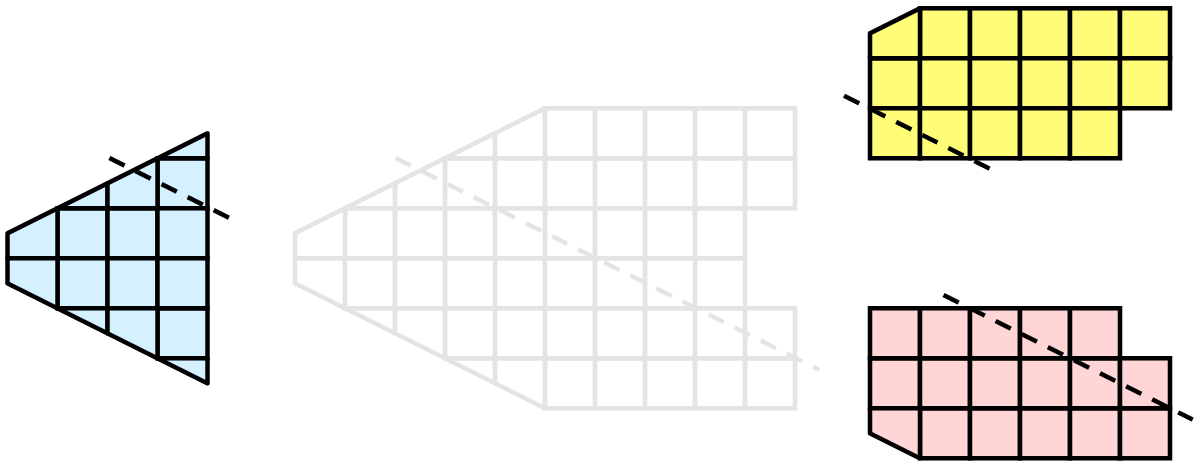
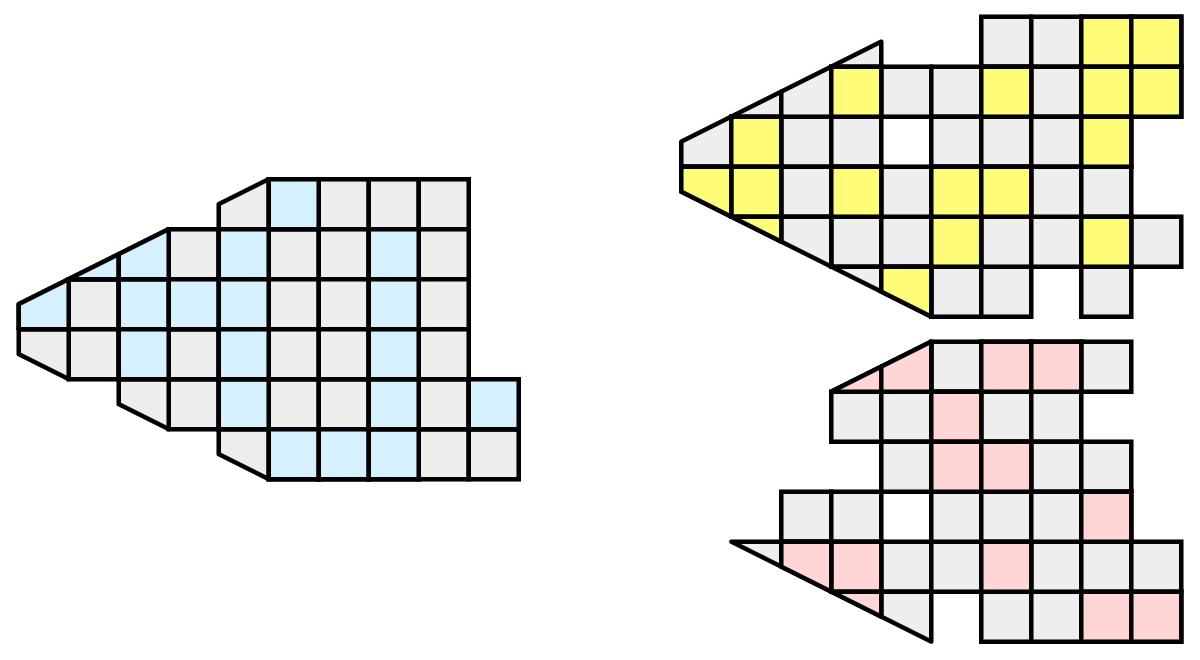
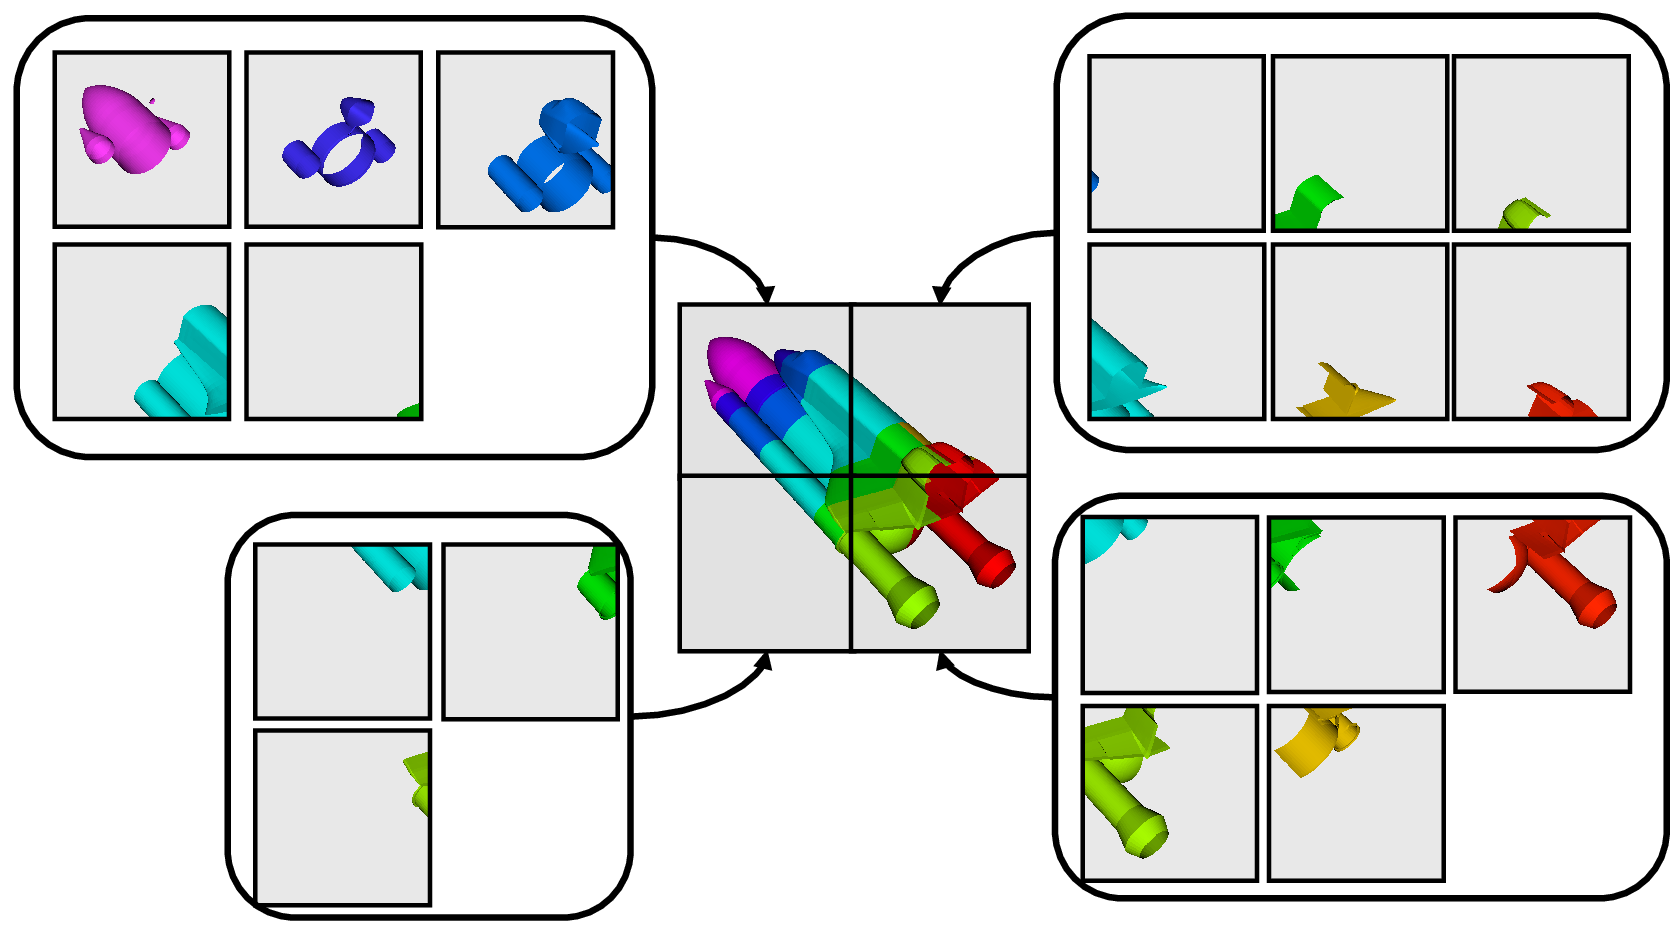
並列処理とは、簡単に言えば、複数のワーカーを同時に使ってデータを並列に処理することです。通常、これらのワーカーは、マルチコアマシンまたはクラスタの複数のノード上で実行される異なるプロセスです。これをランクと呼びます。ほとんどのデータ処理および可視化アルゴリズムにおいて、作業は、処理される必要があるデータの量、すなわち、データセット内のセルまたは点の数に直接関係します。したがって、作業をランク間で分配する簡単な方法は、入力データセットを複数のチャンク(データの塊)に分割し、各ランクにチャンクの独立したセットのみを動作させることです。便利なことに、ほとんどのアルゴリズムでは、データセットを分割して個別に処理した結果は、データセットを1つのチャンクで処理した場合と同じ結果になります。もちろん例外もあります。例を使って、このことをもっとよく理解しましょう。デモンストレーションのために、この非常に単純化されたメッシュを検討してください。

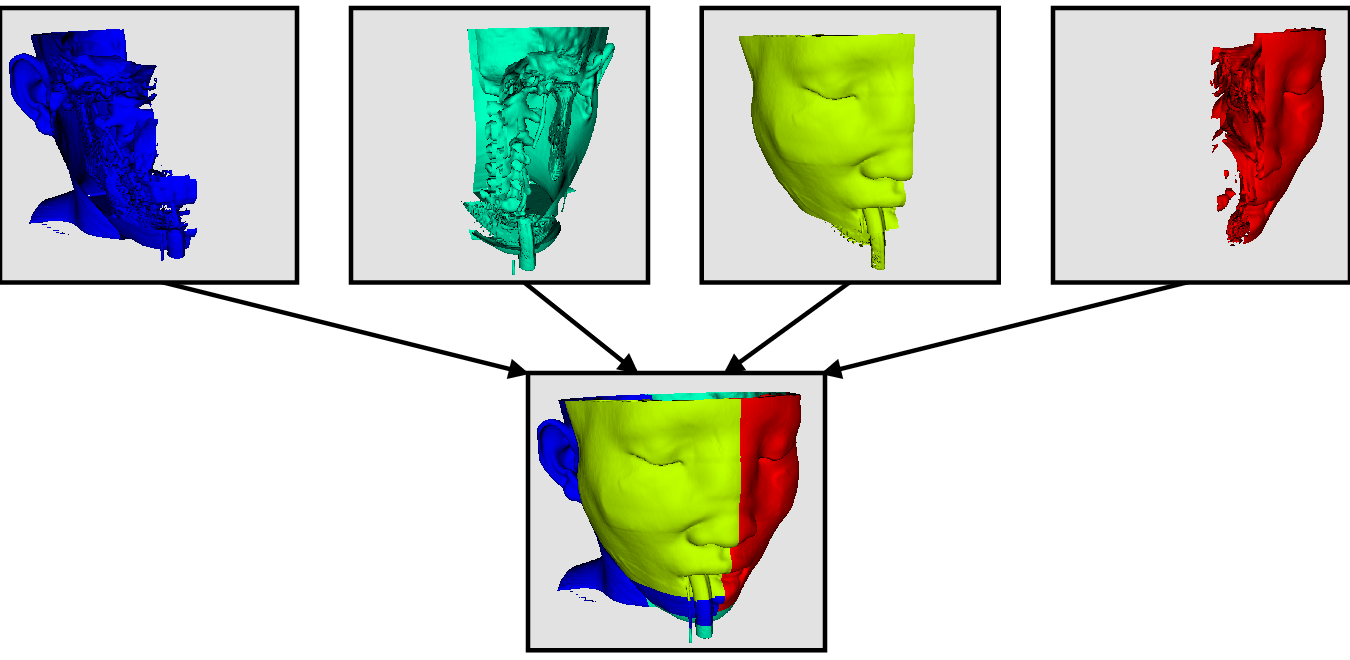
ここで、このメッシュに対して3つのプロセスを使用して可視化を実行するとします。次に示すように、メッシュのセルを青、黄、ピンクの領域で分割できます。
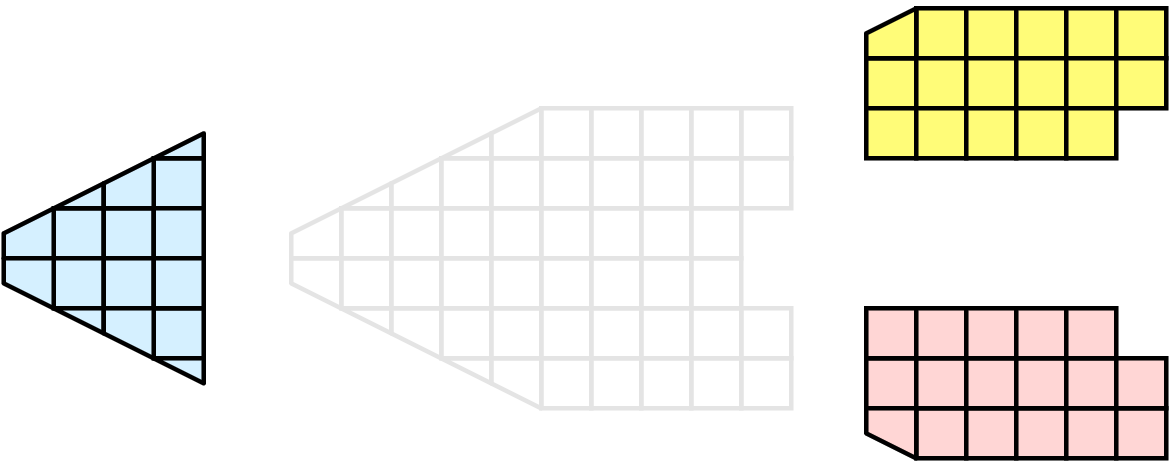
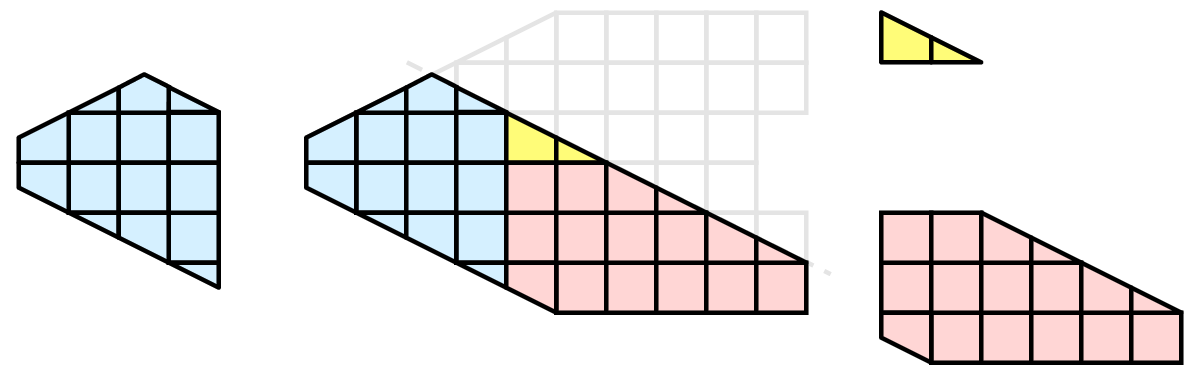
分割されると、いくつかの可視化アルゴリズムは、単に各プロセスがそのローカルなセルの集合上でアルゴリズムを独立して実行することを可能にすることによって機能します。クリッピングを例にとってみましょう。クリップ平面を定義し、その同じ平面を各プロセスに与えるとします。
各プロセスは、このプレーンを使用して個別にセルをクリップできます。最終的な結果は、連続してクリッピングを行った場合と同じです。セルを1つにまとめると(これは明らかな理由から、実際には大きなデータに対して行うことはありません)、クリッピング操作が正しく行われたことがわかります。
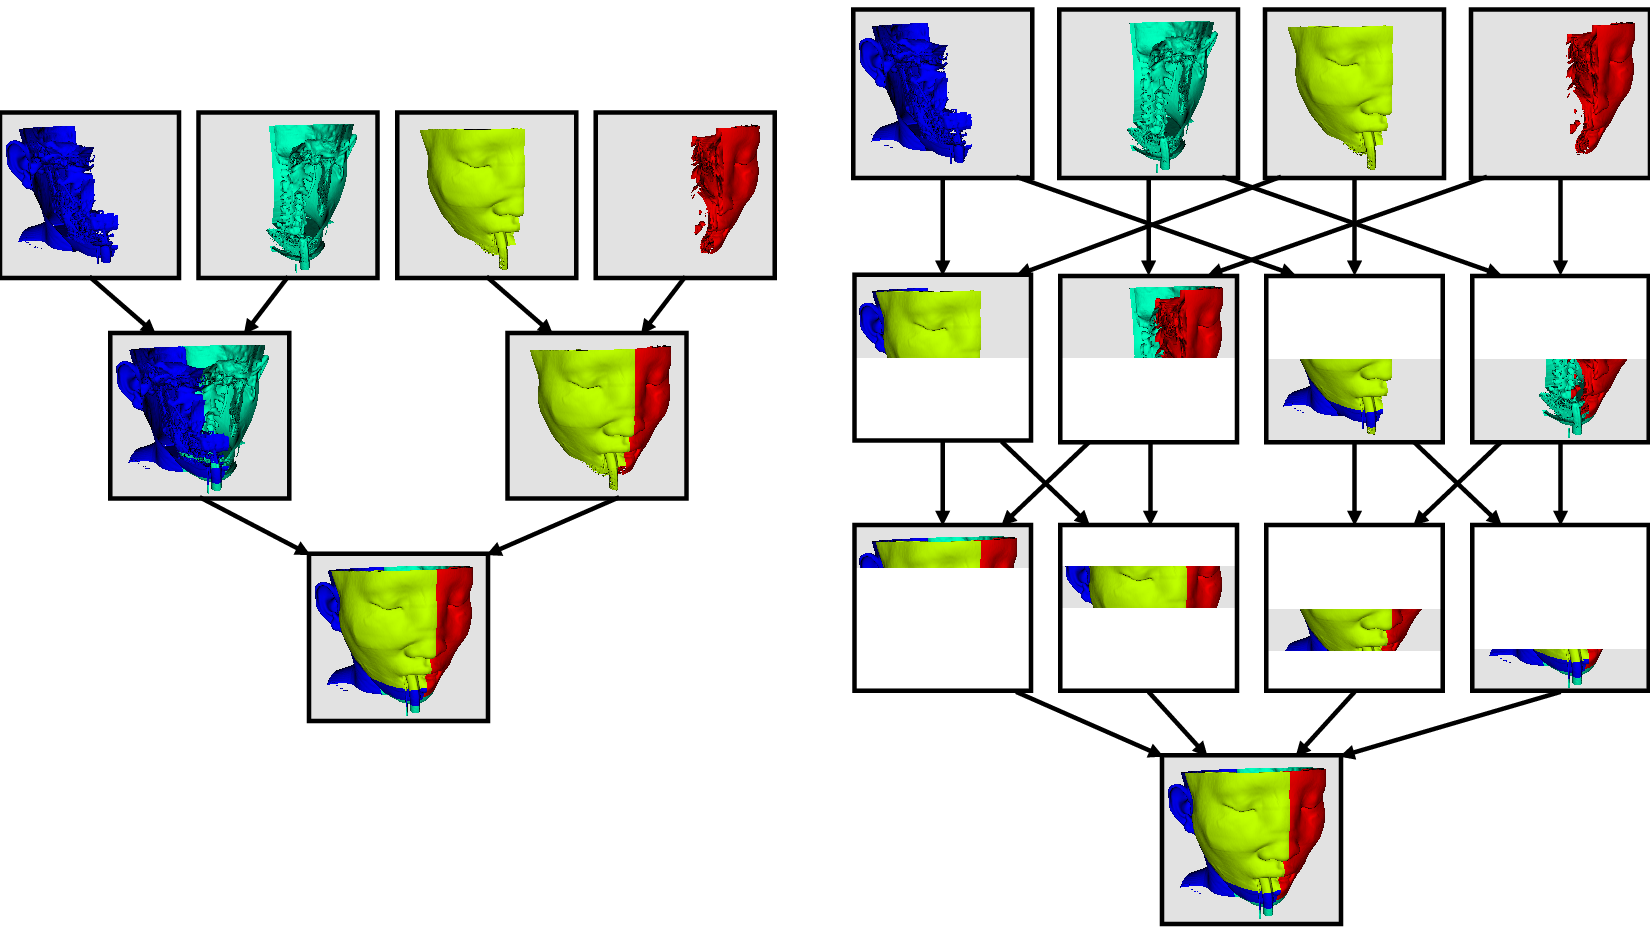
8.6.1. ゴーストレベル
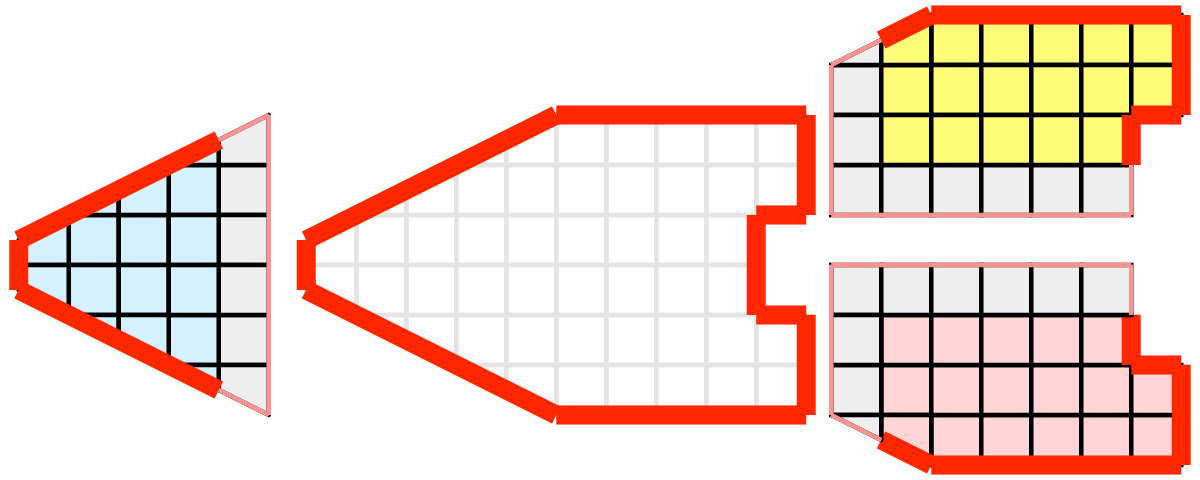
残念ながら、セルのパーティション上で可視化アルゴリズムを盲目的に実行しても、必ずしも正しい答えが得られるとは限りません。簡単な例として、外部面(external faces) アルゴリズムを考えてみましょう。外部面アルゴリズムは、1つのセルのみに属するすべてのセル面を検出し、メッシュの境界を識別します。

おっと!すべてのプロセスが外部面アルゴリズムを独立して実行した場合、内部面の多くが外部であると誤って識別されてしまいます。これは、あるパーティションのセルが別のパーティションに隣接している場合に発生します。プロセスは他のパーティションのセルにアクセスできないため、これらの隣接セルが存在することを知る方法はありません。
ParaViewや他の並列可視化システムで採用されているソリューションは、ゴーストセル(ghost cells) を使用することです。ゴーストセルは、1つのプロセスに保持されていますが、実際には別のプロセスに属するセルです。ゴーストセルを使用するには、まず各パーティションのすべての隣接セルを識別する必要があります。次に、これらの隣接するセルをパーティションにコピーし、次の例で灰色のセルで示すように、ゴーストセルとしてマークします。
ゴーストセルを使用して外部フェースアルゴリズムを実行しても、一部の内部フェースが外部として誤って識別されていることがわかります。 しかし、これらの誤分類された面はすべてゴーストセル上にあり、それらの面は元のセルのゴーストステータスを継承します。ParaViewはゴーストフェースを取り除き、正しい答えを残します。
この例では、ゴーストセルの1つのレイヤ(パーティションのセルに直接隣接するセルのみ)を示しました。ParaViewには、ゴーストセルの複数のレイヤを取得する機能もあります。各レイヤには、下位のゴーストレイヤまたは元のデータ自体にまだ含まれていない、前のレイヤの隣接レイヤが含まれます。これは、ゴーストセルの独自のレイヤを必要とするカスケードフィルタがある場合に便利です。それぞれが上流からゴーストセルの追加レイヤを要求し、下流に送信する前にデータからレイヤを削除します。
8.6.2. データ分割
データを分割して配布しているため、データをどのように分割するかという問題に対処するのが賢明です。前の例で示したデータには、空間的コヒーレント(spatially coherent) パーティションがあります。つまり、各パーティションのすべてのセルは、空間のコンパクトな領域に配置されます。データを分割する方法は他にもあります。たとえば、ランダムなパーティションを作成できます。
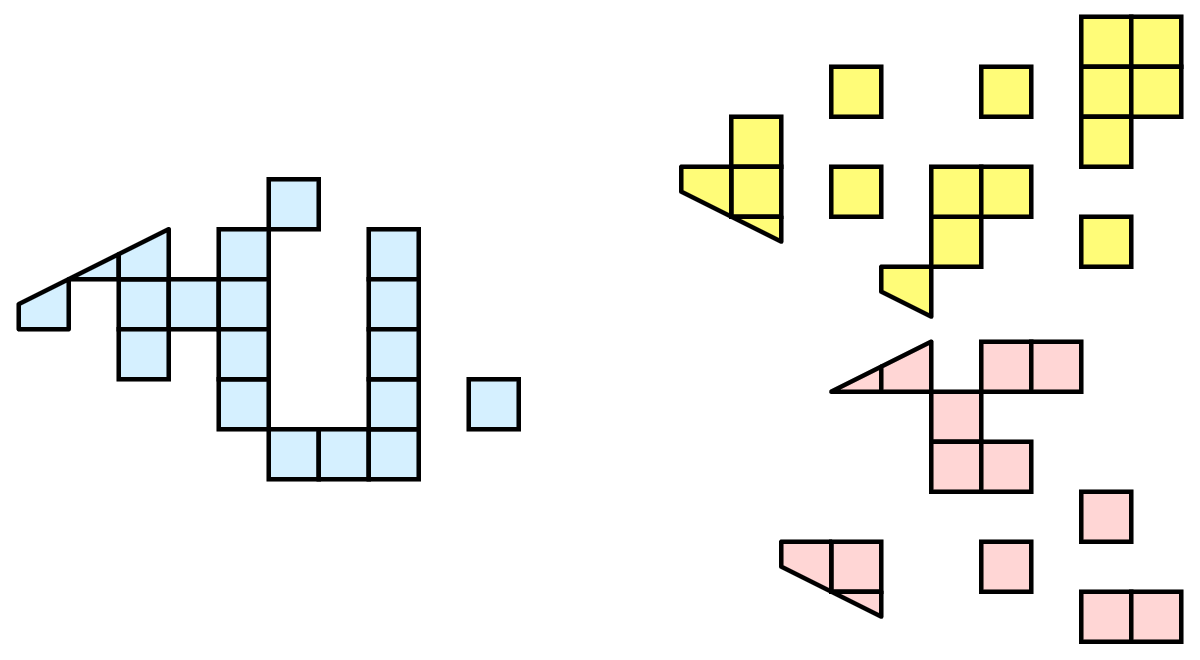
ランダム分割にはいくつかの優れた機能があります。作成が容易で、負荷分散に適しています。しかし、ゴーストセルに関して重大な問題が存在します。
この例では、単一レベルのゴーストセルがすべてのプロセスのデータセット全体をほぼ複製することがわかります。このようにして、並列処理の利点を排除してしまいました。ゴーストセルは頻繁に使用されるため、ParaViewではランダムパーティションは使用されません。
8.6.3. D3フィルタ
前節では、負荷分散と並列可視化のゴーストレベルの重要性について説明しました。本節では、その方法について説明します。
負荷分散とゴーストセルは、構造データ(画像データ、直線格子、構造格子)の読み取り時にParaViewによって自動的に処理されます。陰的トポロジーにより、データを空間的にコヒーレントなチャンクに分割し、隣接セルの位置を同定することが容易になります。
非構造データ(ポリゴンデータと非構造格子)を読み取る場合は、まったく別の問題になります。暗黙的なトポロジーや利用可能な近傍情報はありません。ParaViewは、データがどのようにディスクに書き込まれたかに左右されます。したがって、非構造データを読み込む場合、データのロードバランスがどの程度良好であるかは保証されません。また、データにゴーストセルが含まれる可能性も低く、一部のフィルタの出力が正しくない可能性があります。
ParaViewには、非構造データのバランスをとり、ゴーストセルを作成するフィルタがあります。このフィルタはD3と呼ばれ、distributed data decompositionの略です。D3を使うのは簡単です。パーティションを切り直したいデータに( Filters > Alphabetical > D3)にある)フィルタをかけるだけです。

D3の最も一般的な仕様例は、非構造格子リーダーにD3を直接接続することです。入力データの負荷バランスがどの程度良好であっても、後続のフィルタが正しいデータを生成するようにゴーストセルを検索できることが重要です。上記の例は、非構造格子上の抽出サーフェスフィルタの切断図を示しています。左側では、ゴーストセルが欠落しているため、不適切に抽出された面が多数あることがわかります。右側では、まずD3フィルタを使用して問題を解決します。
8.7. Parallel File Readers
Parallel file readers in ParaView are specialized for reading and processing large datasets by dividing file reading across multiple processes simultaneously. These readers typically read portions of file or even separate files concurrently on different processors, significantly reducing the time required to read and parse large datasets compared to sequential reading performed by a single process. Furthermore, when a dataset is read in parallel by distributed multiple processes, it is already divided amongst the processes, which can lead to more efficient subsequent parallel processing steps that fully use the available computing resources. This section includes a comprehensive list of parallel file readers available in ParaView, along with descriptions and usage guidelines.
All the file readers in this section use distributed memory parallelism. Some of these readers also support shared memory parallelism, which is indicated in the description of those readers.
8.7.1. ADIOS2 BP3 File (using Fides), ADIOS2 BP4/5 Directory (using Fides)
paraview.simple.FidesReaderRead ADIOS2 files as image data. Further details about Fides and using it within ParaView can be found at https://fides.readthedocs.io/en/latest/paraview/paraview.html.
8.7.2. AMReX/BoxLib plotfiles (grids)
paraview.simple.AMReXBoxLibGridReaderThis AMReX reader loads data stored in AMReX plt file format. The output of this reader is an overlapping AMR dataset of uniform rectilinear grids.
8.7.3. AMReX/BoxLib plotfiles (particles)
paraview.simple.AMReXBoxLibParticlesReaderReads particle data from AMReX plotfiles.
8.7.4. AMR Velodyne Files
paraview.simple.VelodyneAMRReaderVelodyne is a multi-physics code written by Corvid Technologies. It is a coupled Lagrangian-Eularian code where the Euler equations are solved using AMR. The resulting *.xamr files can be larger than 40GB. This reader was designed to read these files efficiently. The output of this reader is an overlapping AMR dataset.
8.7.5. CGNS Files
paraview.simple.CGNSSeriesReaderThe CGNS reader reads files stored in CGNS format. The default file extension is .cgns. The output of this reader is a multi-block dataset.
This reader handles two types of file series:
temporal file series - where each file is simply a single timestep.
partitioned file series - where each file corresponds to data dumped out from a rank but has all timesteps.
This reader determines the nature of the file series encountered and reads the files accordingly. For partitioned files, the files are distributed among data-processing ranks, while for temporal file series, blocks are distributed among data-processing ranks
8.7.6. CellGrid Files
paraview.simple.CompositeCellGridReaderReader for discontinuous Galerkin and other data in cell-grid format. This reader supports user-extensible cell grid data (for discontinuous fields, novel function spaces, non-isoparametric elements, and other geometric data that does not hold to the assumptions implicit in unstructured grids). If the file contains data in multiple blocks, they are split across ranks in a round-robin fashion. No effort at redistribution is made by the reader.
For more information on how the reader can be extended, see the CellGrid documentation.
8.7.7. Cosmology Files
paraview.simple.CosmoReaderThe Cosmology reader reads a binary file of particle location, velocity, and id creating an unstructured grid. The default file extension is .cosmo64. Reads LANL Cosmo format or Gadget format.
8.7.8. EnSight Gold files (EnSightGoldCombinedReader plugin)
paraview.simple.EnSightGoldCombinedReaderReader for EnSight Gold binary and ASCII files.
Load the EnSightGoldCombinedReader plugin for this reader to be available.
8.7.9. EnSight Gold Server of Server (SOS) files (EnSightSOSGoldReader plugin)
paraview.simple.EnSightSOSGoldReaderReader for EnSight Gold SOS files.
Load the EnSightGoldCombinedReader plugin for this reader to be available.
8.7.10. EnSight Files
paraview.simple.EnSightReaderThe EnSight reader reads files in the format produced by EnSight. EnSight 6 and Gold files (both ASCII and binary) are supported. The default xtension is .case. The output of this reader is a multiblock dataset.
This reader is built-in to ParaView and does not require any plugin to be loaded.
8.7.11. EnSight Master Server Files
paraview.simple.EnSightMasterServerReader8.7.12. ENZO AMR Particles Reader
paraview.simple.ENZOAMRParticlesReaderLoads AMR particle files produced by the Enzo adaptive mesh refinement simulation code: https://enzo-project.org/
8.7.13. Exodus II (legacy)
paraview.simple.LegacyExodusIIReaderLoad the LegacyExodusIIReader plugin for this reader to be available. For comprehensive information about Exodus II file conventions and how they are treated in ParaView, please see the section Exodus.
8.7.14. Metafile for restarted exodus outputs
paraview.simple.LegacyRestartedSimExodusReaderLoad the LegacyExodusIIReader plugin for this reader to be available.
8.7.15. Fides Data Model File (JSON)
paraview.simple.FidesJSONReaderReads an ADIOS2 file using the Fides library. For more information on the JSON model schema, please see https://fides.readthedocs.io/en/latest/schema/schema.html.
8.7.16. GenericIO files to UnstructuredGrid
paraview.simple.GenericIOReaderReads a cosmology file into an unstructured grid.
8.7.17. GenericIO files to MultiBlockDataSet
paraview.simple.GenericIOMultiBlockReaderReads a cosmology file into a multiblock dataset
8.7.18. IOSS Files (Exodus II and CGNS)
paraview.simple.IOSSReaderReads Exodus II and CGNS files using the IOSS library. The reader produces unstructured grids when reading Exodus II files and structured grids when reading CGNS files. For comprehensive information about Exodus II file conventions and how they are treated in ParaView, please see the section Exodus.
8.7.19. IOSS Files (exdg)
paraview.simple.IOSSCellGridReaderReads CellGrid datasets from Exodus II files using the IOSS library. Currently, continuous Galerkin (CG) fields are not supported; only discontinuous Galerkin (DG) fields will be read until a convention is created for storing shared degrees of freedom.
8.7.20. LSDyna
paraview.simple.LSDynaReaderThis reader reads LS-Dyna databases (d3plot files).
8.7.21. Nek5000 Files
paraview.simple.Nek5000ReaderReads Nek5000 data files, producing an unstructured grid dataset.
8.7.22. Nrrd Raw Image Files
paraview.simple.NrrdReaderNrrd reader reads raw image data much like the Raw Image Reader except that it will also read metadata information in the Nrrd format. This means that the reader will automatically set information like file dimensions. There are several limitations on what type of nrrd files we can read. This reader only supports nrrd files in raw format. Other encodings like ASCII and hex will result in errors. When reading in detached headers, this only supports reading one File that is detached.
8.7.23. OpenFOAM Files
paraview.simple.OpenFOAMReaderReads OpenFOAM data files, producing multiblock datasets. File requests are multithreaded to hide latency on network file systems.
8.7.24. PIO Dump Files
paraview.simple.PIOReaderPIO is a file format in support of xRage, a physics code from Los Alamos National Laboratory. The input file (.pio) opened by the PIO reader is an ASCII description of the data files within a dump directory numbered by cycle. The reader uses a PIOData class to read the file and a PIOAdaptor to build an unstructured or hypertree grid from the data. Requested data is filled into the structures.
8.7.25. PLOT3D Meta Files
paraview.simple.PLOT3DMetaFileReaderReads a metadata file that describes the geometry and solution files of a PLOT3D dataset.
8.7.26. PLOT3D Solution Files
paraview.simple.PLOT3DReaderThe PLOT3D reader can read both ASCII and binary PLOT3D files. The default file extension for the geometry files is .xyz, and the default file extension for the solution files is .q. The output of this reader is a multiblock dataset containing curvilinear (structured grid) datasets.
8.7.27. POP Ocean NetCDF (Rectilinear)
paraview.simple.ParallelNetCDFPOPreaderReads HDF5 files generated from xRage, a physics code from Los Alamos National Laboratory. The data is first read in by one process, then it is partitioned and distributed to all other processes.
8.7.28. POP Ocean NetCDF (Unstructured)
paraview.simple.UnstructuredNetCDFPOPreaderThe reader reads regular rectilinear grid (image/volume) data from a NetCDF file and turns it into an unstructured spherical grid.
8.7.29. Rage HDF Files
paraview.simple.HDF5RageReaderReads HDF dump files generated from xRage, a LANL physics code, using the PIO (Parallel Input Output) library.
8.7.30. SLAC Mesh Files
paraview.simple.SLACDataReaderA reader for a data format used by Omega3p, Tau3p, and several other tools used at the Standford Linear Accelerator Center (SLAC). The underlying format uses NetCDF to store arrays, but also imposes several conventions to form an unstructured grid of elements.
8.7.31. SpyPlot CTH dataset
paraview.simple.SpyPlotReaderThe Spy Plot reader loads an ASCII meta-file called the "case" file (extension .spcth). The case file lists all the binary files containing the dataset. This reader produces hierarchical datasets.
8.7.32. Case file for restarted CTH outputs
paraview.simple.RestartedSimSpyPlotReaderReads a metadata file listing restart files from multiple restarts of the CTH simulation code and treats them as one continuous dataset. For additional details on restarted SPCTH files, see the section SPCTH.
8.7.33. VPIC Files
paraview.simple.VPICReaderVPIC is a 3D kinetic plasma particle-in-cell simulation. The input file (.vpc) opened by the VPIC reader is an ASCII description of the data files which are written one file per processor, per category and per time step. These are arranged in subdirectories per category (field data and hydrology data) and then in time step subdirectories. This is a distributed reader.
8.7.34. Legacy VTK Files (partitioned)
paraview.simple.PartitionedLegacyVTKReaderThe Partitioned Legacy VTK reader loads files stored in VTK's partitioned legacy file format (before VTK 4.2, although still supported). The expected file extension is .pvtk. The type of the dataset may be structured grid, uniform rectilinear grid (image/volume), non-uniform rectilinear grid, unstructured grid, or polygonal.
Details about the legacy VTK file format can be found at https://docs.vtk.org/en/latest/vtk_file_formats/vtk_legacy_file_format.html
8.7.35. VTKHDF Files
paraview.simple.VTKHDFReaderReads VTKHDF serial or parallel data files. All data types are read from the same reader. This reader also supports file series.
For comprehensive details about the VTKHDF file format, please see https://docs.vtk.org/en/latest/vtk_file_formats/vtkhdf_file_format/
8.7.36. VTK ImageData Files (partitioned)
paraview.simple.XMLPartitionedImageDataReaderThe XML Partitioned Image Data reader reads the partitioned VTK image data file format. It reads the partitioned format's summary file and then the associated VTK XML image data files. This reader also supports file series.
Details about the legacy VTK file format can be found at https://docs.vtk.org/en/latest/vtk_file_formats/vtk_legacy_file_format.html
8.7.37. (VTK) HyperTreeGrid (partitioned)
paraview.simple.XMLPartitionedHyperTreeGridReaderThe XML Partitioned Hyper Tree Grid reader reads the partitioned VTK htg data file format. It reads the partitioned format's summary file and then the associated VTK XML htg data files. This reader also supports file series.
Details about the legacy VTK file format can be found at https://docs.vtk.org/en/latest/vtk_file_formats/vtk_legacy_file_format.html
8.7.38. VTK PolyData Files (partitioned)
paraview.simple.XMLPartitionedPolyDataReaderThe XML Partitioned Polydata reader reads the partitioned VTK polydata file format. It reads the partitioned format's summary file and then the associated VTK XML polydata files. This reader also supports file series.
Details about the legacy VTK file format can be found at https://docs.vtk.org/en/latest/vtk_file_formats/vtk_legacy_file_format.html
8.7.39. VTK RectilinearGrid Files (partitioned)
paraview.simple.XMLPartitionedRectilinearGridReaderThe XML Partitioned Rectilinear Grid reader reads the partitioned VTK rectilinear grid file format. It reads the partitioned format's summary file and then the associated VTK XML rectilinear grid files. This reader also supports file series.
Details about the legacy VTK file format can be found at https://docs.vtk.org/en/latest/vtk_file_formats/vtk_legacy_file_format.html
8.7.40. VTK StructuredGrid Files (partitioned)
paraview.simple.XMLPartitionedStructuredGridReaderThe XML Partitioned Structured Grid reader reads the partitioned VTK structured grid data file format. It reads the partitioned format's summary file and then thed associated VTK XML structured grid data files. This reader also supports file series.
Details about the legacy VTK file format can be found at https://docs.vtk.org/en/latest/vtk_file_formats/vtk_legacy_file_format.html
8.7.41. VTK Table (partitioned)
paraview.simple.XMLPartitionedTableReaderThe XML Partitioned Table reader reads the partitioned VTK table data file format. It reads the partitioned format's summary file and then the associated VTK XML table data files.
Details about the legacy VTK file format can be found at https://docs.vtk.org/en/latest/vtk_file_formats/vtk_legacy_file_format.html
8.7.42. VTK UnstructuredGrid Files (partitioned)
paraview.simple.XMLPartitionedUnstructuredGridReaderThe XML Partitioned Unstructured Grid reader reads the partitioned VTK unstructured grid data file format. It reads the partitioned format's summary file and then the associated VTK XML unstructured grid data files. This reader also supports file series.
Details about the legacy VTK file format can be found at https://docs.vtk.org/en/latest/vtk_file_formats/vtk_legacy_file_format.html
8.7.43. VTX reader: ADIOS2 BP3 File, VTX reader: ADIOS2 BP4 Directory
paraview.simple.ADIOS2VTXReaderReads an ADIOS2 BP file with embedded VTK XML Schema for vti (Image) and vtu (UnstructuredGrid) types either as an attribute or as a subfile.
8.7.44. WindBlade Data
paraview.simple.WindBladereaderWindBlade/Firetec is a simulation dealing with the effects of wind on wind turbines or on the sread of fires. It produces three outputs - a StructuredGrid for the wind data fields, a StructuredGrid for the ground topology, and a PolyData for turning turbine blades. The input file (.wind) opened by the WindBlade reader is an ASCII description of the data files expected. Data is accumulated by the simulation processor and is written one file per time step. WindBlade can deal with topology if a flag is turned on and expects (x,y) data for the ground. It also can deal with turning wind turbines from other time step data files which gives polygon positions of segments of the blades and data for each segment.
8.7.45. Xdmf Reader (XDMF 2)
paraview.simple.XDMFReaderThe XDMF reader reads files in XDMF 2 format. The expected file extension is .xmf. Metadata is stored in the XDMF file using an XML format, and large attribute arrays are stored in a corresponding HDF5 file. The output may be unstructured grid, structured grid, or rectiliner grid. See http://www.xdmf.org for a description of the file format.
8.7.46. Xdmf3 Reader
paraview.simple.Xdmf3ReaderTThe output data produced by this reader depends on the number of grids in the data file. If the data file has a single domain with a single grid, then the output type is a dataset of the appropriate type, otherwise it's a multiblock data set. This reader treats a file series as a time series rather than as a spatial partition.
8.7.47. Xdmf3 Reader (Top Level Partition)
paraview.simple.Xdmf3ReaderSThe output data produced by this reader depends on the number of grids in the data file. If the data file has a single domain with a single grid, then the output type is a dataset of the appropriate type, otherwise it's a multiblock data set. Treats a file series as a spatial partition rather than as a time series.
8.8. Parallel File Writers
ParaView can save files to various parallel file formats. The following is a comprehensive list of parallel file writers available in ParaView, along with their descriptions and usage guidelines. Unless otherwise noted, parallel writers typically save the portions of datasets that are local to each process in separate data files and produce a summary file that references the individual data files.
8.8.1. ADIOS2 BP File
paraview.simple.FidesWriterWrite ADIOS2 files using Fides. Further details about Fides and using it within ParaView can be found at https://fides.readthedocs.io/en/latest/paraview/paraview.html.
8.8.2. CGNS Files
paraview.simple.CGNSWriterThe CGNS writer writes files stored in CGNS format. The file extension is .cgns. This writer can write structured grids, poly data, unstructured grids or a multi-block dataset containing these data types.
8.8.3. Comma or Tab Delimited Files
paraview.simple.CSVWriterWriter to write comma- or tab-delimited files from any dataset. The output is a single file containing the data from all ranks.
8.8.4. EnSight File
paraview.simple.EnSightWriterWriter to write unstructured grid data as an EnSight file. Binary files written on one system may not be readable on other systems. Be sure to specify the endian-ness of the file when reading it into EnSight.
8.8.5. Generic IO Files
paraview.simple.GenericIOWriterWriter to write GenericIO files from multiblock data, each block becomes one rank's data in the written GenericIO file.
8.8.6. Houdini File Format
paraview.simple.HoudiniWriterWriter to write polygonal data in ASCII Houdini .geo (pre-v12.0) format. This writer gathers all the geometry to the root node and saves one file.
8.8.7. IOSS Exodus File
paraview.simple.IOSSWriterWrite Exodus II files using the IOSS libraries. This writer expects datasets to have a structure that matches the datasets read by the IOSS Exodus File reader. In addition, if global point or cell Ids are missing from the dataset, this writer will generate them. It will also make a best-effort attempt to generate element sides.
8.8.8. ExodusII File (legacy)
paraview.simple.LegacyExodusIIWriterLegacy writer to write Exodus II files. Available through the LegacyExodusWriter plugin.
8.8.9. Wavefront OBJ File Format
paraview.simple.POBJWriterThis writer gathers polydata from all ranks and writes it to a single file in the Wavefront OBJ format. Written files contain the geometry including lines, triangles and polygons. Normals and texture coordinates on points are also written if they exist.
8.8.10. OpenVDB File Format
paraview.simple.OpenVDBWriterWrites image data or point sets to OpenVDB files. A separate grid is written for each rank.
8.8.11. Legacy VTK Files (polydata)
paraview.simple.PDataSetWriterPolyDataWriter to save polydata in VTK's legacy file format. This writer gathers all the geometry to the root node and saves one file.
Details about the legacy VTK file format can be found at https://docs.vtk.org/en/latest/vtk_file_formats/vtk_legacy_file_format.html
8.8.12. Legacy VTK Files (unstructured grid)
paraview.simple.PDataSetWriterUnstructuredGridWriter to save unstructured grids in VTK's legacy file format. This writer gathers all the geometry to the root node and saves one file.
Details about the legacy VTK file format can be found at https://docs.vtk.org/en/latest/vtk_file_formats/vtk_legacy_file_format.html
8.8.13. PVTK Hyper Tree Grid Files (XML)
paraview.simple.XMLPHyperTreeGridWriterWriter to write hyper tree grid in a XML-based VTK data file. Can be used for parallel writing.
8.8.14. PVTK ImageData Files (XML)
paraview.simple.XMLPImageDataWriterWriter to write image data in a XML-based VTK data file.
Details about the legacy VTK file format can be found at https://docs.vtk.org/en/latest/vtk_file_formats/vtkxml_file_format.html
8.8.15. VTK Multi Block Files (XML)
paraview.simple.XMLMultiBlockDataWriterWriter to write a multiblock dataset in a XML-based VTK data file. When used for parallel writing, each rank saves data for one or more blocks, and the root node saves a summary file that references the individual block files.
Details about the legacy VTK file format can be found at https://docs.vtk.org/en/latest/vtk_file_formats/vtkxml_file_format.html
8.8.16. VTK Multi Block Files (hypertree grid)
paraview.simple.SerialHTGMultiBlockWrites hypertree grids to multiblock files. The same as the writer for PVTK XML MultiBlockDataSet Files, but specialized to hypertree grids.
Details about the legacy VTK file format can be found at https://docs.vtk.org/en/latest/vtk_file_formats/vtkxml_file_format.html
8.8.17. VTK Partitioned Data Set Files (XML)
paraview.simple.XMLPPartitionedDataSetWriterWriter to write a partitioned dataset in a XML-based VTK data file. When used for parallel writing, each rank saves data for one or more partitions, and the root node saves a summary file that references the individual partition files.
Details about the legacy VTK file format can be found at https://docs.vtk.org/en/latest/vtk_file_formats/vtkxml_file_format.html
8.8.18. VTK PartitionedDataSetCollection Files (XML)
paraview.simple.XMLPartitionedDataSetCollectionWriterWriter to write a partitioned dataset collection in a XML-based VTK data file. When used for parallel writing, each rank saves data for one or more partitions, and the root node saves a summary file that references the individual partitioned datasets in the collection.
Details about the legacy VTK file format can be found at https://docs.vtk.org/en/latest/vtk_file_formats/vtkxml_file_format.html
8.8.19. PVTK PolyData Files (XML)
paraview.simple.XMLPPolyDataWriterWriter to write polydata in a XML-based VTK data file. Can be used for parallel writing.
Details about the legacy VTK file format can be found at https://docs.vtk.org/en/latest/vtk_file_formats/vtkxml_file_format.html
8.8.20. PVTK RectilinearGrid Files (XML)
paraview.simple.XMLPRectilinearGridWriterWriter to write rectilinear grid in a XML-based VTK data file. Can be used for parallel writing.
Details about the legacy VTK file format can be found at https://docs.vtk.org/en/latest/vtk_file_formats/vtkxml_file_format.html
8.8.21. PVTK StructuredGrid Files (XML)
paraview.simple.XMLPStructuredGridWriterWriter to write structured grid in a XML-based VTK data file. Can be used for parallel writing.
Details about the legacy VTK file format can be found at https://docs.vtk.org/en/latest/vtk_file_formats/vtkxml_file_format.html
8.8.22. VTK AMR Files (XML)
paraview.simple.XMLUniformGridAMRWriterWriter to write an AMR data-set (overlapping/non-overlapping) in a XML-based VTK data file.
Details about the legacy VTK file format can be found at https://docs.vtk.org/en/latest/vtk_file_formats/vtkxml_file_format.html
8.8.23. Stereo Lithography File Format
paraview.simple.PSTLWriterWrites stereo lithography (.stl) files in either ASCII or binary form. This writer gathers all the geometry to the root node and saves one file.
8.8.24. VTKHDF Files
paraview.simple.VTKHDFWriterThe VTKHDF Writer writes files in VTKHDF format, using extension .vtkhdf, a format derived from HDF5. Currently, it supports writing Unstructured Grid and PolyData datasets, possibly transient, as well as composite types Partitioned Dataset Collection and Multiblock Dataset, without transient support.
Details about the VTKHDF file format can be found at https://docs.vtk.org/en/latest/vtk_file_formats/vtkhdf_file_format/
8.8.25. Xdmf3 Data File
paraview.simple.Xdmf3WriterThe Xdmf3 writer writes VTK data objects to XDMF format and and when run in parallel under MPI each rank writes only the data it is responsible for.
8.9. Ghost Cells Generationフィルタ
非構造格子データがすでに十分にパーティション化されていますが、ゴーストセルがない場合は、 Ghost Cells フィルタを使用して生成できます。このフィルタは、 D3 フィルタと同様にソースにアタッチできます。 D3 とは異なり、データセットの再分割は行われず、一部のアルゴリズムを正しく実行するために必要なゴーストセルが生成されるだけです。
Ghost Cells フィルタにはいくつかのオプションがあります。 Build If Required は、下流のフィルタで必要な場合にのみゴーストセルを生成するようフィルタに指示します。ゴーストセルの計算は計算および通信の負荷が高いプロセスであるため、このオプションをオンにすると、処理時間を大幅に節約できます。 Minimum Number Of Ghost Levels は、 Build If Required がオフの場合に生成されるゴーストレベルの数を指定します。ダウンストリームフィルタは、この最小値よりも多くのゴーストレベルを要求する場合があります。この場合、 Ghost Cells Generator は要求された数のゴーストレベルを生成します。 Use Global Ids オプションは、GlobalIds配列があればそれを使用します。オフの場合、ゴーストセルは一致するポイントによって定義されます。
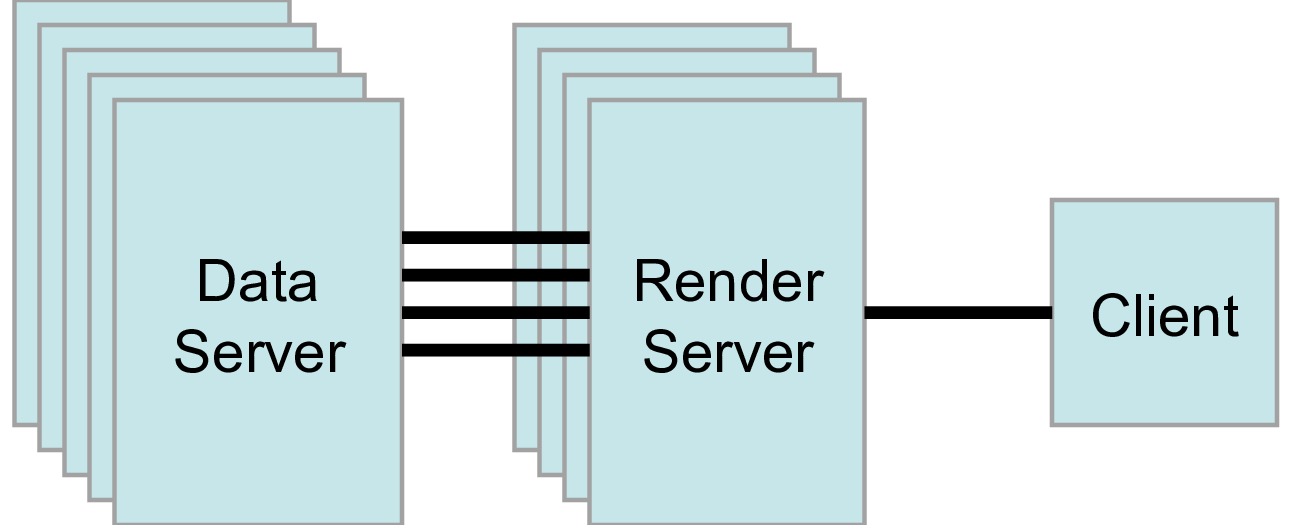
8.10. ParaViewアーキテクチャ
並列データ処理にParaViewを使用する方法を説明する前に、ParaViewのアーキテクチャについて詳しく説明します。ParaViewは、3層のクライアントサーバアーキテクチャとして設計されています。ParaViewの3つの論理ユニットは次のとおりです。
Data Server データの読み込み、フィルタリング、書き込みを行うユニット。パイプラインブラウザに表示されるすべてのパイプラインオブジェクトは、データサーバーに含まれます。データサーバーは並列にすることができます。
Render Server レンダリングを担当するユニット。レンダーサーバーを並列にすることもできます。この場合、組み込みの並列レンダリングも有効になります。
Client 可視化を確立するためのユニット。クライアントは、サーバーでのオブジェクトの作成、実行、および破棄を制御しますが、データは含まれません(これにより、クライアントでボトルネックを発生させることなくサーバーを拡張できます)。GUIがある場合は、それもクライアントにあります。クライアントは常にシリアル・アプリケーションです。
これらの論理ユニットは、物理的に分離されている必要はありません。論理ユニットは同じアプリケーションに組み込まれることが多く、論理ユニット間の通信が不要になります。ParaViewは3つのモードで実行できます。
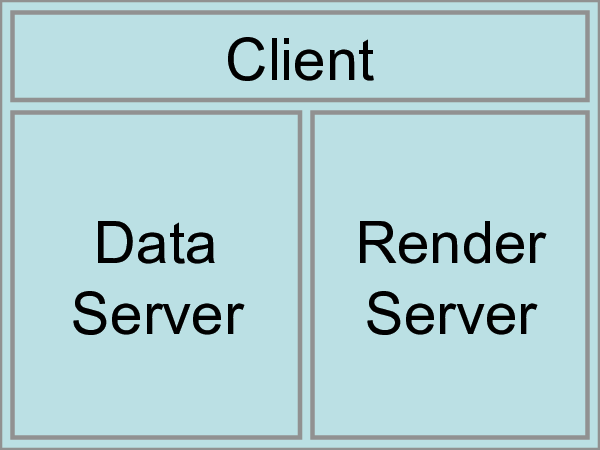
最初のモードは、すでにお馴染みのものですが、スタンドアロンモード( standalone モード)です。スタンドアロンモードでは、クライアント、データサーバー、レンダーサーバーはすべて1つのシリアルアプリケーションに統合されます。paraview アプリケーションを実行すると、自動的に builtin サーバーに接続され、ParaViewのすべての機能を使用できるようになります。
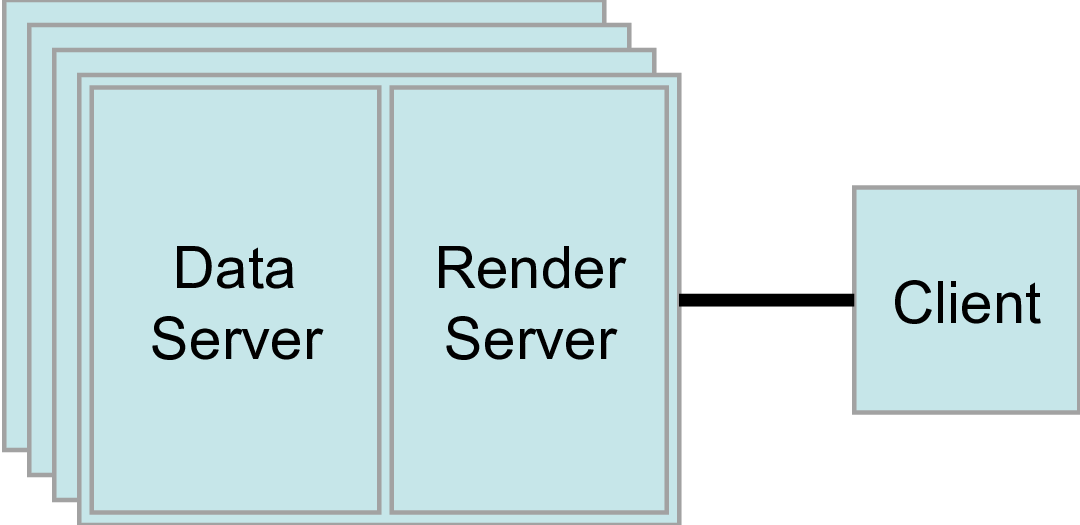
2番目のモードはクライアントサーバーモード( client-server モード)です。クライアントサーバーモードでは、並列マシン上で pvserver プログラムを実行し、paraview クライアントアプリケーション(又は pvpython )で接続します。pvserver プログラムには、データサーバとレンダーサーバの両方が組み込まれているため、データ処理とレンダリングの両方が行われます。 クライアントとサーバはソケットを介して接続され、これは通信の比較的遅いモードであると想定されるので、このソケットを介したデータ転送は最小限に抑えられます。この操作モードについては、 8.2 章 で説明しました。
3番目のモードはクライアントレンダーサーバデータサーバーモード( client-render server-data server モード)です。このモードでは、3つの論理ユニットすべてが別々のプログラムで実行されます。前と同様に、クライアントはシングルソケット接続を介してレンダリングサーバに接続されます。レンダーサーバーとデータサーバーは、レンダーサーバーのプロセスごとに1つずつ、多数のソケット接続によって接続されます。ソケットを介したデータ転送は最小限に抑えられます。
クライアントレンダーサーバデータサーバーモードはサポートされていますが、使用することはほとんどお勧めしません。このモードの本来の目的は、大規模で強力な計算プラットフォームと、グラフィックハードウェアを備えた第2の小型並列マシンを持つ異種環境を利用することです。しかし、実際には、ジオメトリをデータサーバーからレンダーサーバーに移動する時間の方が、ほとんどの場合メリットが少ないことがわかります。計算プラットフォームがグラフィックスクラスタよりもはるかに大きい場合は、大規模な計算プラットフォームでソフトウェアレンダリングを使用します。2つのプラットフォームのサイズがほぼ同じ場合は、グラフィックスクラスタですべての計算を実行します。このモードで使用される実行可能ファイルは、paraview (または pvpython ) (クライアントとして動作)、データサーバー用の pvdataserver 、およびレンダーサーバー用の pvrenderserver です。
8.11. paraview と pvpython での並列処理
paraview または pvpython の並列処理機能を利用するには、リモート可視化を使用する必要があります。つまり、 pvserver に接続する必要があります。この pvserver への接続処理は、 8.2 章 と 8.3 章 で説明した処理と変わりません。変更されるのは、pvserver の起動方法だけです。
mpirun を使用すると、pvserver を起動して複数の処理コアで実行できます。
mpirun -np 4 pvserver
これにより、4つの処理コアで pvserver が実行されます。デフォルトポートのクライアントからの着信接続をリッスンします。この方法で pvserver を実行する場合の大きな違いは、データソースが parallel aware (並列認識)されていて、異なるプロセッシングコア間でのデータの分散をサポートしている場合、データがソースからロードされたときに4つのコア間で分散されることです。
このデータがどのように分散されているかを確認するには、上記のコマンドで pvserver を実行し、paraview を使用して接続します。次に、Source > Sphere を使用して別の Sphere ソースを作成します。配列をcolorから vtkProcessId に変更します。図 8.16 のようなイメージが表示されます。
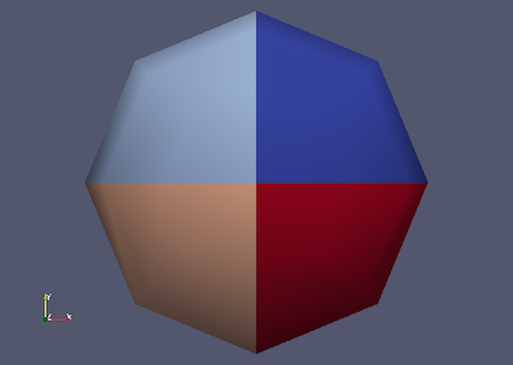
図 8.16 球体データが存在する処理コアをエンコードする vtkProcessId 配列で色付けされたSphereソース。この例では、球体データは mpirun-np 4 pvserver コマンドで呼び出される4つの処理コアに分割されます。
データリーダーまたはデータソースが parallel aware でない場合でも、 D3 フィルタを使用することで、処理コア間でデータを分散させるメリットを得ることができます。このフィルタはデータセットを凸領域に分割し、各領域を異なる処理コアに転送します。D3がどのようにデータセットを分割するかの例を見るには、paraview が pvserver に接続されたままの状態で Source > Wavelet を作成します。次に、Filters > Alphabetical > D3 を選択し、 Apply をクリックします。 D3 の出力は、最初は元のウェーブレットソースと異なって表示されません。ただし、 vtkProcessId で色付けすると、サーバー処理コアに分配された4つのパーティションが表示されます。
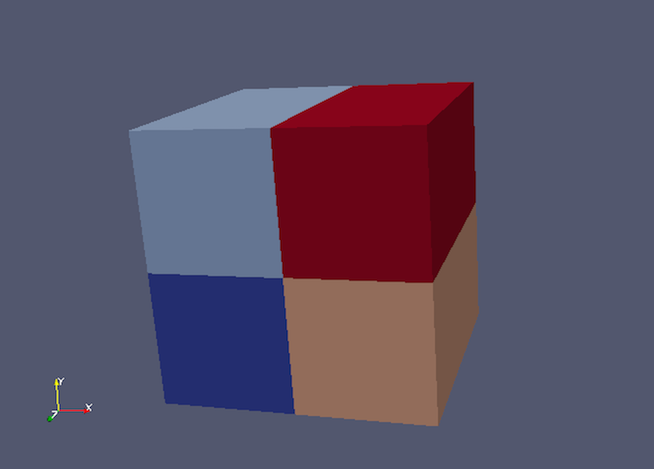
図 8.17 D3フィルタで処理され、 vtkProcessId 配列で色付けされたウェーブレットソース。pvserver を mpirun-np 4 pvserver で実行すると、画像データの四つの領域が四つの処理コアに均等に分割されることに注意してください。
8.12. pvbatch の使用
8.11 章 では、並列処理機能を使用するには、リモート可視化を使用する必要があると説明しました。つまり、クライアント( paraview または pvpython )が mpirun を使用して並列実行されているサーバー (pvserver) に接続して、クライアント/サーバーモードでParaViewを使用する必要があります。ただし、1つだけ例外があります。 pvbatch です。pvpython と pvbatch はよく似ていて、どちらも python に似ています。
ただし、pvbatch は例外です。pvpython と pvbatch は、どちらもPythonスクリプトを実行する python executableに似ています。これらの実行可能ファイルを標準の python と比較すると、これらの実行可能ファイルは環境を初期化し、実行するスクリプトがParaView Pythonモジュールとライブラリを自動的に見つけられるようにします。pvpython は、GUIを持たない paraview 実行ファイルとまったく同じです。paraview のGUIが pvpython のPythonインタプリタに置き換えられたと考えることができます。 一方、pvbatch は pvserver と考えることができます。pvbatch では、リモートクライアント( paraview または pvpython )から制御コマンドを受け取るのではなく、pvbatch 実行ファイル自体で実行されるPythonスクリプトからコマンドを受け取ります。pvbatch は pvpython とは異なり、pvserver に 似ているため、mpirun を使用して並列実行できます。この場合、ルートランク(または最初のランクまたはインデックス 0 のランク)がクライアントとして動作し、Pythonスクリプトを解釈してコマンドを実行します。 pvbatch は独自のサーバとして動作するように設計されているため、Pythonスクリプトでリモートサーバーに接続することはできません。つまり simple.Connect を使用することはできません。 さらに、pvbatch はバッチ操作用に設計されているため、Pythonスクリプトはコマンドライン引数としてしか指定できません。pvpython とは異なり、この実行ファイルを実行してPythonコマンドを入力するための対話型シェルを取得することはできません。
# process the sample.py script in single process mode.
> pvbatch sample.py

# process the sample.py script in parallel.
> mpirun -np 4 pvbatch sample.py
通常、インタプリタを対話的に使用する場合は pvpython を使用し、並列実行する場合は pvbatch を使用します。
8.13. クライアントへのデータの取り込み
4.3 章 では、データオブジェクトに 関する 情報を取得する方法について説明していますが、データオブジェクト自体にアクセスする方法については説明していません。本節では、Pythonスクリプトからデータにアクセスするいくつかの方法について説明します。ParaViewのクライアント/サーバの性質上、生データにアクセスするにはいくつかのステップが必要です。 Pythonスクリプトはクライアント側で pvpython または paraview のいずれかで実行されるため、1つの手順として、サーバーからクライアントにデータを移動します。これは、次の方法で実行できます。
from paraview.simple import *
Connect("myhost")

# Create a sphere source on myhost
s = Sphere()
full_sphere = servermanager.Fetch(s)
ここでは、データセット全体がサーバからクライアントに移動されます。
2番目のステップは、リモートサーバー上のデータが分散プロセスに分割される可能性があるという事実に対処するために必要です。デフォルトでは、servermanager.Fetch(s) は、異なるリモートプロセス上のすべてのピースを追加し、追加されたデータ・セットをクライアント上に生成します。正確な追加操作は、取得するデータセットのタイプによって異なります。複合データセットは、各分散プロセス上のデータセット片を新しい多重ブロックデータセットに併合されたブロックとして扱うことにより併合され、多角形データセットは単一多角形データセットに付加され、直線格子は一様直線格子に付加され、他のデータセットは非構造格子に付加されます。現在、分散イメージデータセットをクライアントにフェッチできません。リモートシステム上の多くの分散プロセスに適合するデータがクライアントメモリに適合しない可能性があるため、データセット全体をクライアントにフェッチするときは注意が必要です。
もう1つのオプションは、1つのリモート・プロセス上のデータセットの一部だけをクライアントにフェッチすることです。これを行うには、データを取得したいリモートプロセスのランク番号を Fetch 関数に渡します。例えば以下になります。
# Retrieve the piece of the dataset on remote process 2
s = Sphere()
sphere_piece = servermanager.Fetch(s, 2)
最後に、servermanager.Fetch は、2つのステージで実行されるデータセットにヘルパーフィルタを適用する方法を提供します。第1段階のフィルタは各リモートプロセスのデータに適用され、第2段階のフィルタはルートサーバープロセスに収集された後の第1段階の結果に適用されます。 フィルタリングの第2段階の結果は、ルートサーバープロセスからクライアントに転送されます。
次の例では、最初の段階で各プロセスのデータを含むソースに Extract Surface フィルタを適用します。結果は、Append Geometry フィルタでアセンブルされ、クライアントに送信されます。
s = Sphere()
extract = servermanager.filters.ExtractSurface()
append = servermanager.filters.AppendGeometry()
full_surface = servermanager.Fetch(s, extract, append)
2番目のフィルタは、複数の接続を受け入れ、最初のフィルタからの出力データセットタイプを処理できる必要があります。
8.14. レンダリング
レンダリングは、データに基づいて表示されるイメージを合成するプロセスです。データを効果的に操作できるかどうかは、レンダリングの速度に大きく依存します。コンピュータゲーム市場に支えられた3Dハードウェアアクセラレーションの進歩により、中価格のコンピュータでも3Dを素早くレンダリングすることができます。ただし、レンダリングの速度は、レンダリングされるデータの量に比例します。 データが大きくなると、当然ながらレンダリング処理が遅くなります。
可視化セッションをインタラクティブなままにするために、ParaViewは、必要に応じて自動的に反転される2つのレンダリングモードをサポートしています。最初のモード still render では、データは最高レベルの詳細さ(ディテール)でレンダリングされます。このレンダリングモードでは、すべてのデータが正確に表示されます。2番目のモード interactive render では、速度が精度よりも優先されます。このレンダリングモードでは、データサイズに関係なくレンダリング速度が速くなります。
3Dビューを操作している間(例えば、マウスによる回転、パン、ズーム)、ParaViewはインタラクティブレンダリングを使用します。これは、インタラクション時にこれらの機能を使用可能にするために高いフレームレートが必要であり、インタラクションが発生している間は各フレームがすぐに新しいレンダリングに置き換えられるため、このモードでは細部の重要性が低くなるためです。3Dビューの操作が行われていないときはいつでも、ParaViewは静止レンダリングを使用して、データの完全な詳細を確認できるようにします。3Dビューでマウスをドラッグしてデータを移動すると、近似レンダリングが表示される場合があります。 詳細は、マウスボタンを放すとすぐに表示されます。
インタラクティブレンダリングは、速度と精度の妥協点です。そのため、レンダリングパラメータの多くは、詳細レベルが低い場合に、どのように使用されるかに関係します。
8.14.1. 基本レンダリング設定
最も重要なレンダリングオプションには、LODパラメータがあります。 インタラクティブレンダリング中に、ジオメトリは下位の level of detail ( LOD ) 、つまりポリゴン数の少ない近似ジオメトリに置き換えられます。

ジオメトリック近似の解像度を制御できます。次のイメージでは、左のイメージがフル解像度、中央のイメージがインタラクティブレンダリングのデフォルトのデシメーション(間引き)、右のイメージがParaViewの最大デシメーション設定です。
3Dレンダリングパラメータは設定ダイアログボックスにあります。このダイアログボックスには、 Edit > Settings メニュー(MacOSでは( ParaView > Preferences )からアクセスできます。このダイアログボックスのレンダリングオプションは、Render View タブにあります。
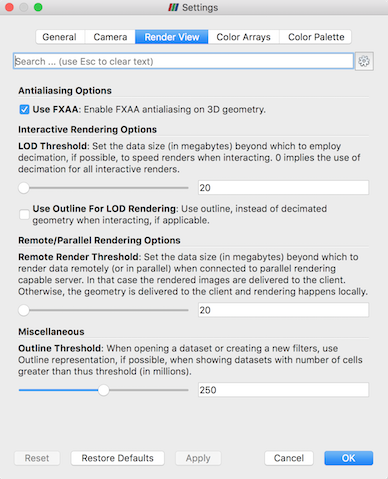
インタラクティブレンダリングの幾何学的デシメーションに関連するオプションは、 Interactive Rendering Options というラベルの付いたセクションにあります。 これらのオプションの一部は高度と見なされるため、それらにアクセスするには、 を使用して詳細オプションをオンに切り替える必要があります。 ボタンを押すか、ダイアログの上部にある編集ボックスを使用してオプションを検索します。 インタラクティブレンダリングオプションには、次のものがあります。
LOD Threshold: インタラクティブレンダリングで間引きされたジオメトリを使用するデータサイズを設定します。ジオメトリサイズがこのしきい値を下回る場合、ParaViewは常にジオメトリ全体をレンダリングします。大容量のデータを処理できる適切なグラフィックスカードを使用している場合は、この値を増やしてください。インタラクティブレンダリングが遅すぎる場合は、この値を小さくしてみてください。LOD Resolution:間引きされたジオメトリの大きさを制御する係数を設定します。 このコントロールは0から1の間の値に設定されます。0は非常に少数の三角形を生成しますが、おそらく多くの歪みがあります。 1は、より詳細なサーフェスを生成しますが、ジオメトリは大きくなります。Non Interactive Render Delay:インタラクティブレンダリングと静止レンダリングの間に遅延を追加します。 ParaViewは通常、インタラクティブモーションが終了した直後に静止レンダリングを実行します(たとえば、回転後にマウスボタンを離すなど)。 このオプションは、静止画のレンダリングが開始する前に2番目のインタラクションを開始する時間を与えることができる遅延を追加できます。これは、静止画のレンダリングが完了するまでに長い時間がかかる場合に役立ちます。Use Outline For LOD Rendering: 縮小されたジオメトリの代わりにアウトラインを使用します。アウトラインは、ジオメトリの縮小に時間がかかりすぎる場合や、作成されるジオメトリが多すぎる場合に使用できます。しかし、アウトラインだけを操作するのはより困難です。
ParaViewには、さらに多くのレンダリング設定が含まれています。ここでは、ParaViewがクライアントサーバーモードで実行されているかどうかに関係なく、レンダリングパフォーマンスに影響するその他の設定の概要を示します。これらのオプションはいくつかのカテゴリに分かれており、いくつかは高度なオプションと見なされます。
Translucent Rendering OptionsDepth Peeling: デプスピーリングを有効または無効にします。 デプスピーリングは、ParaViewが半透明のサーフェスを適切にレンダリングするために使用する手法です。 これを使用すると、上面がレンダリングされてから「剥がされ」、次の下面をレンダリングできるようになります。 サーフェスを透明にすると、処理速度が大幅に低下したり、完全に正しくレンダリングされなかったりする場合は、グラフィックハードウェアがデプスピーリング拡張機能を適切に実装していない可能性があります。 デプスピーリングを止めてみてください。Depth Peeling for Volumes: ボリュームと半透明ポリゴンを正しく混合するために、ボリュームを深度ピーリングに含めます。Maximum Number Of Peels: デプスピーリングで使用するピールの最大数を設定します。 より多くのピールを使用すると、より複雑な深さが可能になりますが、より少ないピールを許可すると、実行が速くなります。 半透明のジオメトリのレンダリングが遅すぎる場合、または半透明の画像が正しく表示されない場合は、このパラメータを調整してみてください。
MiscellaneousOutline Threshold: 非常に大きなデータセットを作成する場合は、デフォルトでアウトライン表示になります。サーフェス表示では通常、サーフェスのジオメトリを抽出するためにParaViewが必要で、時間とメモリがかかります。このしきい値を超えるサイズのデータには、デフォルトではオーバーヘッドがほとんどないアウトライン表現を使用します。Show Annotation: レンダリングパフォーマンス情報を提供する注釈を表示または非表示にします。 この情報は、パフォーマンスの問題を診断するときに役立ちます。
ただし、これはParaViewレンダリング設定の完全なリストではありません。レンダリングパフォーマンスに大きく影響しない設定は除外しました。また、 8.14.4 章 で説明されている、並列クライアントサーバーレンダリングにのみ有効な設定も除外しました。
8.14.2. 並列レンダリングの基礎
並列可視化を実行する場合、データがレンダリングプロセスまでのすべてのプロセス間で確実に分割されるように注意します。ParaViewは IceT と呼ばれる並列レンダリングライブラリを使用します。IceTは並列レンダリングに sort-last アルゴリズムを使用します。この並列レンダリングアルゴリズムでは、各プロセスがジオメトリのパーティションを個別にレンダリングしてから、部分イメージを合成(composites)して最終イメージを作成します。
上の図は単純化しすぎています。IceTには、binary tree 、binary swap 、radix-k などの複数の並列イメージ合成アルゴリズムが含まれており、複数のフェーズを使用するプロセス間で効率的に作業を分割します。
並び替え並列レンダリング(sort-last parallel rendering)の素晴らしい点は、レンダリングされるデータ量にまったく影響されないことです。 これは非常にスケーラブルなアルゴリズムであり、大規模なデータに適しています。 ただし、並列レンダリングのオーバーヘッドは、イメージのピクセル数に比例して増加します。その結果、レンダリングパラメータの一部がイメージサイズを処理します。
IceTはまた、タイル状のディスプレイを駆動する能力も持っています。タイル状のディスプレイは、モニタまたはプロジェクタの配置を構成する大型で高解像度のディスプレイです。タイル状のディスプレイに並び替えアルゴリズムを使用すると、合成するピクセル数が非常に多くなるため、少し直感的ではありません。しかし、 IceTは各プロセスのデータにおける空間的局所性を利用して、必要な合成量を劇的に低減するように設計されています。この空間的な局所性は、データに Filters > Alphabetical > D3 フィルタを適用することで強制できます。
並列レンダリングにはオーバーヘッドが伴うため、ParaViewではいつでも並列レンダリングをオフにすることができます。並列レンダリングをオフにすると、ジオメトリは表示される位置に配置されます。明らかに、これはレンダリングされるデータが小さい場合にのみ発生します。
8.14.3. イメージの詳細レベル
The overhead incurred by the parallel rendering algorithms is proportional to the size of the images being generated. Also, images generated on a server must be transferred to the client, a cost that is also proportional to the image size. To help increase the frame rate during interaction, ParaView introduces a new LOD parameter that controls the size of the images.
During interaction while parallel rendering, ParaView can optionally subsample the image. That is, ParaView will reduce the resolution of the image in each dimension by a factor during interaction. Reduced images will be rendered, composited, and transferred. On the client, the image is inflated to the size of the available space in the GUI.

縮小画像の解像度は、次元を分割する係数によって制御されます。次のイメージでは、左のイメージがフル解像度になっています。次のイメージは、それぞれ2、4、8倍の解像度でレンダリングされています。
ParaViewには、サーバからクライアントに転送する前にイメージを圧縮する機能もあります。圧縮により、転送されるデータ量が削減されるため、使用可能な帯域幅が最大限に活用されます。 ただし、イメージの圧縮と解凍にかかる時間が長くなります。
ParaViewには、クライアント/サーバレンダリング用の複数の異なるイメージ圧縮アルゴリズムが含まれています。1つは、高速圧縮および解凍用に設計されたLZ 4圧縮を使用します。2番目のオプションは Squirt と呼ばれるカスタムアルゴリズムで、Sequential Unified Image Run Transferの略です。 Squirtはランレングス符号化圧縮で、色深度を減らしてランレングスを長くします。3番目のアルゴリズムは、Lempel-Zivアルゴリズムのバリエーションを実装した Zlib 圧縮ライブラリを使用します。Zlibは通常、Squirtよりも優れた圧縮を提供しますが、実行に時間がかかるため、遅延が増加します。paraview WindowsおよびLinuxの実行可能ファイルには、Keplerクラス以上のNVIDIA GPUが使用可能な場合に、ハードウェアアクセラレーションによる圧縮および解凍にNVIDIAのNVIDIAライブラリを使用する圧縮オプションが含まれています。
8.14.4. 並列レンダリングパラメータ
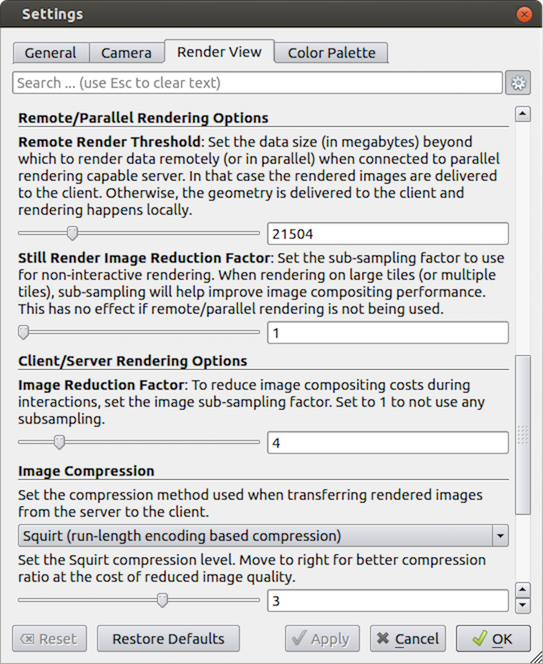
他の3Dレンダリングパラメータと同様に、並列レンダリングパラメータは Settings ダイアログにあります。このダイアログボックスの並列レンダリングオプションは、Render View タブにあります( 8.14.1 章 で説明されているような他のいくつかのレンダリングオプションと混在しています)。パラレルオプションとクライアントサーバーオプションはいくつかのカテゴリーに分けられ、そのうちのいくつかは高度なものと見なされます。
Remote/Parallel Rendering OptionsRemote Render Threshold: リモートで並列レンダリングする、またはローカルでレンダリングするデータサイズを設定します。ジオメトリがこのしきい値を超える場合(ParaViewがリモートサーバーに接続されている場合)、データはリモートで並列にレンダリングされ、イメージがクライアントに送り返されます。ジオメトリがこのしきい値を下回る場合、ジオメトリはクライアントに送り返され、イメージはクライアント上でローカルにレンダリングされます。Still Render Image Reduction Factor: 静止(非対話型)レンダリングのサブサンプリング係数を設定します。 一部の大型ディスプレイは実際に必要な解像度よりも高い解像度を持っているため、このサブサンプリングにより、表示されるすべての画像の解像度が低下します。
Client/Server Rendering OptionsImage Reduction Factor: インタラクティブサブサンプリング係数を設定します。 パラレルレンダリングのオーバーヘッドは、生成される画像のサイズに比例します。 したがって、画像のサブサンプリングレートを指定することで、インタラクティブなレンダリングを高速化できます。 このボックスをオンにすると、インタラクティブレンダリングによって小さな画像が作成され、表示時に拡大されます。 このパラメータは、インタラクティブレンダリング中にのみ使用されます。
Image Compression画像をサーバーからクライアントに送信する前に、オプションで、LZ4、Squirt、またはZlibの3つの利用可能な圧縮アルゴリズムのいずれかを使用して画像を圧縮できます。 圧縮をより効果的にするために、どちらのアルゴリズムでも、圧縮前に画像の色解像度を下げることができます。 スライダーは、保存されるカラービットの量を決定します。 静止画のレンダリング中は、常にフルカラー解像度が使用されます。
一般的なネットワークの種類に応じて、推奨される画像圧縮のプリセットが提供されています。最適な画像圧縮オプションを選択する場合は、接続に最も適したプリセットから始めてみてください。
8.14.5. 大規模データに対するパラメータ
デフォルト値のレンダリングパラメータは、ほとんどのユーザに適しています。ただし、非常に大きなデータを処理する場合は、レンダリングパラメータを調整すると便利です。最適なパラメータは、データとParaViewを実行しているハードウェアによって異なりますが、ここではいくつかのアドバイスを紹介します。
特定のデータセットの最初のインタラクティブレンダリングの前に長い一時停止がある場合、それは間引きされたジオメトリの作成である可能性があります。インタラクションでは、間引きされたジオメトリではなくアウトラインを使用してみてください。また、間引き係数を0に下げて、より小さいジオメトリを作成することもできます。
大きなジオメトリをクライアントに返送しないでください。リモートレンダリングでは、サーバ全体の能力を使用してイメージをレンダリングし、クライアントに送信します。リモートレンダリングがオフの場合、ジオメトリはクライアントに送り返されます。データが大きい場合は、データを送信するよりもイメージを送信する方が常に高速です(ただし、ネットワークの遅延が大きい場合は、インタラクティブなフレームレートで問題が発生する可能性があります)。
必要に応じて、クライアントサーバーレンダリングのインタラクティブイメージサブサンプリングを調整します。イメージ合成の速度が遅い場合、クライアントとサーバー間の接続の帯域幅が低い場合、または非常に大きなイメージをレンダリングする場合は、サブサンプルレートを高くするとインタラクティブレンダリングのパフォーマンスが大幅に向上します。
Image Compressionがオンになっていることを確認します。これはデスクトップ配信のパフォーマンスに多大な影響を与え、インタラクティブレンダリング中にのみ発生するアーティファクトは最小限に抑えられます。低帯域幅の接続では、Squirt圧縮の代わりにZlibを使用できます。Zlibは圧縮/解凍時間を長くして、より小さな画像を作成します。ネットワーク接続の遅延が大きい場合は、対話中にリモートレンダリングが行われないようにパラメータを調整します。この場合、リモートレンダリングのしきい値を少し上げてみてください。ここでは、インタラクティブレンダリングにアウトラインを使用することが効果的です。
静止(非インタラクティブ)レンダリングが遅い場合は、不要なレンダリングを避けるために、インタラクティブレンダリングと静止レンダリングの間の遅延をオンにしてみてください。